


PinP Position
Switch the PinP display position.
Upper Right
Display the PinP screen in the upper right of the
main screen.
Lower Right
Display the PinP screen in the lower right of the
main screen.
Upper Left
Display the PinP screen in the upper left of the main
screen.
Lower Left
Display the PinP screen in the lower left of the main
screen.
Control pad and its buttons
Perform pan/tilt operations.
The camera images can be adjusted in the horizontal, vertical, and
diagonal directions.
• When PinP is displayed, switch [Control] to [Main] before beginning
operation.(→ page 21)
Control pad
Control buttons
Control buttons:
Click to perform the pan/tilt operation.
Control pad:
Click or drag to perform the pan/tilt
operation.
The nearer the click or drag operation is to
the edge, the faster the pan/tilt speed.
<NOTE>
• When the mouse is used for dragging and dropping from the control
pad area to a position outside this area, the panning, tilting and
other operations will not stop.
In a case like this, click the control pad area to stop these
operations.
• Panning and tilting are not possible when the zoom level is 1x. (→
page 21)
Brightness
Adjust the brightness of the images.
You can switch between auto mode and manual mode.
[Auto]
Switch to auto mode.
The brightness is adjusted automatically to match the
scene.
[Manual]
Switch to manual mode.
Adjust the brightness manually when, for example,
shooting in a location that is too dark (light).
[‒]
Make the images darker in manual mode.
This is disabled in auto mode.
[+]
Make the images brighter in manual mode.
This is disabled in auto mode.
<NOTE>
• [Contrast Level] and [Back Light COMP.] cannot be set in manual
mode.
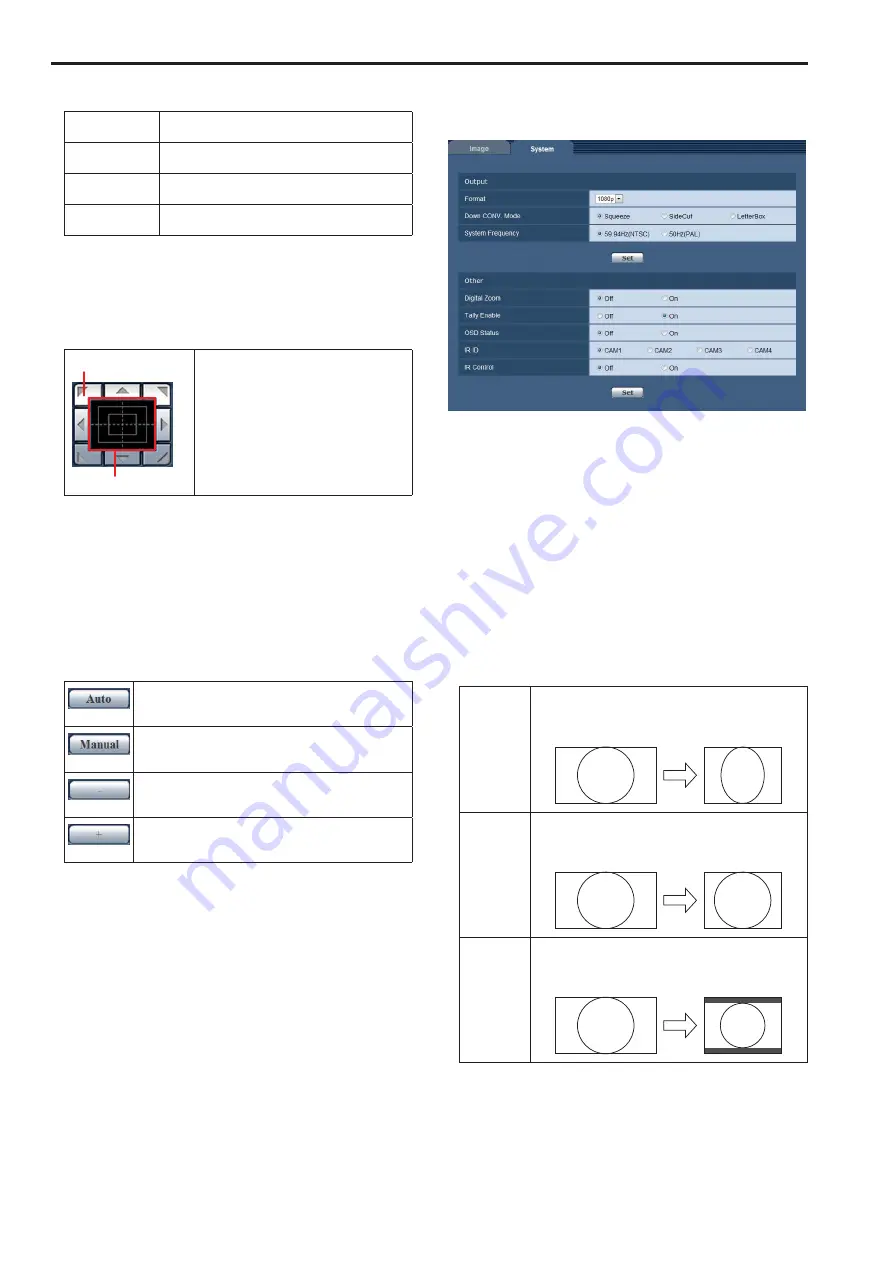
System screen
This menu has items related to the camera’s output image settings.
To display the [System] screen, click the [System] tab in the [Image]
screen.
z
Output
The settings are reflected when the [Set] button is clicked.
Format
Switch the HDMI output video format.
Setting values:
1080p / 1080i / 720p / 480p (576p)
*
1
*
1
When [System Frequency] is [59.94Hz(NTSC)], [480p] can be
selected, and when it is [50Hz(PAL)], [576p] can be selected.
Factory setting:
1080P
Down CONV. Mode
Select the down-conversion mode.
This is only enabled when [Format] is [480p (576p)]
*
2
.
*
2
When [System Frequency] is [59.94Hz(NTSC)], [480p] can be
set, and when it is [50Hz(PAL)], [576p] can be set.
Setting values:
Squeeze
Use this when the aspect ratio of the monitor is 16:9.
When the 4:3 aspect ratio has been set for the monitor
screen, the images are squeezed horizontally and
extended vertically changing the angle of view.
SideCut
Use this when the aspect ratio of the monitor is 4:3. With
the vertical height serving as the reference, the parts
which extend beyond this at the two sides are cropped
changing the angle of view.
LetterBox
Use this when the aspect ratio of the monitor is 4:3. With
the horizontal width serving as the reference, black bands
are added at the top and bottom changing the angle of
view.
Factory setting:
Squeeze
22
Web screen configurations (continued)
23
Summary of Contents for AW-HEA10WPJ
Page 33: ...33 MEMO...


