28
2. PC EVR (ADJUSTMENT)
SOFTWARE
2-1. BOOT UP THE ADJUSTMENT
SOFTWARE
1. At the first, copy the EVR software from floppy disc
(VFK1837) to the HDD in your Personal Computer
(PC).
2. Power ON the PC.
3. Restart the PC in DOS mode.
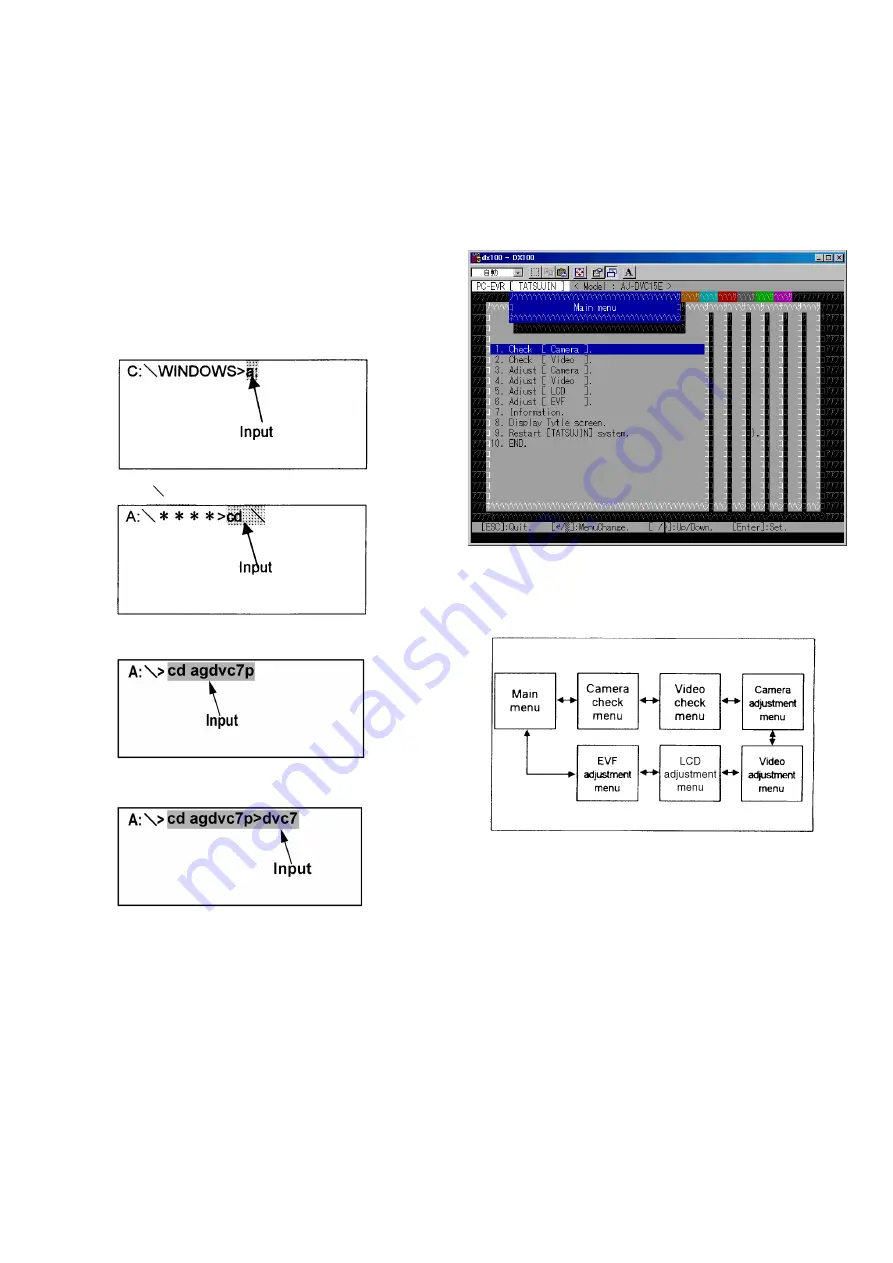
4. Boot up the EVR program as the following steps.
1) Type “a:” and then press the “ENTER” key.
C:¥WINDOWS>a:
2) Type “cd
” and then press the “ENTER” key.
3) Type the “cd agdvc7p” and press the “ENTER” key.
4) Type the “dvc7” and then press the “ENTER” key.
5) Wait for a few seconds so that the EVR adjustment
program is started.
6) For the adjustments, follow the program display.
2-2. How to Use the Main Menu
Select a Sub Menu to check, adjust the unit and etc. by
pressing
¯
(UP/DOWN) Key in Main Menu. Then press
“ENTER” Key. the Sub Menu will be displayed.
Note: Menu (pages) 3,4 and 5 are needed for adjustment.
The menu (page) 5 is not available for AG-DVC7P
because it has no LCD monitor.
Fig.E7
With using
¨
keys, also the menu can be changed.
Fig.E8
Summary of Contents for AG-DVC7P
Page 7: ...How to use extension cables Fig T1 2 6 ...
Page 20: ...Fig D2 Fig D3 19 ...
Page 21: ...Fig D4 Fig D5 Fig D6 Fig D7 20 ...
Page 22: ...Fig D8 Fig D9 Fig D10 21 ...
Page 23: ...Fig D11 Fig D12 22 ...
Page 24: ...Fig D13 Fig D14 Fig D15 23 ...
Page 69: ...68 ...
Page 87: ...86 ...
Page 100: ...12 EXPLODED VIEWS REPLACEMENT PARTS LISTS 99 ...
Page 110: ...109 12 5 VCR MECHANISM ASSEMBLY B7 B6 B8 27 28 ...
Page 122: ...SCD0302OYNK107 ...
Page 125: ...How to use extension cables Fig T1 2 6 ...
Page 138: ...Fig D2 Fig D3 19 ...
Page 139: ...Fig D4 Fig D5 Fig D6 Fig D7 20 ...
Page 140: ...Fig D8 Fig D9 Fig D10 21 ...
Page 141: ...Fig D11 Fig D12 22 ...
Page 142: ...Fig D13 Fig D14 Fig D15 23 ...
Page 187: ...68 ...
Page 205: ...86 ...
Page 218: ...12 EXPLODED VIEWS REPLACEMENT PARTS LISTS 99 ...
Page 228: ...109 12 5 VCR MECHANISM ASSEMBLY B7 B6 B8 27 28 ...


