background image

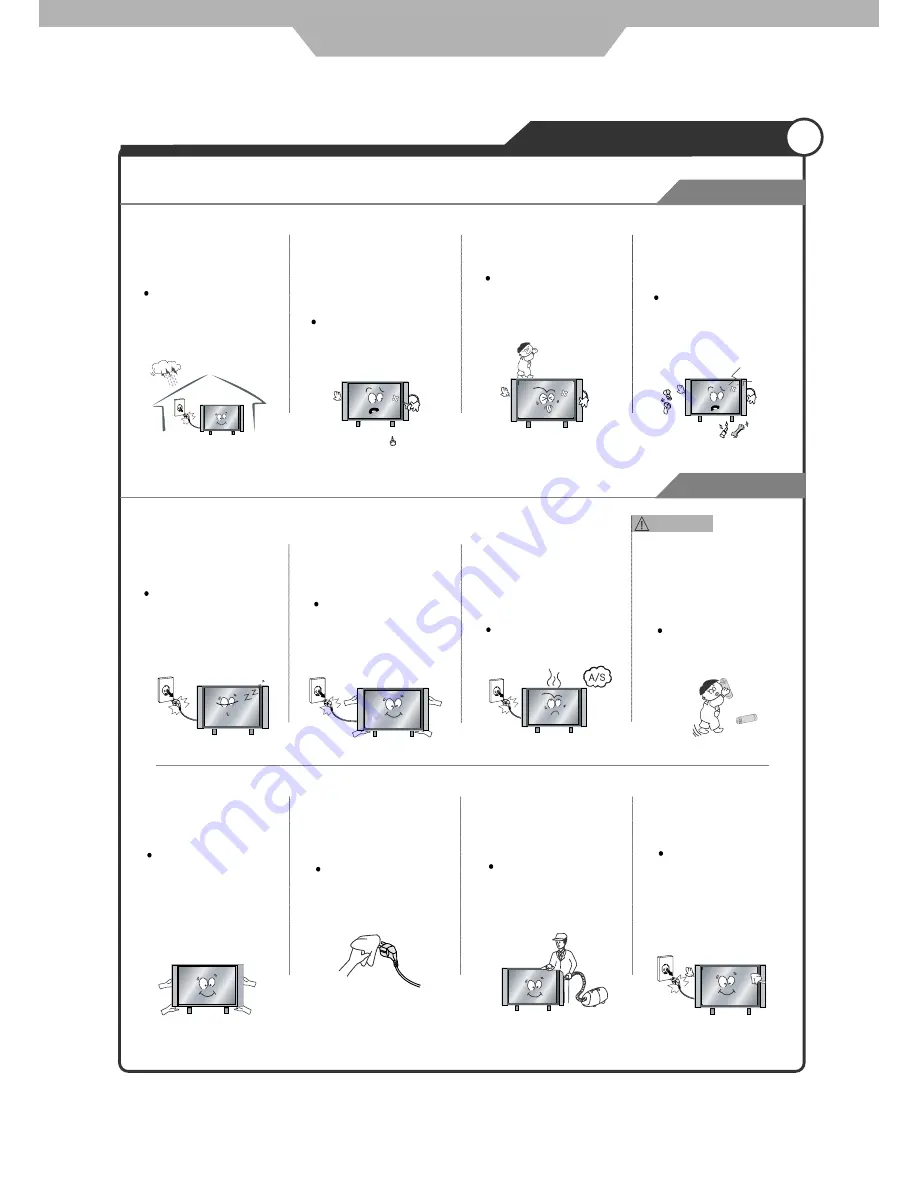
Disconnect the power

cord from the wall outlet

during an electrical storm.

Dust could accumulate over

time on the unit and cause it

to generate heat and ignite

or deteriorate insulation,

which in turn may result in

an electrical fire.

When not using the unit for

long periods of time, discon-

nect the power cord from

the wall outlet.

If the unit is dropped, it

could be damaged or

other wise cause injury.

Always use two or more

people to lift or move the

unit.

Warnings

Failure to do so may

result in fire or electric

shock.

Wipe off any moisture,

dirt, or dust on the power

plug pins with a clean dry

cloth.

Continuing to use the unit

without cleaning off the dust

build-up inside it may result

in fire or electric shock.

3

Warnings

Safety Precautions

Always turn off the unit and

unplug the power cord when

cleaning the unit. Use a soft

dry cloth to clean the unit.

Never clean with industrial

strength polish, wax, benzene,

paint thinner, air freshener,

lubricant, detergent, or other

such chemicals. Also, do not

clean with a damp cloth.

It is advisable to clean the

interior of the unit at least once

a year. Contact the store of

purchase or service centre for

information.

Cautions

When removing the batteries

from the remote control, make

sure children do not swallow

them. Keep the batteries out

of the reach of infants and

children.

If a child has swallowed a

battery, seek medical atten-

tion immediately.  

When moving the unit be

sure to turn off the unit and

unplug the power cord from

the wall outlet.

Moving the unit with the

power cord connected to the

outlet may cause damage to

the cord,resulting in fire or

electric shock.

If you notice any unusual

odours or smoke around the

unit, immediately disconnect

the unit from the outlet and

contact the service centre.

Failure to do so may result

in fire or electric shock. 

Use and Maintenance

Not doing so may result

in fire or electric shock.

Do not insert any metal

objects, such as a screwdriver

paper clip, or bent wire into

the ventilation openings or

A/V terminals.

Doing so poses a serious

risk of fire or electric shock. 

Do not allow children to

climb or hang on the unit.

The unit could topple

over on to a child and

result in serious injury.

Never disassemble or modify

the unit in anyway. Do not

attempt to service the unit

yourself.

Doing so may result in fire

or electric shock. If the unit

requires repair, contact the

service centre.

Summary of Contents for TFTV6040BR

Page 1: ...WITH BLU RAY DVD AND DVB T INSTRUCTION MANUAL TFTV6040BR 60cm 23 9 LCD TV COMBINATION...

Page 2: ...omizing the TIMER Settings Customizing the SETUP Settings Customizing the LOCK Settings Customizing the CHANNEL Settings Blu_Ray Disc Player 14 15 16 17 18 19 20 21 22 32 Trouble shooting Specificatio...

Page 3: ...lace heavy objects on it Be sure to ground the unit Failing to do may lead to electric shock when a short circuit overload occurs If necessary install a ground fault circuit breaker Never ground to a...

Page 4: ...losure such as a cabinet Do not run power cords near heat producing appliances such as radiators stoves or irons Do the antenna away from high voltage power lines and communication cables and make sur...

Page 5: ...e a year Contact the store of purchase or service centre for information Cautions When removing the batteries from the remote control make sure children do not swallow them Keep the batteries out of t...

Page 6: ...s or other apparatus including amplifiers that produce heat 9 Do not defeat the safety purpose of the polarized or grounding type plug A polarized plug has two blades with one wider than the other A g...

Page 7: ...titute a risk of electric shock to persons The exclamation point within an equilateral tri angle is intended to alert the user to the pres ence of Important operating and maintenance servicing instruc...

Page 8: ...illustration 4 TV AV button Input Source Select Button 1 MENU button OSD Menu Display Button 2 CH button Channel Program Button 3 VOL button Volume Button 7 POWER button 8 9 Eject the disc Play Pause...

Page 9: ...is product depending on availability and your needs 3 Optional connections Route audio to other devices Digital amplifier receiver Analog stereo system LAN USB device As additional memory for software...

Page 10: ...with support area smaller than the LCD TV Please refer to the desktop stand manual for details of installation B Using the Stand Mounting on a wall Please secure enough space for safe use Please refe...

Page 11: ...then press button to confirm Then you can enter TV mode 9 Coaxial Round Antenna Cable User Guidance Information Installing an Antenna Wall Jack with F Connector external Antenna HDMI2 HDMI1 Video R L...

Page 12: ...CANCEL Cancel the Teletext display REVEAL Reveal any hidden text HOLD Hold or carry on the current subpage SIZE Press to see top half of page double size Press again to see the bottom half of page dou...

Page 13: ...ss A B can repeat playback of a user defined section BD Display the top menu DVD Display the title menu Open 2nd Audio of 2nd video PIP s sub window video Load eject disc Previous chapter Fast reverse...

Page 14: ...battery is replaced by an incorrect type Dispose of used batteries according to the national code Recycling program 1 Open the cover completely 2 Insert the two supplied batteries AA 1 5V Ensure that...

Page 15: ...on Press POWER button on the LCD TV To turn the LCD TV off Press POWER button on the LCD TV Selecting Input Source You can select between the TV signal and the input signal of other equipment connecte...

Page 16: ...age Audio Language Subtitle Language Country Restore Factory Default English English English Australia Lock Channel Set Password Block Program Parental Guidance Off On Block LOCK CHANNEL Auto Tuning D...

Page 17: ...irection buttons to change the settings 15 Customising the PICTURE Settings Application Controls the tint Control the colour Cycles among picture display modes Standard Dynamic Soft Personal Controls...

Page 18: ...SurroundSound Off Use the and buttons to select the SOUND menu as the picture above press button to enter the menu Press or Direction buttons to change the settings 50 50 50 Customising the SOUND Set...

Page 19: ...you to setup the sleep timer among 5min 10min 15min 30min 45min 60min 90min 120min 180min 240min and off Turn on off the auto sleep function Allows you to select the time zone Application Customising...

Page 20: ...be selected in TV mode Allows you to select subtitle language Country Restore Factory Default OPTION Language Audio Language Subtitle Language Country Restore Factory Default English English English...

Page 21: ...bove press button to enter the menu Note You should enter the code to operate the menu original code is 0000 Block Program 19 Parental Guidance Allows you to turn on or off the system lock Press butto...

Page 22: ...ation The CHANNEL menu includes the following options Auto Tuning 20 CHANNEL Auto Tuning DTV Manual Tuning ATV Manual Tuning Programme Edit Use the and buttons to select the CHANNEL menu as the pictur...

Page 23: ...utton then you could use and buttons to change the position of the program press YELLOW again to confirm the change Skip Select a program and press BLUE button to sign the program while the program ha...

Page 24: ...e the menu When a menu is displayed press the buttons on the remote control to navigate through it Select menu display language Select General Settings in the SETUP menu Press to select Language in th...

Page 25: ...or restricted disc If you pause or stop a disc the screen saver appears after 3 minutes of inactivity Press any button to deactivate the screen saver press any button Disc content structure The struct...

Page 26: ...ay the root menu of a disc TITLE will display disc information and guide you through the available functions on the disc Change video play Button Action AUDIO Selects an audio language or channel on a...

Page 27: ...video disc Blu ray video discs have larger capacity and support features interactive menus and so on 1 Insert a BD video disc 2 Playback will automatically start or select a play option in the menu a...

Page 28: ...e unit must be connected and set up to access Internet Depending on the connection environment it may take time to connect to the Internet When BD Live functions are used and the unit is connected to...

Page 29: ...how Note It may require longer time to display the disc content on your TV if there are a large number of songs photos compiled onto one disc This product can only display digital camera pictures in t...

Page 30: ...egins and continues till the end of the photo folder Audio continues to play until the end of the disc To stop the slideshow play Press To stop the music play press again Note If the setup option is g...

Page 31: ...ttings System 1 Screen Saver Turns the screen save on off The screen saver will display in 3 mins if there is no operation when the unit is turned on 2 Disc Auto Playback Turns the disc auto playback...

Page 32: ...e program Note You have to select the audio and subtitle language according to the requirements on the disc Playback 1 Closed Caption Turns the Closed Caption function on off 2 Angle Mark Turn the Ang...

Page 33: ...or router This player will start to detect if there is a connection to the network If the connection test fails select Retry and press ENTER to try and re connect to the network again 1 Internet Conn...

Page 34: ...4Hz Enable disable HDMI 1080P 24Hz setting Video Process 1 Video Adjust Enter the submenu to adjust the video display 2 Sharpness Select the playback sharpness mode Adjust the Brightness Contrast Hue...

Page 35: ...g then press 3 Select System Upgrade then press OK Update software via USB 1 2 panel 3 In the SETUP menu select General Setting System Upgrade USB Storage 4 5 Once the software update is complete this...

Page 36: ...air driers and electric drills The screen does not move Screen appears Voice is not heard 1 Press the MUTE button 2 Increase the sound level by pressing volume adjustment button 3 Check if sound termi...

Page 37: ...fied without prior notice for improving the performance Panel Size LCD Panel Max Resolution Input Connector Output Connector VIDEO S VIDEO YPbPr AUDIO L R PC AUDIO L R HDMI RF VIDEO AUDIO L R Power So...

Page 38: ...PALSONIC 1 JOYNTON AVENUE WATERLOO NSW 2017 AUSTRALIA TEL 02 9313 7111 FAX 02 9313 7555 www palsonic com au PALSONIC CUSTOMER SERVICE TELEPHONE AUSTRALIA 1300 657 888...

Reviews: