background image

Using the unit

Digital Clock Function 

The unit has a built-in digital clock, which is displayed when the unit is in ‘Standby’ mode. The display will continuously 
show the current time.

When the digital clock is not set the digital clock display will continuously flash to indicate that the correct time has not 
yet been set.

When the unit is set in the ‘On’ mode, the LCD screen will display ‘On’ and the time will not be displayed. However,  
if you wish to see the time then press the ‘Display’ button 

2


on the remote control and the time will be displayed for  

5 seconds.

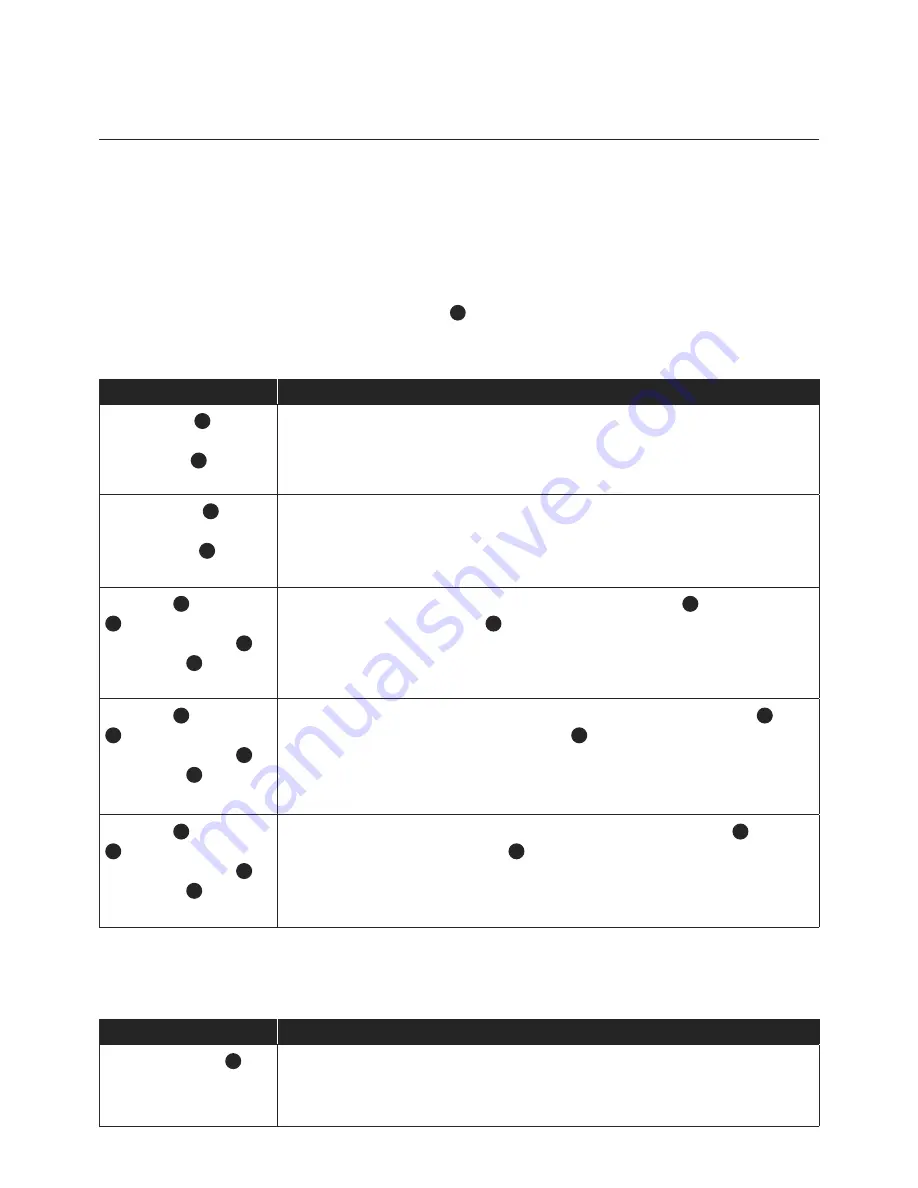
How to Set the Clock

Press

Function / Result

The ‘Standby’ 

1

 button 

on the remote control or 
the ‘Standby’ 

1

 button on 

the unit.

Switch unit to ‘Standby’ mode.

The ‘Clock Set’ 

13

 button 

on the remote control or 
the ‘Clock Set’ 

7

 button 

on the unit. 

HOLD FOR 3 SECONDS.  DO YOU HAVE TO HOLD FOR 3 SECONDS

The display flashes 12 hour or 24 hour.

The ‘Back’ 

20

 or the ‘Next’ 

22

 button on the remote 

control. Or the ‘Back’ 

5


or the ‘Next’  

6

 button on 

the unit.

To select 12 hour or 24 hour clock display, then press ‘Clock Set’ 

13

 button on the 

remote control or the ‘Clock Set’ 

7

 button on the unit to confirm your selection.

The ‘Back’ 

20

 or the ‘Next’ 

22

 button on the remote 

control. Or the ‘Back’ 

5


or the ‘Next’  

6

 button on 

the unit.

Press repeatedly to set the correct hour in the display , then press ‘Clock Set’ 

13


button on the remote control or the ‘Clock Set’ 

7

 button on the unit to confirm  

your selection.

The ‘Back’ 

20

 or the ‘Next’ 

22

 button on the remote 

control. Or the ‘Back’ 

5


or the ‘Next’  

6

 button on 

the unit.

Repeatedly to set the correct minute in the display, then press ‘Clock Set’ 

13

 button on 

the remote control or the ‘Clock Set’ 

7

 button on the unit to confirm your selection.

Automatic Power Off Sleep Function 

This unit has a special sleep timer function which can automatically switch off the unit after a selected period of time. 
while the unit is on, follow instructions below.

Press

Function / Result

The ‘Sleep’ button  

11

 on 

remote control 

Pressing this button repeatedly will scroll though different time selections:

90 MINS, 80 MINS, 70 MINS, 60 MINS, 50 MINS, 40 MINS, 30 MINS, 20 MINS,  
10 MINS, 00 (this means the sleep timer is deactivated).  

Summary of Contents for iP30iP1US

Page 1: ...CD DISPLAY PLL DIGITAL TUNER 3WAY SPEAKER SYSTEM SD MEMORY PLAYBACK CLOCK QUARTZ DIGITAL IR REMOTE CONTROL USB MEMORY PLAYBACK User s Manual iP30iP1US Docking System with FM PLL Radio and Radio Alarm...

Page 2: ...the power socket grasp the plug and pull it from the power socket Never drag the appliance by the power cord Keep the power cord away from heated surfaces It is NOT recommended to use the appliance w...

Page 3: ...6 Radio Memory 7 MP3 8 Media Memory Device Playback 8 Programming Media Memory Devices 9 Text Display ID3 9 Repeat Playback Function 9 Operating the iPod iPhone or iPad 10 Repeat Playback Function of...

Page 4: ...ct 10 Function 11 Volume down 12 Volume up 13 iPod iPhone iPad Dock Accessory 14 iPod iPhone iPad Dock Connector 15 Docking Platform Cover 16 Cavity for iPod iPhone iPad Support Stand 17 iPod iPhone i...

Page 5: ...adaptors with a rating of DC 15v 3a Please only use the supplied AC adaptor to operate the unit Use of other adaptors may damage the unit Make sure the voltage of the AC adaptor operates at the same...

Page 6: ...the unit To select 12 hour or 24 hour clock display then press Clock Set 13 button on the remote control or the Clock Set 7 button on the unit to confirm your selection The Back 20 or the Next 22 but...

Page 7: ...urce or ALARM MODE it is inconsistant The Back 20 or the Next 22 button on the remote control Or the Back 5 or the Next 6 button on the unit To select the wake up source iPod iPhone iPad Radio USB or...

Page 8: ...music you are listening to HALL 1 HALL 2 or OFF Tone Control Press Function Result The Tone button 4 on the remote control or 8 on the unit Press repeatedly to select between Treble and Bass controls...

Page 9: ...a desired frequency or station is reached It can be saved into one of the Memory positions see Radio Memory below Radio Memory At any time the currently displayed radio station or frequency can be st...

Page 10: ...standards The reading time for a media device varies depending on the speed of the memory device and the number of songs and folders In some cases the reading time may be as long as 60 seconds Press F...

Page 11: ...ROG MEM P MODE button 7 on the remote control o on the unit to confirm your selection The display will advance to the next memory position P 02 Repeat the previous 2 steps each time selecting any trac...

Page 12: ...it will skip forward or backwards by one track If you press and hold the buttons it will fast forward or fast reverse The Tune Up button 6 on the remote control or 11 on the unit The Tune Down button...

Page 13: ...such as a MP3 Player or a TV to this unit This enables you to listen to the audio of that device through the high quality amplifier of this unit To connect the external device please use a standard st...

Page 14: ...d Rotate the Screw control in clock wise to stretch out the rubber pad To reverse the rubber pad backward simply rotate the Screw control in anti clock wise 1 BACK OF THE REAR SUPPORT STAND RUBBER PAD...

Page 15: ...ntrolling playback using the iPod iPhone or iPad screen iPod rear support stand can be adjusted by the Screw control which is located at the back of the rear support stand Rotate the Screw control in...

Page 16: ...0655 www palsonic com au Specifications Power Requirements DC 15V 3A though built in DC jack External AC DC power adaptor 100V 240V 50 60hz Power Consumption Frequency FM 87 5 108 Mhz Energy Rating S...

Reviews: