background image

18

51-4771

OPERATION

NOTICE! AVOID SWEEPER DAMAGE. Reduce travel speed to avoid hitting  

immovable objects.

OPERATING TIPS

NOTICE! Avoid sweeper damage. Do not ram into piles. Use a dozer blade for this type 

of job.

STUCK ON MATERIAL


When encountering stuck on material that cannot be removed by the rotating brush 

alone, the operator may simply back over the material and lower the bucket cutting edge to 

the ground and scrape the material loose. The brush direction may then be reversed to assist 

in collecting this material. 

NOTE: Do not forget to lift the bucket approximately 1” and 

change brush rotation to the forward direction after removal of stuck on material. 

BRUSH, ENGINE & TRAVEL SPEEDS


Vary brush, engine and travel speeds to match sweeping conditions.

DIRT & GRAVEL


To keep dust at a minimum, plan your sweeping for days when it is overcast and humid 

or after it has rained. Also, sweep so the wind blows at your back or in the direction the brush 

head is angled. 


Low brush speeds and moderate ground speeds work best for cleaning debris from hard 

surfaces. Brush speeds that are too fast tend to raise dust because of the aggressive sweeper 

action. To sweep gravel, use just enough brush speed to “roll” the gravel, not throw it.

HEAVY DEBRIS


For 2” (51mm) or more of heavy debris, a maximum brush speed in the low range and 

ground speeds of less than 5 mph (8 kph) are recommended.

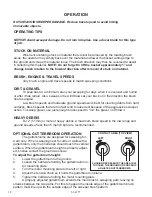
OPTIONAL GUTTERBROOM OPERATION


The gutterbrooms are designed for sweeping for-

ward only.  When sweeping next to curbs or walls with a 

gutterbroom, only the bristle tips should touch the vertical 

surface. When the gutterbroom height is properly adjust-

ed, bristles contact the ground as shown. 

To adjust the gutterbroom height:

1. 

Lower the gutterbroom to the ground.

2. 

Loosen the hardware holding the gutterbroom mo-

tor mounting plate.

3. 

Turn the motor mounting plate to the left or right.

4. 

Adjust the tension chain so it holds the gutterbroom in place.

5. 

Tighten the hardware holding the motor mounting plate. 


A properly adjusted gutterbroom extends the main brush’s sweeping path, leaving no 

streaks between the two paths. For this to happen the inside edge of the gutterbroom brush 

pattern must line up with the outside edge of the sweeper brush pattern. 

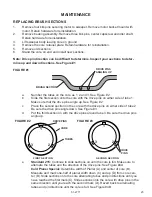
CONTACT AREA (TOP VIEW)

LEFT

RIGHT

SHADING REPRESENTS THE AREA THAT 

TOUCHES THE GROUND ON PROPERLY 

ADJUSTED GUTTERBROOMS.

Summary of Contents for Sweepster 215 Series

Page 1: ...com 2800 N Zeeb Rd Dexter MI 48130 United States of America Copyright OPERATOR S MANUAL PICK UP SWEEPER 215 Series SERIAL NUMBER ___________________ MODEL NUMBER ___________________ Manual Number 51...

Page 2: ......

Page 3: ...Adjusting The Sweeper Brush Pattern 16 Before Operating Sweeper 17 While Operating Sweeper 17 Operating Tips 18 Stuck On Material Dirt Gravel Heavy Debris Optional Gutterbroom Operation 18 19 Optiona...

Page 4: ...4 51 4771 THIS PAGE IS INTENTIONALLY BLANK...

Page 5: ...the operator Make sure the equipment is operated only by trained individuals that have read and understand this manual If there is any portion of this manual or function you do not understand contact...

Page 6: ...6 51 4771 THIS PAGE IS INTENTIONALLY BLANK...

Page 7: ...ting Visually inspect your equipment before you start and never operate equipment that is not in proper working order with all safety devices intact Check all hardware to ensure it is tight Make certa...

Page 8: ...HYDRAULIC FLUID PRESSURE Hydraulic fluid under pressure can penetrate the skin and cause serious injury or death Hydraulic leaks under pressure may not be visible Before connecting or dis connecting h...

Page 9: ...d Wear the protective equipment specified by the tool manufacturer SAFELY OPERATE EQUIPMENT Do not operate equipment until you are completely trained by a qualified operator in how to use the controls...

Page 10: ...utilities for location of buried utility lines gas water and sewer as well as any other hazard you may encounter WARNING EXPOSURE TO RESPIRABLE CRYSTALLINE SILICA DUST ALONG WITH OTHER HAZARDOUS DUSTS...

Page 11: ...ime mover Allow room in the fuel tank for expansion Wipe up any spilled fuel Secure cap tightly when done MAINTAINING THE ATTACHMENT Before performing maintenance lower the attachment to the ground ap...

Page 12: ...Keep all safety decals clean and legible Replace all missing illegible or damaged safety decals When replacing parts with safety decals attached the safety decals must also be replaced Safety decals...

Page 13: ...50 0724 WARNING HIGH PRESSURE FLUID 50 0727 WARNING FLYING OBJECTS 50 0737 WARNING PINCH POINT HAZARD 07 10012 BRUSH MARKERS FOR COLD PLANER SPECIAL ONLY 41043 WARNING HAZARDOUS DUST NOTE CONTACT YOU...

Page 14: ...unit to the ground and relieve pressure to the auxiliary hydraulic lines 4 Following the safety shut down procedure for your prime mover shut down and exit the prime mover 5 After making sure that the...

Page 15: ...ature wear To clean up this pile at the end of the sweeping pass throttle down the prime mover drop the bucket cutting edge to the ground and change the hydraulic flow reversing brush rotation and inc...

Page 16: ...he sweeper at a slow speed and lower it so the boom arms bottom out Run the sweeper in a stationary position for 10 15 seconds 4 Raise the sweeper and back away Lower the sweeper to the ground apply t...

Page 17: ...ing away from all moving parts Leave all shields and safety equipment in place when operating the sweeper Be aware of the extra weight and width a sweeper adds Reduce travel speed accordingly Keep in...

Page 18: ...that are too fast tend to raise dust because of the aggressive sweeper action To sweep gravel use just enough brush speed to roll the gravel not throw it HEAVY DEBRIS For 2 51mm or more of heavy debri...

Page 19: ...on the brush Weight will deform the bristles destroying the sweeping effectiveness To avoid this problem place the sweeper on blocks or use storage stands Do not store polypropylene brushes in direct...

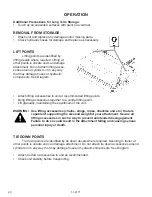
Page 20: ...as recommended Check unit stability before transporting Attach lifting accessories to unit at recommended lifting points Bring lifting accessories together to a central lifting point Lift gradually ma...

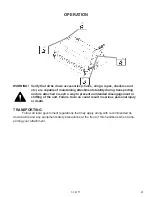
Page 21: ...the front of this handbook when trans porting your attachment WARNING Verify that all tie down accessories chains slings ropes shackles and etc are capable of maintaining attachment stability during t...

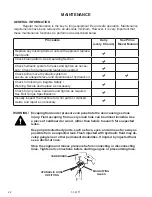
Page 22: ...disabilities If injured by injected fluid see a doctor at once Stop the engine and relieve pressure before connecting or disconnecting lines Tighten all connections before starting engine or pressuriz...

Page 23: ...ine width of Planer A and center of core B Measure and mark one half of planer width down C and up D from core cen ter B Slide sections onto the core alternating tubes and pin directions until you hav...

Page 24: ...he hex receiver plate at tached to the core 4 Inspect the hex receiver plate for damage and replace if required 5 Your new replacement motor assembly will come complete with bucket mount and hex hub I...

Page 25: ...e bearing assembly and side of sweeper 2 Remove the bearing flange from the mounting plate 3 Press out existing bearing and replace with new 4 Reinstall the bearing flange to the mounting plate using...

Page 26: ...ydraulic filter on prime mover is dirty Replace filter THE MOTOR RUNS BUT THE BROOM DOES NOT RUN Motor shaft has a sheared key Replace key OIL LEAKS FROM THE MOTOR One or more seals have failed in the...

Page 27: ...is dirty Replace hydraulic oil and or filter on prime mover Quick couplers are not properly seated Reconnect quick couplers properly Brush pattern too wide Adjust brush pattern Travel speed too fast R...

Page 28: ...72 30 183 6cm 84 30 214 1cm 96 30 244 6cm C Overall Length 61 00 154 9cm 61 00 154 9cm 61 00 154 9cm D Sweeping Width 60 00 152 4cm 72 00 182 9cm 84 00 213 4cm G Center of Gravity 20 30 51 6cm 20 30...

Page 29: ...135 1 1 2 38 10 1649 1870 2236 2535 2686 3026 3642 4103 METRIC BOLT TORQUE SPECIFICATIONS NOTE The following torque values are for use with metric hardware that is unplated and either dry or lubricate...

Page 30: ...30 51 4771 THIS PAGE IS INTENTIONALLY BLANK...

Page 31: ...specific attachment The product control number model and serial number for your attachment should be recorded in the space provided on the cover of this manual This information may be obtained from t...

Reviews: