background image

Digital Video Recorder 


33 


The DVR checks to see if anything is blinding a camera. 


Highlighting the box under the 

Sensitivity

 heading allows you to adjust the DVR’s sensitivity to video blind for Black 

and White independently from 0 (Never) and 1 (least sensitive) to 15 (most sensitive).


NOTE:  Video blind might NOT be detected for a camera with a very noisy image especially when set for low 

sensitivity values. 


Highlighting the box under the 

Activation Time

 heading allows you to set the duration before the DVR will report a 

Video Blind.  The DVR will not consider any blinded camera to be a Video Blind if the detected blindness is less than 
the Activation Time set on this screen.


Highlight the box under the 

Actions

 and press the 

 button.  The DVR can be set to react to video blind differently 

for each camera.  Each camera can be associated with another camera, trigger an Alarm-Out connector, sound the DVR’s 
internal buzzer, notify a number of different devices, and/or move PTZ cameras to preset positions. 


Highlight 

Use Ignoring Time

 and press the 

 button to toggle between On and Off.  When set to On, the DVR 

will ignore video blind events occurred during the preset period.  Highlighting 

Time Setup

 and press the 

 button 

allows you to set up event ignoring time. 
 

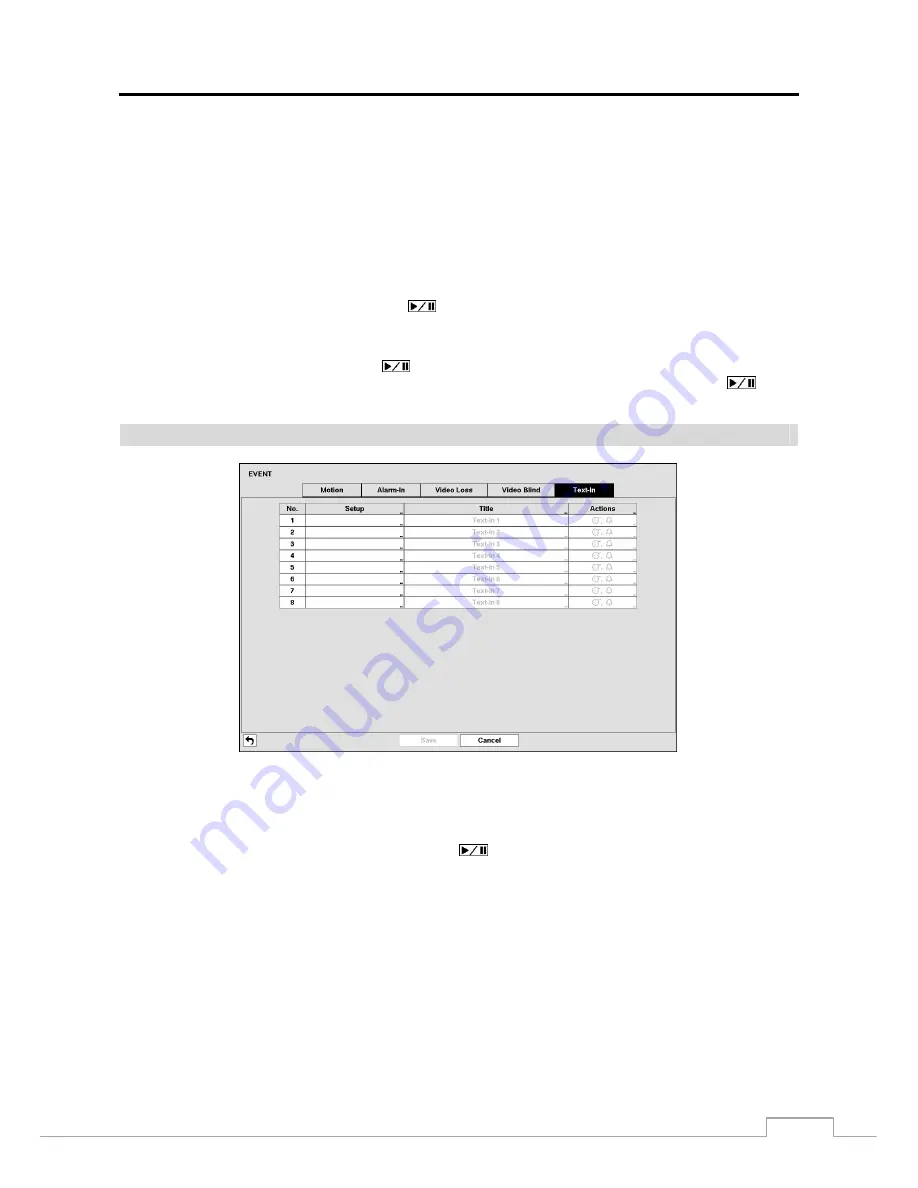
Text-In 


Figure 21:  Event – Text-In setup screen. 


The DVR can be set to react to text input from devices such as ATMs (Automated Teller Machines) and POS (Point 
of Sale; i.e., cash registers).  This screen allows you to configure the DVR for each text-in device. 


Highlight the box under the 

Setup

 heading, and press the 

 button.  Selecting the 

Setup

 heading changes all the 

parameters excluding Port settings of all the text input channels. 


NOTE:  The system performance might be affected when a large quantity of text inputs are detected from several 

channels at the same time. 


Summary of Contents for PDR960H-4E

Page 1: ...PDR960H 4E S84678 4 Channel Digital Video Recorder User Manual Digital Video Recorder PDR960H 8E S84679 8 Channel Digital Video Recorder ...

Page 2: ......

Page 3: ...NERATES USES AND CAN RADIATE RADIO FREQUENCY ENERGY AND IF NOT INSTALLED AND USED IN ACCORDANCE WITH THE INSTRUCTION MANUAL MAY CAUSE HARMFUL INTERFERENCE TO RADIO COMMUNICATIONS OPERATION OF THIS EQUIPMENT IN A RESIDENTIAL AREA IS LIKELY TO CAUSE HARMFUL INTERFERENCE IN WHICH CASE USERS WILL BE REQUIRED TO CORRECT THE INTERFERENCE AT THEIR OWN EXPENSE WARNING CHANGES OR MODIFICATIONS NOT EXPRESSL...

Page 4: ...ified service personnel under the following conditions A When the power supply cord or the plug has been damaged B If liquid is spilled or objects have fallen into the equipment C If the equipment has been exposed to rain or water D If the equipment does not operate normally by following the operating instructions adjust only those controls that are covered by the operating instructions as an impr...

Page 5: ... 3 Configuration 7 Front Panel Controls 7 Camera Buttons 7 HDD LED 7 Alarm LED 7 Arrow Buttons 8 Play Pause Button 8 Menu Button 8 PTZ Zoom Button 8 Panic Button 8 Search Button 9 USB Port 9 Remote Control Buttons 9 ID Button 10 Camera Buttons 10 Sequence Button 10 Freeze Button 10 Arrow Buttons 10 Menu Button 10 Playback Buttons 10 Panic Button 10 Layout Button 11 Zoom Button 11 PTZ Button 11 Ent...

Page 6: ... General 35 PTZ 36 Device Setup 37 Audio 37 Alarm Out 37 Remote Control 38 Network Setup 39 General 39 LAN 40 FEN 42 RTSP 43 WebGuard 44 VNC 44 Notification Setup 45 Callback 45 Mail 46 SNS 48 Schedule 48 Display Setup 49 OSD 49 Main Monitor 50 Chapter 4 Operation 53 Turning on the Power 53 Live Monitoring 53 Live Monitoring Menu 54 Active Cameo Mode 56 Zoom Mode 56 PTZ Mode 56 Event Monitoring 57...

Page 7: ...DVR installation 2 Figure 2 8 Channel DVR rear panel 3 Figure 3 8 Channel DVR front panel 7 Figure 4 Infrared remote control 9 Figure 5 Login screen 12 Figure 6 Logout screen 12 Figure 7 Setup screen 12 Figure 8 System General setup screen 13 Figure 9 System Date Time setup screen 20 Figure 10 System User setup screen 22 Figure 11 System Storage setup screen 24 Figure 12 System System Event setup ...

Page 8: ...Callback setup screen 45 Figure 34 Notification Mail setup screen 46 Figure 35 Notification SNS setup screen 48 Figure 36 Notification Schedule setup screen 48 Figure 37 Display OSD setup screen 49 Figure 38 Display Main Monitor setup screen 50 Figure 39 Live Monitoring menu 53 Figure 40 PTZ Select Camera menu 56 Figure 41 PTZ Preset menu 56 Figure 42 Event Status Event Status screen 58 Figure 43 ...

Page 9: ...ew In addition to replacing both a time lapse VCR and a multiplexer in a security installation your DVR has many features that make it much more powerful and easier to use than even the most advanced VCR The DVR converts analog NTSC or PAL video to digital images and records them on a hard disk drive Using a hard disk drive allows you to access recorded video almost instantaneously there is no nee...

Page 10: ... the 4 and 8 channel digital video recorders The DVRs are identical except for the number of cameras and alarms that can be connected and the number of cameras that can be displayed For simplicity the illustrations and descriptions in this manual refer to the 8 camera model ...

Page 11: ...he DVR Refer to the installation manuals for the other items that make up part of your system Figure 2 8 Channel DVR rear panel Video Input Audio In Out Alarm Input Output RS485 Port RS232 Port Network Port Video Out Factory Reset Switch Power Cord Connector Your DVR can be used with either NTSC or PAL equipment NOTE You cannot mix NTSC and PAL equipment For example you cannot use a PAL camera and...

Page 12: ...larm Inputs 1 to 8 GND Chassis Ground COM Relay Common NO Relay Alarm Out Normally Open RS485 Port Connector Pin Outs Master Unit Slave Unit To TX RX To TX RX RS232 Port Your DVR can record audio from up to four sources Connect the audio sources to Audio In 1 Audio In 2 Audio In 3 and Audio In 4 as needed using RCA jacks Connect Audio Out to your amplifier NOTE To make connections on the Alarm Con...

Page 13: ...actory Reset Switch The DVR has a Factory Reset switch to the left of the HDMI connector on the rear panel This switch will only be used on the rare occasions that you want to return all the settings to the original factory settings CAUTION When using the Factory Reset you will lose any settings you have saved To reset the unit you will need a straightened paperclip 1 Turn the DVR off 2 Turn it on...

Page 14: ...AVE A GROUNDING PIN RECEPTACLE DO NOT MODIFY THE PLUG DO NOT OVERLOAD THE CIRCUIT BY PLUGGING TOO MANY DEVICES IN TO ONE CIRCUIT CAUTION Ensure the DVR is not near any heat source that could cause overheating CAUTION The DVR does not have an internal fan so leave a clearance of at least 6 inches near ventilation hole areas on each side panel of the unit for proper ventilation Your DVR is now ready...

Page 15: ...ted However when you are in the menu or PTZ mode you have to exit the menu or PTZ mode first to reset alarm output The infrared sensor on the DVR is just to the left of the HDD LED Make certain that nothing blocks the sensor or the remote control will not function properly When you use wireless communication devices such as Wi Fi or Bluetooth near the DVR the remote control might not function prop...

Page 16: ...ng system setup When in one of the multi view formats pressing and holding the button for three seconds or longer enters the cameo mode and allows you to change the screen layout Refer to the following Live Monitoring Active Cameo Mode section for details Menu Button In the Live Monitoring mode and Search mode pressing the MENU button displays the menu icons on the right edge of the screen Pressin...

Page 17: ... or system upgrades Position external drives close enough to the DVR so that you can make the cable connections usually less than 6 feet Use the USB cable provided with the hard disk drive to connect it to the DVR A USB mouse not supplied can be connected to one of the ports You can use the mouse to navigate through the screens and menus much like you would on a computer A PostScript USB printer n...

Page 18: ...and Down arrow buttons moves the position of the small screen counter clockwise and clockwise Pressing the Left and Right buttons moves through screen pages in the Live Monitoring mode and Search mode Menu Button In the Live Monitoring mode and Search mode pressing the MENU button displays the menu icons on the right edge of the screen Pressing the button also hides the menu icons During menu setu...

Page 19: ... the PTZ mode the PRESET buttons are used to save Presets and load a Preset View the ZOOM buttons are used to Zoom In and Zoom Out and the FOCUS buttons are used for Near Focus and Far Focus Backup Button Pressing the BACK UP button allows you to copy video clips Calendar Button In the search mode pressing the CALENDAR button displays the Calendar Search screen Turning on the Power Connecting the ...

Page 20: ...management of the system setting up a password is strongly recommended If you cannot use the front panel buttons click the button using the mouse to enter a password and the virtual keyboard displays See instructions below for using the virtual keyboard To log the user out of the system press the MENU button or move the mouse pointer on the right edge of the screen and then select Logout in the Li...

Page 21: ...side System ID and press the button Change the number by highlighting it and using the Up and Down arrow buttons to increase and decrease the number from 0 to 99 NOTE The System ID number is used to identify the unit when it is connected with other DVRs through the RS485 port You cannot use the same ID number for two or more DVRs that are in the same RS485 network It is possible to have multiple D...

Page 22: ... When set to Off the network settings will not be changed To export the current DVR settings connect the USB device to the DVR Highlight Setup Export and press the button Highlight the box beside File name and press the button A virtual keyboard allows you to enter the file name Selecting Export will save the current settings in dat file format on the USB device NOTE Even after changing the DVR se...

Page 23: ...mation of recorded data Highlighting Clear All Data and pressing the button will clear all video data You will be asked to verify that you wish to clear all data before the DVR erases the video data Clear All Data will not clear the System Log Highlight Wizard and press the button The Wizard setup screen appears The Wizard setup guides you through configuring the system for basic operation Select ...

Page 24: ... map Use Daylight Saving Time Selecting the box sets the system to use daylight saving time NOTE The Date Time will be set and the clock will start when you click the Next button Record Method Setup Select the desired recording mode from Motion Event Record Recommended Continuous Motion Event Record Continuous Record NOTE You should understand each recording mode before setting the DVR s recording...

Page 25: ...ality and recording speed of each camera channel will be set as show below according to the Record Method and Record Video Quality you set HVQPP SRP LRTPP Motion Event Record Very High 30 ips High 5 ips Standard 3 ips Continuous Motion Event Record Very High 30 ips Time Very High 30 ips Event High 5 ips Time Very High 30 ips Event Standard 3 ips Time High 5 ips Event Continuous Record Very High 30...

Page 26: ...User s Manual 18 If you selected the Go to Network Setup select the Next button to start the Network Setup Wizard Internet Connection Select whether or not your DVR is connected to the Internet ...

Page 27: ... configuration you set should be tested by selecting Test otherwise the Next button will cannot be selected and you cannot move to the next step Use DSL PPPoE Setup Selecting the box allows you to set up the DSL network Entering the ID and password for DSL connection is required FEN Setup FEN Name Enter the DVR name to be registered on the DVRNS DVR Name Service server NOTE The FEN Name you entere...

Page 28: ... of the time will highlight Use the Up and Down arrow buttons to change the number Use the Left and Right arrow buttons to move between hour minutes and seconds Once you have the correct time press the button Highlight the Format box beside Time and press the button Select from the three available time formats and press the button to save your selected format NOTE The clock will not start running ...

Page 29: ...ation from 30 minutes to 1 day at various time intervals Last Sync Time displays the last time the DVR was synchronized with the time server Highlight Run as Server and press the button Pressing the button toggles between On and Off When it is On the DVR you are setting up will run as a time server Highlighting Holiday and pressing the button displays the Holiday screen You can set up holidays by ...

Page 30: ...and save it in a secure place If the password is forgotten the unit must be reset using the Factory Reset Button and all data settings will be lost Highlighting a User Name and pressing the button allows you to add or change the password assigned to that user You can also change the group to which the user is assigned The column can be used to delete a User Name or an entire Group If the is grayed...

Page 31: ...m date and time on a local system or a PC running RAS Data Clear The user can clear all video data or format disks on a local system or a PC running RAS PTZ Setup The user can establish all PTZ settings on a local system or a PC running RAS Alarm Out Setup The user can establish all Alarm Out settings on a local system or a PC running RAS Covert Camera Setup The user can establish all Covert Camer...

Page 32: ...ormat the device for recording When selecting Not Using from Use As and highlighting the Format button the device will not be used for recording The Information column displays whether the device is being used or not Other indicates the device has been used for another DVR Highlight the box in the Information column for the desired storage device and press the button You will be able to check the ...

Page 33: ...set to On you can select the day time range and interval that you want the DVR to run self diagnostics on the recorder The Interval can be selectable from 1 min to 7 days or Never Highlight the and press the button to add a schedule item The box allows you to delete a check recording schedule Highlight the Settings box beside Check Alarm In and press the button You can select the interval that you...

Page 34: ...igure 13 Record General setup screen Highlighting Recycle and pressing the button toggles between On and Off In the Recycle mode the DVR records over the oldest video data once all available storage space has been used When Recycle is turned off the DVR stops recording once all available storage space has been used Highlight the Event Record Dwell box and set the length of time you would like to r...

Page 35: ... Select No Limit if you want to stop panic recording manually Highlighting the Panic Recording ips and pressing the button allows you to set the images per second for Panic recording You can select from 1 00 to 30 00 ips 25 00 ips PAL Highlighting the Panic Recording Quality and pressing the button allows you to set the recorded image quality for Panic recording You can select from Very High High ...

Page 36: ...ding When the DVR is in the Pre Event mode the red and display when any event occurs and the DVR starts recoding When the DVR is in the Time Event mode the DVR will follow the Time settings and the icon displays at the top left corner of the screen The DVR follows the Event settings and the icon displays Highlight the box under the Channels heading and press the button to select which cameras will...

Page 37: ...ng the button allows you to set the length of time you would like to record for the associated event Advanced Mode Only Pre Event Figure 16 Record Pre Event setup screen When the DVR is in the Event Record mode it is possible to have it record images before the event occurs The Pre Event screen allows you to define how to handle pre event recording If you do not have Event set up in the Record Sch...

Page 38: ...or clearing blocks NOTE You can set up motion zones one block at a time in groups of four or eight individual block groups 4 and 8 channel DVR respectively A block group is positioned within the image area using the Up and Down arrow buttons and individual blocks within the block groups are selected or cleared using the camera buttons Press the button to display the menu screen The menu on the set...

Page 39: ...ion events occurred during the preset interval range NOTE The record action for motion events will not be affected by the Motion Ignoring function Highlighting Daytime Setup and pressing the button allows you to set up the Daytime range Highlight the box beside Daytime and press the button Use the Up and Down arrow buttons to set the Daytime range The DVR will consider the remaining time range as ...

Page 40: ...tions and press the button The DVR can be set to react to video loss differently for each camera Each camera can be associated with another camera trigger an Alarm Out connector sound the DVR s internal buzzer notify a number of different devices and or move PTZ cameras to preset positions Highlight Use Ignoring Time and press the button to toggle between On and Off When set to On the DVR will ign...

Page 41: ... Each camera can be associated with another camera trigger an Alarm Out connector sound the DVR s internal buzzer notify a number of different devices and or move PTZ cameras to preset positions Highlight Use Ignoring Time and press the button to toggle between On and Off When set to On the DVR will ignore video blind events occurred during the preset period Highlighting Time Setup and press the b...

Page 42: ... virtual keyboard to enter the Transaction End string Refer to the device manufacturer s documentation for the text string that the device sends when a transaction ends Highlight the more line s box and press the button Select the number of additional lines of text that you want the DVR to record You can choose from 0 to 10 Highlight the box beside Line Delimiter and press the button Use the virtu...

Page 43: ...l keyboard You can also determine which cameras will display on the monitors by selecting Normal Covert 1 or Covert 2 from a drop down list in the Use column NOTE When selecting the Covert 1 the DVR displays the camera title and status icons on the covert video When selecting the Covert 2 the DVR displays only camera title on the covert video A user who does not have Covert Camera View authority c...

Page 44: ...ed to connect the camera to the RS232 or RS485 connector on the back of the DVR following the camera manufacturer s instructions You can assign IDs to each camera by highlighting the box under the ID heading and pressing the button Change the number by highlighting it and using the Up and Down arrow buttons to increase and decrease the number The PTZ ID number can be set from 0 to 256 Highlight th...

Page 45: ...io input Highlight Enable Audio Out and press the button This toggles between enabling and disabling audio out Alarm Out Figure 25 Device Alarm Out setup screen Highlighting the box beside Dwell Time and pressing the button allows you to set the dwell time of the alarm output Dwell times range from 5 seconds to 30 minutes Each alarm output can be given its own title by highlighting Title and press...

Page 46: ...uring the scheduled time When set to Event the Alarm Out is only active when there is an Event during the scheduled time The Channels box allows you to set which alarm outputs will be active You can also select the DVR s internal buzzer The box allows you to delete an alarm output schedule You will be asked to confirm whether or not you really wish to delete the schedule Remote Control Figure 26 D...

Page 47: ...idth Highlight the box beside Network Bandwidth Limit and press the Up and Down arrow buttons to set the desired maximum bandwidth from 100Kbps to 1Gbps NOTE When limiting the network bandwidth the remote watch image on the PC running RAS or WebGuard might not be displayed properly The DVR supports two way audio communication between a local system and a PC running RAS Highlighting the box beside ...

Page 48: ...dress Gateway and Subnet Mask from your network administrator Highlight the box beside DNS Server Press the Up and Down arrow buttons to set the IP address of the DNS server Highlight the Port Number Setup box and press the button The Port Number Setup screen appears NOTE You will need to get the appropriate Port Numbers for each RAS and WebGuard related program Admin Callback Watch and Search fro...

Page 49: ... the Type and highlighting Save button reads the current IP address of the DVR configured by DHCP Dynamic Host Configuration Protocol network Highlight Auto Default and press the button to toggle between On and Off When it is On the DVR will obtain the IP address of the DNS server automatically NOTE Selecting Auto will only be enabled when the DVR is configured for DHCP or an ADSL network Selectin...

Page 50: ...f you already set up the DNS Server when setting up the LAN Highlight the box beside Port and press the button Set the port number of the FEN server using the Up and Down arrow buttons to increase or decrease the numbers Highlight the box beside FEN Name and press the button A virtual keyboard appears allowing you to enter the DVR name to be registered on the DVRNS DVR Name Service server Highligh...

Page 51: ...tton to toggle between On and Off When set to on you can access a remote DVR using a Blackberry or other mobile devices NOTE Selecting Use Mobile sets the WebGuard service to be enabled automatically regardless of your WebGuard settings When using NAT Network Address Translation or firewall services opening all UDP ports allows you to access a DVR using Blackberry and Android devices You can acces...

Page 52: ...uard by using the Up and Down arrow buttons to increase or decrease the numbers VNC Figure 32 Network VNC setup screen Highlight Use VNC Virtual Network Computing and press the button to toggle between On and Off You will be able to change the settings if Use VNC is enabled NOTE VNC service allows you to access the DVR and control it remotely using a PC or mobile devices via Ethernet Highlight the...

Page 53: ...or Windows Pressing the m or key displays the Live Monitoring menu or Search menu on the screen It is the same as pressing the MENU button on the front panel Enter or Return Pressing the Enter or Return key selects the highlighted item or completes an entry that you have made during system setup It is the same as pressing the Play Pause button on the front panel d or PageUp or PageDown Pressing th...

Page 54: ...group has been expanded and all of the Recipient Names within that group are displayed below the Group Name If there is a in front of the Group Name it indicates that the group has been collapsed and all of the Recipient Names within that group are hidden To collapse or expand a group highlight the column in front of the desired group and press the button The column can be used to delete a Recipie...

Page 55: ...ver when setting up the LAN Highlight the box beside Port and press the button Use the arrow buttons to enter the SMTP Server port number obtained from your system administrator The default port number is 25 Highlight Use SSL TLS and press the button to toggle between On and Off When it is On the DVR can send an email via an SMTP server requiring SSL Secure Sockets Layer authentication NOTE This p...

Page 56: ...ount highlight the and press the button Highlight the box beside Type and press the button Selecting Twitter from the Type allows you to post a tweet on Twitter when an event occurs Highlight the box beside User Name Password and press the button A virtual keyboard appears allowing you to enter the user name and password The SNS accounts can be deleted by highlighting the beside the account and pr...

Page 57: ... item you select should be enabled in the Notification setup screen and the DVR should be registered in the RAS Remote Administration System NOTE The Notify action for system events you made in the System Event setup screen on the System menu will not be affected by your Notification Schedule settings Highlight the box beside Summary Email Interval and select the interval that you want the DVR to ...

Page 58: ...e text input strings display on the screen You can adjust the Display Dwell time sec for the text input strings displayed on the screen You can adjust the transparency of the setup screens by highlighting Transparency and using the Left and Right arrow buttons Highlighting OSD Margin and pressing the button displays how OSD text will be displayed on the monitor You can adjust the horizontal and ve...

Page 59: ...ssing the button You can select dwell intervals ranging from 1 second to 1 minute Highlight Event Monitoring On and press the button Pressing the button toggles between On and Off When it is On the DVR will display the camera associated with the event when an event occurs Highlight the box beside Resolution and press the button You can select from 1280x1024 1440x900 and 1920x1080 for NTSC video an...

Page 60: ...User s Manual 52 ...

Page 61: ... Power Once you have installed the DVR following the instructions in Chapter 2 Installation it is ready to record Live Monitoring As soon as the DVR completes its initialization process it will begin showing live video on the attached monitor and playing live audio through the attached speaker The default mode is to display all cameras at once Pressing any camera button will cause that camera to d...

Page 62: ...o To Main swaps the selected channel with the main channel This function is supported only in the 1 5 and 1 7 display modes and can be activated from any of channel screens except the main channel screen Camera OSD Status OSD Selecting Display Camera OSD or Status OSD toggles Camera OSD or Status OSD On and Off Previous Group Next Group Selecting or Previous Group or Next Group in the Live Monitor...

Page 63: ... for the selected camera if a user who has Color Control authority logs into the system It is the same as pressing and holding a camera button for a few seconds Edit Group Selecting Camera Menu Edit Group enters to the Active Cameo mode It is the same as pressing and holding the Play Pause button for three seconds or longer in any multiview formats Refer to the following Active Cameo Mode section ...

Page 64: ...ea in rectangle Exit the Zoom mode by pressing the ZOOM button While in the Zoom mode the icon displays if Zoom is selected in the Display setup screen OSD tab PTZ Mode If a user who has PTZ Control authority logs into the system the user can control PTZ cameras The DVR will control cameras with Pan Tilt and Zoom capabilities Press and hold the PTZ button on the front panel for three seconds or lo...

Page 65: ...event and the icon displays on screen if Event Monitoring On is selected in the Display setup screen Main Monitor tab How the cameras are displayed depends on the number of cameras associated with the event If one camera is associated with the event the DVR will display the camera full screen If two to four cameras are associated with the event the DVR will display the cameras on a 2x2 screen If f...

Page 66: ...when each event is detected based on the settings you made in the System Event setup screen on the System menu Panic Record will be highlighted while the DVR is in the panic recording mode Disk Almost Full will be highlighted when the DVR is not in the Recycle mode and the level of disk usage reaches the Disk Almost Full percentage you made in the System Event setup screen on the System menu Disk ...

Page 67: ...ce you have installed the DVR following the instructions in Chapter 2 Installation it is ready to record The DVR will start recording based on the settings you made in the Record setup screen See Chapter3 Configuration Recycle On or Recycle Off The factory default is Recycle On It does this by recording over the oldest video once the hard disk is full Setting the DVR to Recycle Off causes it to st...

Page 68: ...live monitoring will continue except for the camera that has been selected for playback Figure 44 Select Playback Camera menu When playing video for the first time the DVR will display the most recent image When playing video subsequent times the DVR will start playing video from the last recalled image Recorded audio will be played when the DVR displays a camera with recorded audio in full screen...

Page 69: ... Exit Figure 45 Search menu NOTE The Search menu also can be displayed by moving the mouse pointer on the right edge of the screen Search Menu Search Event Log Search Selecting Search Event Log Search selects video from the event log See the following Event Log Search section for details Record Table Search Selecting Search Record Table Search selects using a recording table See the following Reco...

Page 70: ...utton on the remote control or scrolling the mouse wheel up and down when in one of the multiview formats i e 2x2 1 5 1 7 or 3x3 Camera OSD Status OSD Selecting Display Camera OSD or Status OSD toggles Camera OSD or Status OSD On and Off Previous Group Next Group Selecting or Previous Group or Next Group in the Search menu moves to the previous or next page Alarm Selecting Alarm in the Search menu...

Page 71: ... user who has System Check authority Data Source Selecting Data Source in the Search menu allows you to select the data source to be searched Selecting Record searches recorded data on primary storage installed in the DVR and selecting Other searches recorded data on storage used for another DVR then installed in this DVR Exit Selecting Exit in the Search menu exits the search mode and enters the ...

Page 72: ...only be able to turn the Check Time Overlap on or off if a user defined date and time is set to From and To If the DVR s date and time have been reset it is possible for the DVR to have more than one overlapping start and stop time When set to On you will be asked to select one of the overlapping start and stop time When set to Off the DVR will display search results from all start times to all st...

Page 73: ... range In this case the overlapping time range in the record table will be separated by a yellow vertical line NOTE The recorded data in the time range located after the yellow vertical line is the latest There are three view modes Standard view Expanded view and Compact view Standard view default displays combined recording information of all camera channels currently displayed on the screen In t...

Page 74: ...irst or last recorded image or searches by date and time see the previous Searching Video Go To section of this chapter for more details Clip Copy Clips a video segment and saves it see the following Clip Copy section for more details Print Prints the current playback image Zoom Zooms the current playback image Slow Play Plays video at low speed x1 2 x1 3 x1 4 x1 6 and x1 8 The individual playback...

Page 75: ...Search detects motion in the defined area Museum Search detects if a defined object has moved Highlight the box beside Zone and press the button An image from the video appears with a grid overlaid You can turn sensor blocks On and Off to define the area of the picture in which you want to search for motion NOTE Defining the area of the image in which you want to search for motion is nearly identi...

Page 76: ...ent video segment Pressing SEARCH returns to live monitoring NOTE It is possible that no recorded image displays on the current screen Change the screen mode to 3x3 for the 8 channel DVR and 2x2 for the 4 channel DVR You will be able to easily see the camera have recorded video during target time Text Input information will be overlaid on the image while the recorded video is played at regular spe...

Page 77: ...tting up search parameters The column can be used to delete a set of search parameter or entire sets of search parameters Highlighting the Option box and pressing the button allows you to select whether or not the search will find only text strings in which the case matches find only exact words that match with the word you entered during text in setup or delete transactions duplicated within text...

Page 78: ...Search Export menu press the BACK UP button on the remote control while in the Live Monitoring mode or press and hold the SEARCH button on the front panel for more than three seconds while in the Search mode and the Clip Copy screen appears to allow clip copy setup Figure 51 Clip Copy screen You can search video from the first to last recorded images or you can set the start and stop times and dat...

Page 79: ... Close Clip Copy continues and a confirmation screen will display when complete NOTE The file size for clip copy is limited to 30GB When copying video clips larger than 2GB the video clips will be save in units of 2GB For example 3 individual 2GB files will be created when saving a 6GB video clip However the file size for the One Touch Clip Copy is limited to 2GB You can use other functions on the...

Page 80: ... saved as PDF files can be printed on any printer connected to your PC Highlight the box beside Paper Size and press the button You can select the paper size Once you have selected the printer model and paper size highlight the Print button and press the button A message appears asking you if you want to print the current image Highlight the Continue button and press the button to print NOTE If yo...

Page 81: ...cated region of the USB hard disk drive Then click Create Partition 6 In the Create Partition wizard click Next then Primary Partition and follow the instructions on the screen Make sure that the FAT32 is selected for the file system NOTE The partition size should be less than 32GB because of Microsoft limitations After formatting is complete the USB hard disk drive will be added to My Computer 7 ...

Page 82: ...omparison value is located at 17th Unit price mark will be ignored automatically 28th Qty and 40th amount characters including spaces from the left but the value of amount category is located on a different line from Item In this case you can enter 17 28 and 40 in each Column box and enter 1 in the Line box for the next line For example if you want to search for Coke with a Qty Quantity of more th...

Page 83: ...and PASSWORD and clicking the LOGIN button logs in using the selected mode You will need to enter the DVR IP address in the DVR ADDRESS field when running the WebGuard program by entering http www dvronline net Selecting the Use DVRNS option allows you to enter the DVR name registered on the DVRNS server instead of the IP address You must enter the DVRNS server address and port number in the SETUP...

Page 84: ...t with elevated administrator permissions Restart your computer to apply the changes Web Monitoring Mode WebWatch is a remote web monitoring program that allows you to monitor live video transmitted in real time from the remote DVR Click the to log out the WebGuard program Click the to access to the web search mode Position the mouse pointer on the WebWatch logo to see the version of the WebGuard ...

Page 85: ... the attached speaker and click the button again stop monitoring live audio Clicking both and allows two way communication Clicking the disables audio communication Aspect Ratio Changes the image aspect ratio Anti Aliasing Screen Enhances image display quality by eliminating stair stepping aliasing effects in the enlarged image NOTE A camera name change in the Web Watch mode does not affect the ca...

Page 86: ...e image drawing mode and select OSD information to be displayed on the screen Click the to save any video clip of recorded data as an executable file or click the to save the current image in a bitmap or JPEG file format NOTE When saving as an executable file selecting the Exclude Player option will reduce the file size and its saving time You can download the Player program to review the video cl...

Page 87: ... range using a search menu such as Event Log Search Text In Search or Motion Search it is possible for the DVR to have two overlapping start and stop times You will be asked to select one of the overlapping start and stop times from the search time ranges as follows From four o clock of the first segment to five o clock of the first segment From four o clock of the first segment to five o clock of...

Page 88: ...Verify failed 405 Unsupported file system 500 System is busy clip copying System Log Notices Boot Up Clear All Data Shutdown Clear Disk Restart Format Disk Upgrade Disk Full Upgrade Fail Disk Config Change Power Failure Disk No serial number Time Change Disk No Removed Time Zone Change Auto Deletion Time Sync Search Begin Time Sync Fail Search End Disk Bad Clip Copy Begin Login Clip Copy End Logou...

Page 89: ...er Storage System Event RECORD General Schedule Pre Event EVENT Motion Alarm In Video Loss Video Blind Text In CAMERA General PTZ DEVICE Audio Alarm Out Remote Control NETWORK General LAN FEN RTSP WebGuard VNC NOTIFICATION Callback Mail SNS Schedule DISPLAY OSD Main Monitor ...

Page 90: ...higher than the upgrade package file version you should reset the DVR first using the Factory Reset When using the Factory Reset you will lose any settings you have saved Specifications VIDEO Signal Format NTSC or PAL Auto Detect Video Input Composite 4 or 8 inputs 1 Vp p auto terminating 75 Ohms Monitor Outputs HDMI 1 HDMI VGA 1 Video Resolution HDMI 1920x1080 1440x900 1280x1024 VGA 1920x1080 144...

Page 91: ...rol USB Port 2 USB 2 0 STORAGE Primary Storage SATA hard disk drive Secondary Storage USB hard disk drive or flash drive GENERAL Dimensions W x H x D 10 4 x 2 0 x 7 5 265mm x 52mm x 191mm Unit Weight 3 3 lbs 1 48kg Shipping Weight 6 0 lbs 2 73kg Shipping Dimensions W x H x D 14 0 x 4 1 x 13 4 355mm x 103mm x 340mm Operating Temperature 41 F to 104 F 5 C to 40 C Operating Humidity 0 to 90 Power 12V...

Page 92: ......

Page 93: ... read the Owner s Manual before installing the device x Never place the Equipment in a confined space eg bookcase built in cabinet unless proper ventilation is available It is advised to leave a 10cm space around the unit x To prevent fire or shock hazard do not expose the Equipment to water Ensure that objects filled with liquid eg vases are not placed on or near the Equipment x Avoid keeping or ...

Page 94: ... must return the Equipment to Pacific Communications The consumer will be responsible for the collection and freight costs of returning the Equipment to Pacific Communications or to any designated Pacific Communications Authorised Service Centre for repair or replacement The consumer will also be responsible for the freight costs to deliver any new or repaired Equipment to the consumer e This warr...

Page 95: ......

Page 96: ...V1 0 ISO 14001 Environmental Management System in use Fibre sourced from pulp suppliers who use sustainable forestry techniques ...

Reviews: