MAKING USER SETTINGS (cont.)
If you have not done so, put your set-top into “user settings mode”, as described on page 21. The
front panel displays “ASPt”.
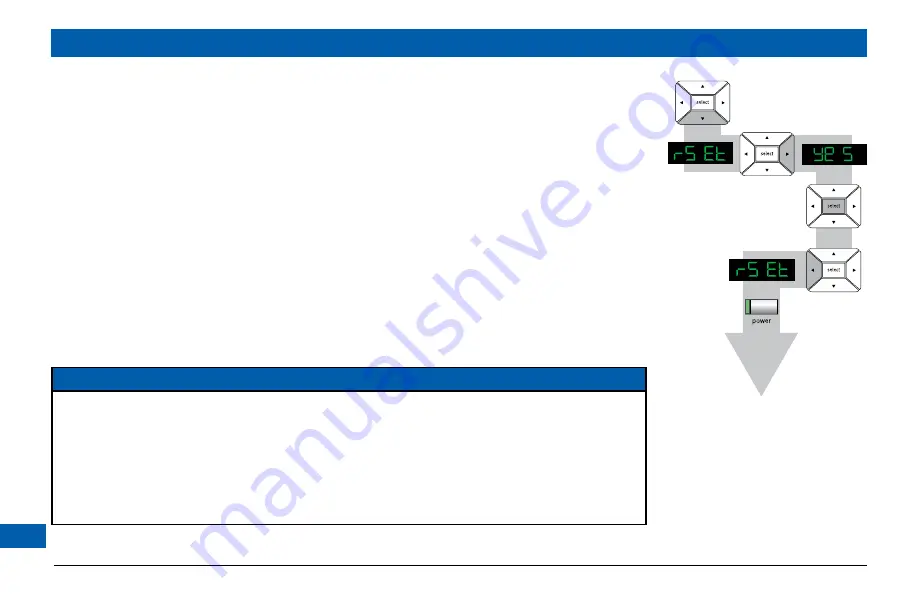
The flow diagram on the right shows how you use the
arrow
,
select
and
power
buttons on your
set-top’s front panel to change the display and make the settings. See also the instructions below.
1. Press the
D
button until the front panel displays “rSEt” (short for “
r
estore factory
set
tings”), as
shown right.
2. Press the
R
button. “yes” appears on your set-top’s front panel. (If you no longer wish to restore
the factory settings, press the
L
button.)
3. To restore the factory settings, press the
select
button.
4. The factory settings are restored. If you want to continue changing the settings, press
L
then see
the sections from page 21 onwards. If you have finished changing the settings, press the
power
button. Your set-top will switch on with the restored settings.
NOTES
If your set-top and HDTV are connected via a HDMI cable, your HDTV may pass information about the
required settings back to your set-top (see page 23). If you wish to restore your set-top’s settings to those
created by your HDTV, you should disconnect your set-top from your HDTV before you restore the
factory default settings. When you reconnect your HDTV to your set-top via the HDMI cable, your HDTV
will pass back the information again.
Always turn off your set-top, wait 60 seconds, then disconnect your set-top from the wall AC
outlet before you connect or disconnect any other equipment to or from its rear panel.


