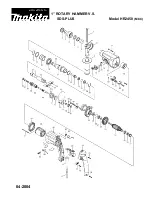
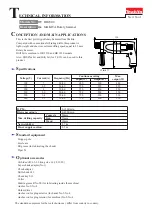
background image

2.  SDS

+

 ACCESSORIES

3.  FITTING AND USING THE DUST COVER

1   Prior to insertion into 

chuck, ensure the SDS

+


accessory is clear of 

dust and debris.

1   Slide dust cover over 

accessory.

3   Insert drill bit in locking 

sleeve.

4   Press dust cover to the 

end of locking sleeve.

2  Add lubrication grease.

3   Pull locking sleeve back 

and hold.

5   Rotate and continue to 

insert as far as possible.

7   Checked  SDS

+

 accessory 

is locked. Try to pull it out. 

Note: It should have approx 

10 – 20mm movement. This 

is normal.

2   Prior to insertion into 

drill add supplied 

lubricant to the SDS

accessory.

4  Insert SDS

+

 Accessory.

6  Release locking sleeve.

8   To remove the SDS

+


accessory pull back the 

locking sleeve and pull 

accessory out.

a

b

Accessory

SDS

+

The cover catches dust and debris - while using the drill upright or 

overhead - to avoid dust entering the air vents.

Summary of Contents for RHD-900

Page 1: ...or resulting from abuse accidents or alterations Failure to perform maintenance as set out within the instruction manual If the tool is disassembled or tampered with in any way Professional industrial or high frequency use WARRANTY TO ENSURE A SPEEDY RESPONSE PLEASE HAVE THE MODEL NUMBER AND DATE OF PURCHASE AVAILABLE A CUSTOMER SERVICE REPRESENTATIVE WILL TAKE YOUR CALL AND ANSWER ANY QUESTIONS Y...

Page 2: ...SDS Flat Chisel 14 x 250mm 13 1 x SDS Point Chisel 14 x 250mm 14 Dust Cover 15 High Temperature Grease 16 Pin Spanner ACCESSORIES SETUP PREPARATION WARNING ENSURE THE TOOL IS DISCONNECTED FROM THE POWER SUPPLY BEFORE PERFORMING ANY OF THE FOLLOWING OPERATIONS Required Drilling Depth 1 Loosen the depth rod securing nut then insert depth rod 4 Drill the hole until the end of the depth rod touches th...

Page 3: ... and hold 5 Rotate and continue to insert as far as possible 7 Checked SDS accessory is locked Try to pull it out Note It should have approx 10 20mm movement This is normal 2 Prior to insertion into drill add supplied lubricant to the SDS accessory 4 Insert SDS Accessory 6 Release locking sleeve 8 To remove the SDS accessory pull back the locking sleeve and pull accessory out a b Accessory SDS The...

Page 4: ...mode selector to the hammer icon and rotate the rear mode selector to the drill and hammer icon This setting is recommended for use when you desire a hammer action without the accessory rotating which is ideal for chiselling or chipping away at masonry products pick or chisel accessory bits should be used Note In chiselling mode the drill bit is fixed in position and cannot be rotated Drilling Rot...

Page 5: ...Brushes When the carbon brushes wear out the drill will spark and or stop Discontinue use as soon as this happens They should be replaced prior to recommencing use of the drill Carbon brushes are a wearing component of the drill therefore not covered under warranty Continuing to use the drill when carbon brushes need to be replaced may cause permanent damage to the drill Carbon brushes will wear o...

Page 6: ...ety warnings and all instructions Failure to follow the warnings and instructions may result in electric shock fire and or serious injury Save all warnings and instructions for future reference The term power tool in the warnings refers to your mains operated corded power tool or battery operated cordless power tool 1 Work area safety a Keep work area clean and well lit Cluttered or dark areas inv...

Reviews: