background image

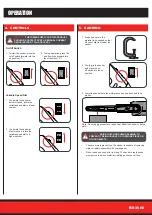
4.  CONTROLS

0

I

OPERATION

5.  SANDING

•    Check your work piece often. The sander is capable of removing 

material rapidly, especially with coarse paper.

•    Do not sand on one spot for too long. The sander’s rapid action 

may remove too much material, creating an uneven surface.

CAUTION:


GUIDE THE CORD DURING SANDING TO 

PREVENT IT BEING CAUGHT ON THE WORK PIECE OR 

OTHER OBJECTS.

WARNING!


THE POWER SUPPLY FOR THIS PRODUCT 

SHOULD BE PROTECTED BY A RESIDUAL CURRENT 

DEVICE (RATED AT 30mA OR LESS).

2   To stop operation, press the 

on/off switch backward into 

the off position (“0”)

1   If required, secure the 

material to be sanded so that 

it doesn’t slip from under the 

sander.

1   To operate the sander at 

a slower speed, rotate the 

variable speed dial to a lower 

number.

2   To operate the sander at 

a faster speed, rotate the 

variable speed dial to a 

higher number.

1   To start the sander, press the 

on/off switch forward into the 

on position (“I”).

2   Firmly grip the sander 

and press the on/

off switch into the on 

position.

3   Lower the sander onto the work piece and use a back and forth 

motion.

Note:

 Do not apply pressure on the sander. Allow the sander to do the 

work.

0

I

0

I

2

1

5

4

On/Off Switch

Variable Speed Dial

FSR-3000

Summary of Contents for FSR-3000

Page 1: ... maintenance as set out within the instruction manual If the tool is disassembled or tampered with in any way Professional industrial or high frequency use WARRANTY TO ENSURE A SPEEDY RESPONSE PLEASE HAVE THE MODEL NUMBER AND DATE OF PURCHASE AVAILABLE A CUSTOMER SERVICE REPRESENTATIVE WILL TAKE YOUR CALL AND ANSWER ANY QUESTIONS YOU MAY HAVE RELATING TO THE WARRANTY POLICY OR PROCEDURE OZITO Aust...

Page 2: ... STEPS CAUTION THE ARROWS ON THE BELT MUST BE ALIGNED WITH THE MARKINGS ON THE FILE SANDER INCORRECT FITMENT COULD CAUSE THE BELT TO BREAK BELTS ARE NOT COVERED BY THE WARRANTY 2 Make sure that the rotation direction indicated by the arrows on the belt and the tool match 1 Push the front belt roller towards the body of the tool until it clicks into place 5 Press the belt tensioning button to secur...

Page 3: ...ction adaptor allows you to connect a vacuum hose to remove dust and debris from the working surface as you operate Note Before attaching the dust extraction adaptor you must first fit the sanding belt 3 Attach a dust hose onto the end of the dust extraction adaptor a b Removing the Sanding Belt Fitting the Dust Extraction Adaptor 2 Adjust the angle of the rotating file arm to the desired position...

Page 4: ...tion press the on off switch backward into the off position 0 1 If required secure the material to be sanded so that it doesn t slip from under the sander 1 To operate the sander at a slower speed rotate the variable speed dial to a lower number 2 To operate the sander at a faster speed rotate the variable speed dial to a higher number 1 To start the sander press the on off switch forward into the...

Page 5: ... injuries caused by the repair of the sander by an unauthorised person or by mishandling of the sander TROUBLESHOOTING Sanding belt slides off the file arm while operating The sanding belt is not installed correctly Ensure that you align the belt on the centre of the front and rear guide rollers Sanding belt breaks while operating The sanding belt may be damaged or worn Replace the sanding belt an...

Page 6: ...l in unexpected situations f Dress properly Do not wear loose clothing or jewellery Keep your hair clothing and gloves away from moving parts Loose clothes jewellery or long hair can be caught in moving parts g If devices are provided for the connection of dust extraction and collection facilities ensure these are connected and properly used Use of dust collection can reduce dust related hazards 4...

Reviews: