ONLINE MANUAL
Scan this QR Code with your
mobile device to take you to
the online manual.
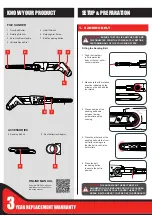
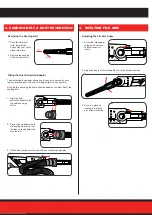
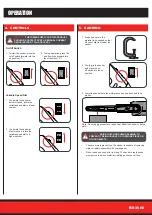
1 Front Belt Roller
2 Rotating File Arm
3 Sure Grip Rear Handle
4 Variable Speed Dial
5 On/Off Switch
6 Rotating Arm Screw
7 Belt Tensioning Button
FILE SANDER
KNOW YOUR PRODUCT
1. SANDING BELT
SETUP & PREPARATION
8 Sanding Belt x 2
9 Dust Extraction Adaptor
ACCESSORIES
WARNING:
ENSURE THE TOOL IS SWITCHED OFF AND
DISCONNECTED FROM THE POWER SUPPLY BEFORE
PERFORMING ANY OF THE FOLLOWING STEPS.
CAUTION:
THE ARROWS ON THE BELT MUST BE
ALIGNED WITH THE MARKINGS ON THE FILE SANDER.
INCORRECT FITMENT COULD CAUSE THE BELT TO
BREAK. BELTS ARE NOT COVERED BY THE WARRANTY.
2 Make sure that the rotation
direction indicated by the
arrows on the belt and the
tool match.
1 Push the front belt
roller towards the
body of the tool, until it
clicks into place.
5 Press the belt
tensioning button
to secure the belt in
position
4 Place the other end of the
sanding belt onto the front
belt roller, making sure
that the belt is central on
both rollers.
3 Place one side of the
sanding belt down
between the rear
guide roller and the
housing.
Fitting the Sanding Belt
1
2
3
4
5
8
9
6
7


