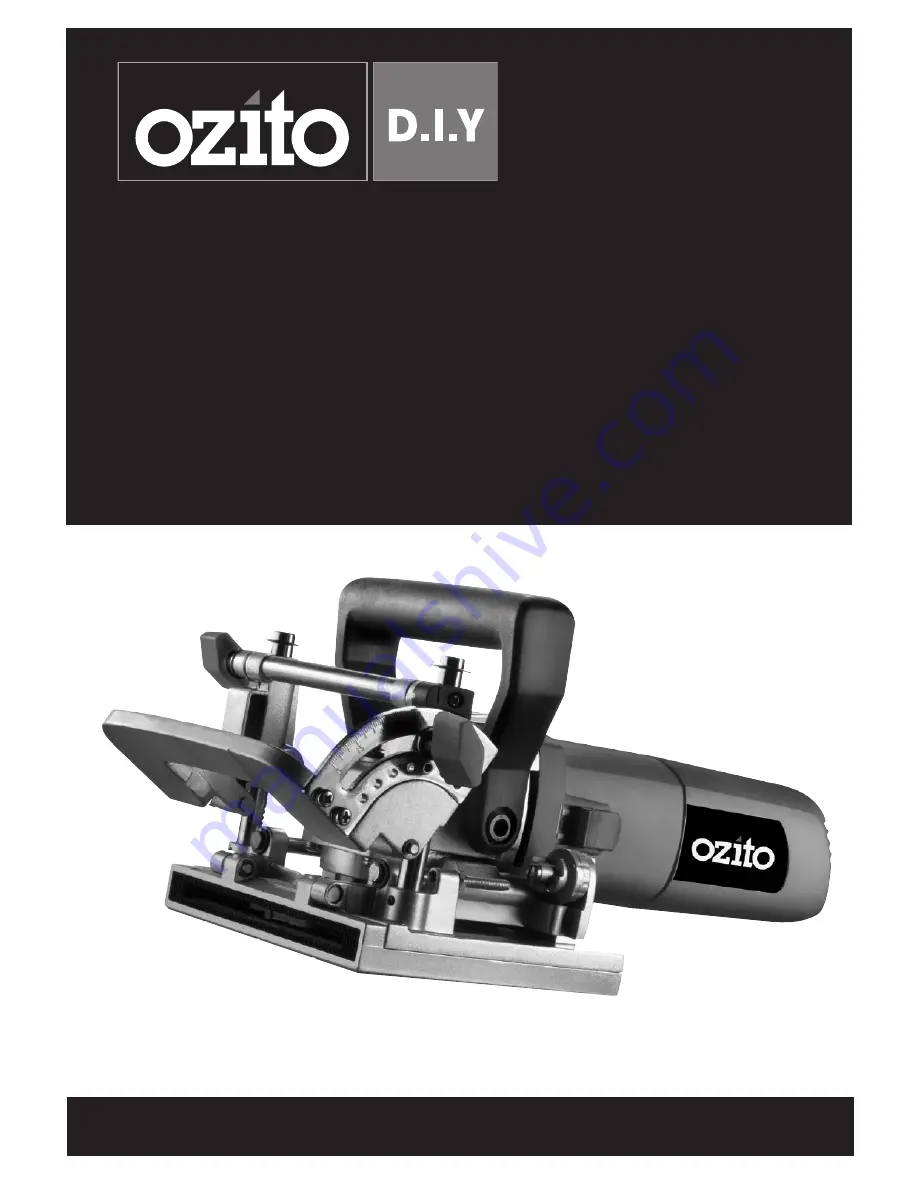
background image

Biscuit Joiner

100mm - 850 Watt

Operation Manual

3 Year Replacement Warranty

BJG-641

To view the full range visit:

www.ozito.com.au

0209

Summary of Contents for BJG-641

Page 1: ...Biscuit Joiner 100mm 850 Watt Operation Manual 3 Year Replacement Warranty BJG 641 To view the full range visit www ozito com au 0209...

Page 2: ...0 90 Spindle dimension M 10 Weight 3 0kg Features Dust Bag Easy Adjustment Centre Lines 2 SPECIFICATIONS MODEL NO BJG 641K 1 Lock on switch 2 Depth adjustment knob 3 Base 4 Bevel locking knob 5 Fence...

Page 3: ...n order to avoid a hazard Note Double insulation does not take the place of normal safety precautions when operating this tool The insulation system is for added protection against injury resulting fr...

Page 4: ...tool when you are tired 9 Secure work piece Use clamps or a vice to hold the work piece it is safer as it frees both hands to operate the tool 10 Remove adjusting keys and wrenches Always check that...

Page 5: ...ntenance and changing accessories Keep handles and switches dry clean and free from oil and grease 20 Have your tool repaired by an electrician or a power tool repairer This power tool complies with r...

Page 6: ...tips on the blade These situations also require replacing the blade How to Replace the Blade 1 Place your Biscuit Joiner upside down on a work bench 2 Loosen the allen key bolt and retaining cup at th...

Page 7: ...ng knob and height locking knob and set fence angle at 0 Rotate the height adjustment knob to slide the fence up or down until the indicator point is aligned with the desired dimension on the scale Re...

Page 8: ...l be stronger if you use multiple biscuits placed close together Loosen bevel locking knob and height locking knob and set fence angle at 0 Rotate the height adjustment knob to slide the fence up or d...

Page 9: ...is joined to the face of another board Attaching shelves to bookcases and inner support braces to frames are typical applications Actual cutting of a T joint is as simple as any other cut However it i...

Page 10: ...uit joiner into the power supply and prepare to cut the slot Slide the switch trigger to turn on your biscuit joiner and then push it down to extend the blade into the wood When the base assembly bott...

Page 11: ...all biscuit slots have been cut place a biscuit in each joint and dry assemble the work pieces Make sure each joint lines up and fits Finally disassemble the work pieces and place a bead of glue in ea...

Page 12: ...eces are the same thickness clamp securely to a work bench with the short sides up Set fence angle at 45 place your plate joiner on the work piece with the adjustable fence resting on the short side o...

Page 13: ...all times and prevent any foreign matter from entering If the housing of the biscuit joiner requires cleaning do not use solvents but a moist soft cloth only The grease in the gearbox will require rep...

Page 14: ...com au CARING FOR THE ENVIRONMENT Petrol tools that are no longer usable should not be disposed of with household waste but in an environmentally friendly way Please recycle where facilities exist Che...

Page 15: ...equency use If the tool has been operated on a supply voltage other than that specified on the tool If the tool shows signs of damage or defects caused by or resulting from abuse accidents or alterati...

Reviews: