background image

RT-Base S User Manual


Revision: 151112 


11 


Conformance notices 

Any use or misuse of the RT-Base S, in a manner not intended by OxTS, may impair 
the protection provided. 

The RT-Base S has been tested to, and passed, the following standards: 


EN 

61326-2-1:2013 Electrical equipment for measurement, control and 

laboratory use. EMC requirements. Particular requirements. Test configurations, 
operational conditions and performance criteria for sensitive test and 
measurement equipment for EMC unprotected applications. 


FCC Rules CFR 47:2013 Parts 15.107 & 15.109 Class A. 


EN 60529:1992+A2:2013 Degrees of protection provided by enclosures (IP 
code). 


EN 

61010-1:2010 Safety requirements for electrical equipment for 

measurement, control, and laboratory use. 

EMC 


The antennas used with this transmitter must be installed with a separation of at 
least 23 centimetres from all persons. The antennas must also be separated by at 
least 20 centimetres from each other. 


Only screened Ethernet cables should be used with this unit. 

ESD notice 


The LCD display is sensitive to electro-static discharge (ESD). 


The display may go blank when ESD occurs to some parts of the RT-Base S. 


Other components in RT-Base S continue to operate correctly even if display 
appears blank due to ESD. 

Summary of Contents for RT-Base S

Page 1: ...Confidently Accurately RT Base S Portable GNSS Base Station User Manual ...

Page 2: ...ll brand names are trademarks of their respective holders The software is provided by the contributors as is and any express or implied warranties including but not limited to the implied warranties of merchantability and fitness for a particular purpose are disclaimed In no event shall the contributors be liable for any direct indirect incidental special exemplary or consequential damages includi...

Page 3: ...t repair at an authorised location only Determination of replacement or repair will be made by Oxford Technical Solutions Limited personnel or by personnel expressly authorised by Oxford Technical Solutions Limited for this purpose In no event will Oxford Technical Solutions Limited be liable for any indirect incidental special or consequential damages whether through tort contract or otherwise Th...

Page 4: ...enna location and setting up the tripod 13 Connecting the GNSS antenna and radio modem cables 15 Powering up and monitoring the RT Base S 16 The control panel 16 Configuring the RT Base S using NAVbase 20 Check your IP settings 21 The NAVbase interface 22 Position manager 27 Downloading and converting the internally logged correction data 29 Attaching the second modem 31 Changing the differential ...

Page 5: ...the area which are also connected to similar radio modems receive the correction information and take it into account when calculating their own position measurements Removing the errors results in more accurate position estimates A base station identifies the errors affecting GNSS signals in one of two ways If the base station is placed at a precisely surveyed location it calculates a GNSS positi...

Page 6: ...o average its position over time It can then estimate the errors affecting each satellite it is tracking and broadcast information about those errors using radio modems Nearby GNSS receivers use radio modems to listen for corrections and apply them to the signals from the common satellites reducing the errors in their own position calculations Differential GNSS can work in real time applications b...

Page 7: ...adios which have a much wider range of configurable frequency SATEL 869 MHz band up to 500 mW typically 2 km License free across most of European Union FreeWave 900 MHz band up to 1 W typically 10 km License free in USA Brazil Canada Futaba 2 4 GHz band 10 mW maximum 2 km License free in Japan As an option the RT Base S can broadcast corrections via Wi Fi using an RT XLAN The RT XLAN transmits DGN...

Page 8: ...mponents that are supplied depending on the radio modem being supplied Please note the customer must check that the supplied radio can be used without a license or obtain a suitable license before using the RT Base S Oxford Technical Solutions cannot be held responsible for using this equipment illegally without the correct radio license Figure 2 RT Base S components ...

Page 9: ...ATEL Satelline 3ASd radio modems one modem is pre installed into the RT Base S 2 Radio modem antenna with 3 m cable and magnetic bases Table 4 Additional components when supplied with FreeWave radios Qty Description 2 FreeWave FGR 115RC 900 MHz radio modems one modem is pre installed into the RT Base S 2 Radio modem antenna with 3 m cable and magnetic bases Table 5 Additional components supplied w...

Page 10: ...ing temperature 10 50 C Charge temperature 20 40 C Environment IP65 when lid is secured shut Output format RTCA RTCA2 RTCM RTCMv3 CMR CMR Output interface RS232 serial Ethernet Case dimensions 474 415 149 mm external Mass 11 9 kg inc all accessories Please note The casing of the RT Base S is air tight when closed but it is fitted with a one way valve to release excess pressure If the RT Base S has...

Page 11: ...2013 Parts 15 107 15 109 Class A EN 60529 1992 A2 2013 Degrees of protection provided by enclosures IP code EN 61010 1 2010 Safety requirements for electrical equipment for measurement control and laboratory use EMC The antennas used with this transmitter must be installed with a separation of at least 23 centimetres from all persons The antennas must also be separated by at least 20 centimetres f...

Page 12: ...attery is capable of running the RT Base S for between 24 and 32 hours depending on conditions Before using the RT Base S for the first time and prior to use each day the battery should be fully charged To charge the battery connect the M12 connector on the supplied charger to the connector marked Charge on the RT Base S then plug the battery charger in to the mains supply Note that the M12 connec...

Page 13: ...onnectors are indicated in the image above To disconnect the battery unscrew the connector Selecting a suitable antenna location and setting up the tripod For the RT Base S to work to specification it is essential to put the antenna in a location where it has a clear view of the sky GNSS antennas do not only look for satellites from above they also receive signals from the side down to an elevatio...

Page 14: ...fixed in the ground and can be left behind until the test has finished When operating in hot environments the RT Base S unit should not be left in direct sunlight or the internal temperature may exceed the specification The temperature range of the unit is restricted because of the internal battery Setting up the tripod and antenna 1 The tripod legs use a friction lock to maintain their position T...

Page 15: ...nnectors over or damage may occur If radio modems are being used to transmit and receive DGNSS corrections one of the supplied antennas should be connected to the Radio connector located to the right of the carry handle The radio modem antenna should be placed as high up as possible to ensure good range is achieved but should be located at least 20 centimetres from the GNSS antenna Cable connectio...

Page 16: ...ow the RT Base S behaves The first time an RT Base S is powered up after delivery the default settings are used The default settings tell the RT Base S to average its position over a three minute period once it computes a GNSS position and to broadcast corrections in RTCMv3 format The base station ID will be set to OxTS Creating custom configurations using our NAVbase software is covered in the ne...

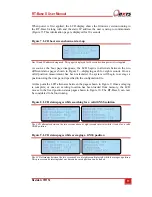
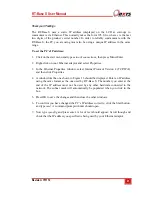
Page 17: ...lculated the system will begin to average a position using the time period specified in the configuration file At this point the LCD alternates between the pages shown in Figure 9 Once averaging is complete or once an existing location has been loaded from memory the LCD moves to the fixed position status pages shown in Figure 10 The RT Base S can now be considered to be functioning Figure 8 LCD s...

Page 18: ...ver the specified time period or a saved location has been loaded Making adjustments using the built in control panel Once the system has booted the Scroll Menu Enter and Back buttons located on the control panel can be used to access the internal menu system This menu system provides an easy way to adjust the main settings used by the RT Base S The layout of the menu system is shown in Figure 11 ...

Page 19: ...menu layout and navigation The settings menu can be accessed at any time from the status pages by pressing the Menu Enter button This image shows how the settings menu is laid out Once an option has been chosen a brief confirmation message not shown here will be displayed ...

Page 20: ...RT Base S for the first time NAVsuite should be installed on your PC To install the software insert the CD into the CD drive and follow the instructions of the installer If the installer fails to run automatically navigate to the CD drive and double click NAVsetup exe Once you have installed the NAVsuite software NAVbase can be launched by pressing the Windows key and typing navbase or by navigati...

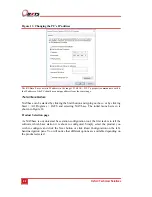
Page 21: ...hernet Properties window select Internet Protocol Version 4 TCP IPv4 and then click Properties 4 A window like the one shown in Figure 13 should be displayed Enter an IP address using the same format as the one used by RT Base S The number you enter at the end of the IP address must not be used by any other hardware connected to the network The subnet mask will automatically be populated when you ...

Page 22: ...and typing navbase or by clicking Start All Programs OxTS and selecting NAVbase The initial launch screen is shown in Figure 14 Product Selection page As NAVbase is our universal base station configuration tool the first task is to tell the software which base station it is about to configured Simply select the product you wish to configure and click the Next button or click Read Configuration on ...

Page 23: ... populates the rest of the configuration pages with default settings These are the same settings that would have been in the RT Base S when it was shipped This is the best option to use unless you specifically want to load an existing configuration using one of the other two options Read settings from folder When this option is selected a box will appear in the lower portion of the window where yo...

Page 24: ...e station can be entered The box will automatically populate to show any base stations that are available on the network Figure 15 The Read Configuration page in NAVbase The Read configuration page tells NAVbase where to get its initial settings Once the desired selection has been chosen click Next to move to the next page or click Settings from the navigation pane on the left hand side Settings p...

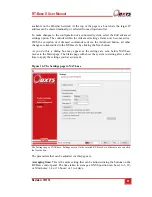
Page 25: ... Base S by clicking the Next button As you do this a dialog box may appear as the settings are sent before NAVbase moves to the Status page The Status page with show the system re starting after a short time to apply the settings you have just sent Figure 16 The Settings page in NAVbase The Settings page of NAVbase Settings are sent to the selected RT Base S via Ethernet once you click the Next bu...

Page 26: ...d commands via this method if instructed to by OxTS support staff Output corrections over Ethernet port 50472 This option tells the system to output raw corrections over Ethernet Output corrections over Ethernet with CCOM wrapper port 50485 This option tells the system to wrap the raw corrections in CCOM before transmitting them over Ethernet Save a copy of output to file When this option is selec...

Page 27: ... uses a specified position or an averaged position to create its corrections The Position manager within NAVbase allows you to manually add locations and upload them to the RT Base S when connected via Ethernet It is also possible to force the RT Base S to start using a location from the Position manager The main interface of the Position manager is shown in Figure 18 To add a new position select ...

Page 28: ...le A dialog will open allowing a location to be chosen To force the RT Base S to start using a position defined in the Position manager select the checkbox next to the desired position then click Use selected position To remove one or more positions from the Position manager select the checkbox next to their Position IDs or to select all positions select the checkbox at the top of the column to to...

Page 29: ...re 19 FTP Data Retrieval window Clicking the Retrieve data button on the Status page opens the window above Select a file from the list and click Ok to download it from the RT Base S to a PC Once downloaded NAVbase gives you the option to convert the binary file into RINEX for use in post processing Because the files stored in the RT Base S are in binary format they will need to be converted to a ...

Page 30: ...30 Oxford Technical Solutions Figure 20 Binary to RINEX conversion after download The window above will appear once binary logged files have successfully been downloaded from the RT Base S via NAVbase ...

Page 31: ...ed with that system Attach the radio modem to the remote user cable and attach the radio modem antenna Once the remote product is powered up and assuming the RT Base S is also powered up and has a fixed location the RD LED on the remote radio modem should flash approximately once per second to show data is arriving Note remember to check that the RT Base S is broadcasting corrections using the sam...

Page 32: ... with RTCA RTCAOBS L1 L2 pseudo range and carrier phase Frequency 1 Hz RTCAREF base station position Frequency 0 1 Hz RTCA1 pseudo range corrections Frequency 1 Hz Messages output with RTCA2 RTCAOBS2 L1 L2 GNSS GLONASS pseudo range and carrier phase Frequency 1 Hz RTCAREF base station position Frequency 0 1 Hz RTCA1 pseudo range corrections Frequency 1 Hz Messages output with RTCM RTCM3 extended L...

Page 33: ...ed antenna descriptor and set up information Frequency 1 Hz The base station firmware always configures the base station antenna as a Novatel GNSS 702 GGL RTCM1033 base station and antenna descriptor Messages output with CMR CMRREF Frequency 0 1 Hz CMROBS Frequency 1 Hz CMRGLOOBS Frequency 1 Hz CMRDDESC Frequency 0 1 Hz Messages output with CMR CMROBS Frequency 1 Hz CMRPLUS Frequency 1 Hz ...

Page 34: ...ion gets this position wrong then the remote GNSS receivers will also be wrong They will be correct relative to the base station but they will have the same error on the earth that the base station has This is important when turning the RT Base S off and on again See Figure 22 Figure 21 Shifting base station antenna example The problem of shifting the antenna typically occurs when The tripod is kn...

Page 35: ...tenna so it is accurate to 2 cm or better However since the timescale for this is long it is not usually practical except for permanent installations Even when you have a permanent installation it is not required since all it does is allows you to relate your measurements to a surveyor s measurements and this is rarely required To overcome the problem of averaging the save restore feature of the R...

Page 36: ...36 Oxford Technical Solutions Revision history Table 7 Revision history Revision Comments 151102 Initial Version 151112 Update for product names ...

Reviews: