


Installation instructions
31
PROTECTING THE FUTURE
supplying control signals to both inputs. The priority of the inputs LEFT
and RIGHT when switching into the pulse mode remains unchanged.
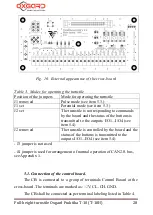
The cross-board is designed with two relay outputs for ACS which operate
under the “dry contact” principle, namely PassOk1 and PassOk2. NO and
COMM means normally opened connection, NC and COMM means
normally closed connection. Actuation of one of the contact groups means
that a passage was performed in a respective direction (PassOk1 – to right,
PassOk2 – to left). “Dry contact” will close/open when the rotatory wicket
door is turned for the angle of 60 degrees. The light emitting diodes D1
and D2 shall signal a relay status with PassOk1 meaning to right and
PassOk2 meaning to left.
The cross-board is designed with a relay output for ACS which operates
under the “dry contact” principle, namely Status. NO and COMM means
normally open connection, whose contacts shall be closed when the
turnstile is switched into the mode AP with simultaneous lighting up of the
D3 diode.
The cross-board is also provided with the following light emitting diodes:
D4 signalizes a supply of a command into the input LEFT.
D5 signalizes a supply of a command into the input RIGHT.
D6 signalizes a supply of a command into the input STOP.
D7 signalizes a supply of a command into the input AP.
Jumper J4 must be installed to be used for connecting the 120 Ohm
resistor to the bus CAN 2.0 in order to provide for its normal operation.
When using two control boards J4 is not installed as the 120 Ohm resistors
are fitted into the terminals CL and CH at the same boards.
Summary of Contents for Praktika T-10
Page 2: ...PROTECTING THE FUTURE...
Page 7: ...Installation instructions 7 PROTECTING THE FUTURE Fig 1 Initial position of the leaves...
Page 21: ...Installation instructions 21 PROTECTING THE FUTURE...
Page 26: ...Full height turnstile Oxgard Praktika 10 T 10H 26 PROTECTING THE FUTURE Fig 14 220 V 12 V...
Page 37: ...Installation instructions 37 PROTECTING THE FUTURE Fig 21 Sample for turnstile installation...
Page 39: ...Installation instructions 39 PROTECTING THE FUTURE...


