4
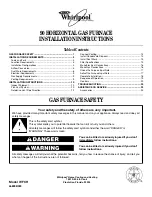
Figure 4. Spring / Stem Assembly Removal
Screws (x2)
Regulator Cover
Assembly
Spring / Stem
Assembly
2 Adjustment Screws
(beneath cap)
2 - Stage Honeywell Valves
Model VR8205Q2381
IMPORTANT NOTE:
When converting to LP/Propane gas from natural gas, the
white stem/spring assembly in the gas valve must be replaced
by the black stem/spring assembly in the kit.
1. Remove two screws securing the pressure regulator cover
assembly to the gas valve. Do not discard the screws. See
Figure 4.
2. Remove the pressure regulator cover assembly from the gas
valve.
3. Remove and discard the existing white spring / stem assembly
from the gas valve.
4. Install the black replacement spring / stem assembly from the
conversion kit.
5. Reinstall the pressure regulator cover assembly onto the gas
valve.
6. Install the two screws (from step 1)and tighten.
7. Affix the label from the conversion kit to the gas valve
GAS PRESSURE ADJUSTMENT
Measuring the Supply Gas Pressure
1. Turn OFF the gas supply at the manual valve located on the
outside of the unit.
2. Using a 3/16” Allen wrench, remove the plug from the inlet
pressure tap (INLET side of gas valve). See Figure 6.
3. Install an 1/8” NPT pipe thread fitting, that is compatible with
a Manometer or similar pressure gauge.
4. Connect the Manometer or pressure gauge to the Inlet Pressure
Tap.
5. Turn ON the main gas supply at the manual valve.
6. Check and adjust the incoming gas line pressure to 11.0-14.0
inches Water Column for LP/Propane gas.
7. Turn OFF the gas supply at the manual valve.
8. Disconnect the Manometer or pressure gauge.
9. Remove the NPT fitting and reinstall the INLET pressure tap
plug. Hand tighten the plug first to prevent cross-threading.
Tighten with 3/16 Allen wrench.
Lighting & Adjustment of the Appliance
WARNING:
FIRE OR EXPLOSION HAZARD
Failure to follow safety warnings exactly could
result in serious injury or property damage.
Never test for gas leaks with an open flame. Use
a commercially available soap solution made
specifically for the detection of leaks to check all
connections. A fire or explosion may result causing
property damage, personal injury or loss of life.
1. Turn ON the manual gas valve, located on the outside of the
unit to the ON position.
2. Check all gas connections for leaks with a soap and water
solution. If the solution bubbles there is a gas leak which must
be corrected.
3. Turn on the electrical power to the appliance.
4. Place the gas valve ON/OFF switch/knob to the ON position.
See Figure 6.
5. Set the thermostat above room temperature to begin the heating
cycle of the furnace.
6. Check that the furnace ignites and operates properly. Refer to
the installation instructions provided with the unit for the normal
operating sequence.
7. After ignition, visually inspect the burner assembly to ensure
that the flame is drawn directly into the center of the heat
exchanger tube. In a properly adjusted burner assembly, the
flame color should be blue with some light yellow streaks near
the outer portions of the flame.
NOTE:
The ignitor may not ignite the gas until all air is bled
from the gas line. If the ignition control locks out, turn the
thermostat to its lowest setting and wait one minute then turn
the thermostat above room temperature and the ignitor will try
again to ignite the main burners. This process may have to be
repeated several times before the burners will ignite. After the
burners are lit, check all gas connections for leaks again with
the soap and water solution.