background image

05

INTRODUCTION

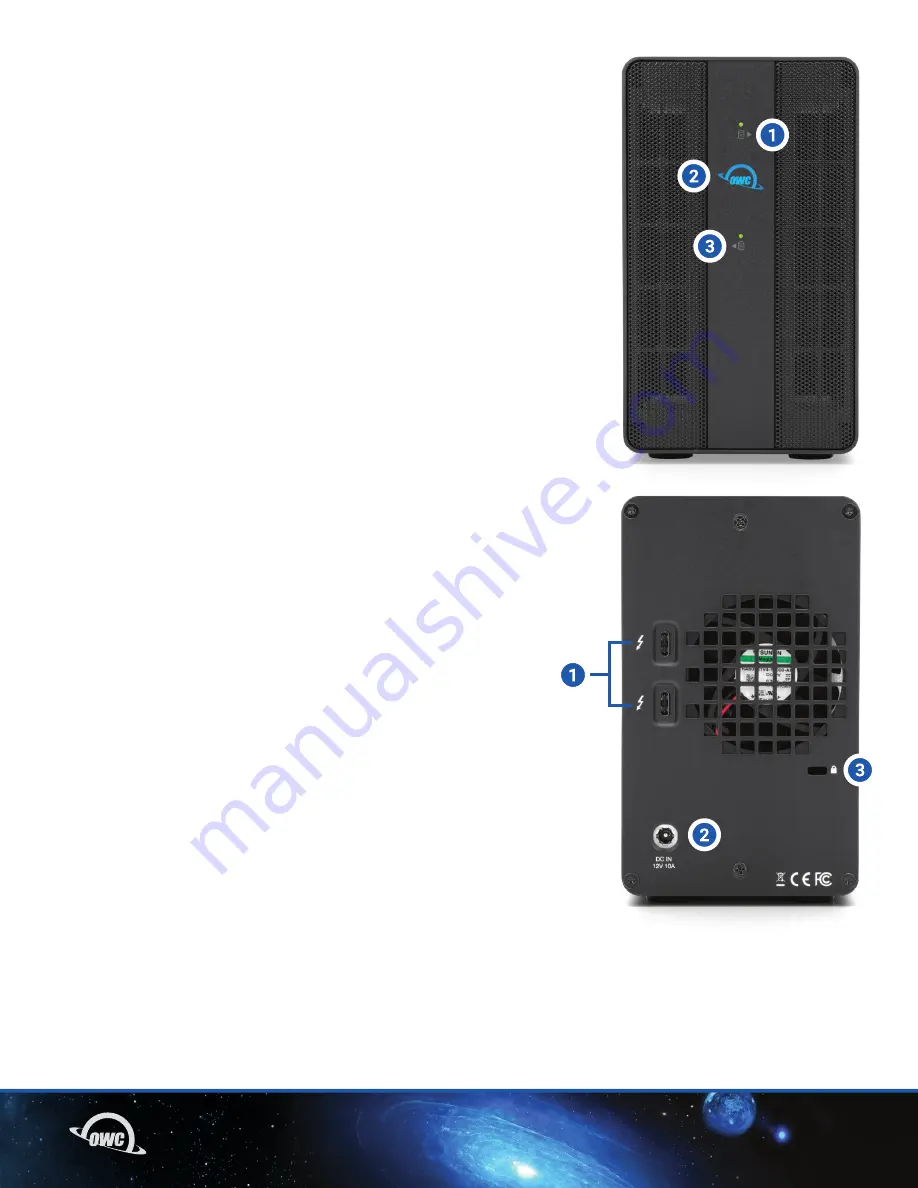
1.4 FRONT VIEW
1.  Drive A LED – light will appear solid green when drive is ready but not 

in use (may not be supported by all drive types); it will flash green 

during read/write operations.

2.  Power LED – solid white when connected to power and solid blue 

when connected to both power and an active host. 

3.  Drive B LED – light will appear solid green when drive is ready  

but not in use (may not be supported by all drive types); it will flash 

green during read/write operations.

1.5 REAR VIEW
1.  Thunderbolt 3 ports – connect one port to your Mac or PC, and chain 

additional Thunderbolt 3 devices to the other port. Each port provides 

up to 15W of bus power.

2.  DC IN – connect the included power supply here.
3.  Kensington Security Slot – connect a Kensington security tether here.

Summary of Contents for MERCURY PRO U.2 DUAL

Page 1: ...kup and edit on the fly with up to 2447MB s real world performance Thunderbolt Compatible with Thunderbolt equipped Macs and PCs NVMe M 2 Powered Solutions use OWC U2 Shuttle adapters with up to eight...

Page 2: ...t This Manual 3 1 4 Front View 5 1 5 Rear View 5 1 6 Usage Notes 6 INSTALLATION 2 1 Quick Start 7 2 2 Drive Installation 7 2 3 Using SoftRAID for Best Performance 8 SUPPORT RESOURCES 3 1 Formatting 9...

Page 3: ...M 2 SSDs Compatible with the OWC Aura P12 series M 2 SSD 1 2 PACKAGE CONTENTS INTRODUCTION OWC Mercury Pro U 2 Dual Thunderbolt 3 cable Power supply and cable Quick start guide 1 3 ABOUT THIS MANUAL T...

Page 4: ...ust during use or storage Dust can build up inside the device increasing the risk of damage or malfunction Do not block any ventilation openings on the device These help to keep the device cool during...

Page 5: ...power and an active host 3 Drive B LED light will appear solid green when drive is ready but not in use may not be supported by all drive types it will flash green during read write operations 1 5 RE...

Page 6: ...he disk icon on your Desktop and press Command E Windows 1 Go to the System Tray located in the lower right corner of your screen Click on the Eject icon a small green arrow over a hardware image 2 A...

Page 7: ...s the OWC U2 Shuttle is sitting flush in the drive carrier the connectors should automatically align 6 Affix the U2 Shuttle to the inner chassis at the locations shown Note the hole for a 2 5 inch U 2...

Page 8: ...Step 2 This completes the assembly process Once you ve completed the installation steps you can format and or RAID the M 2 drives using SoftRAID or the RAID Assistant feature in Apple s Disk Utility a...

Page 9: ...based devices such as the OWC U2 Shuttle used in Mercury Pro U 2 Dual solutions 3 3 ABOUT DATA BACKUP To ensure that your files are protected and to prevent data loss we strongly suggest that you keep...

Page 10: ...ion If this equipment does cause harmful interference with radio or television reception which can be determined by turning the equipment off and on the user is encouraged to try to correct the interf...

Reviews: