


7
C
C
C
h
h
h
a
a
a
p
p
p
t
t
t
e
e
e
r
r
r
2
2
2
H
H
H
a
a
a
r
r
r
d
d
d
w
w
w
a
a
a
r
r
r
e
e
e
I
I
I
n
n
n
s
s
s
t
t
t
a
a
a
l
l
l
l
l
l
a
a
a
t
t
t
i
i
i
o
o
o
n
n
n
2.1 Panel Layout
2.1.1. Front Panel
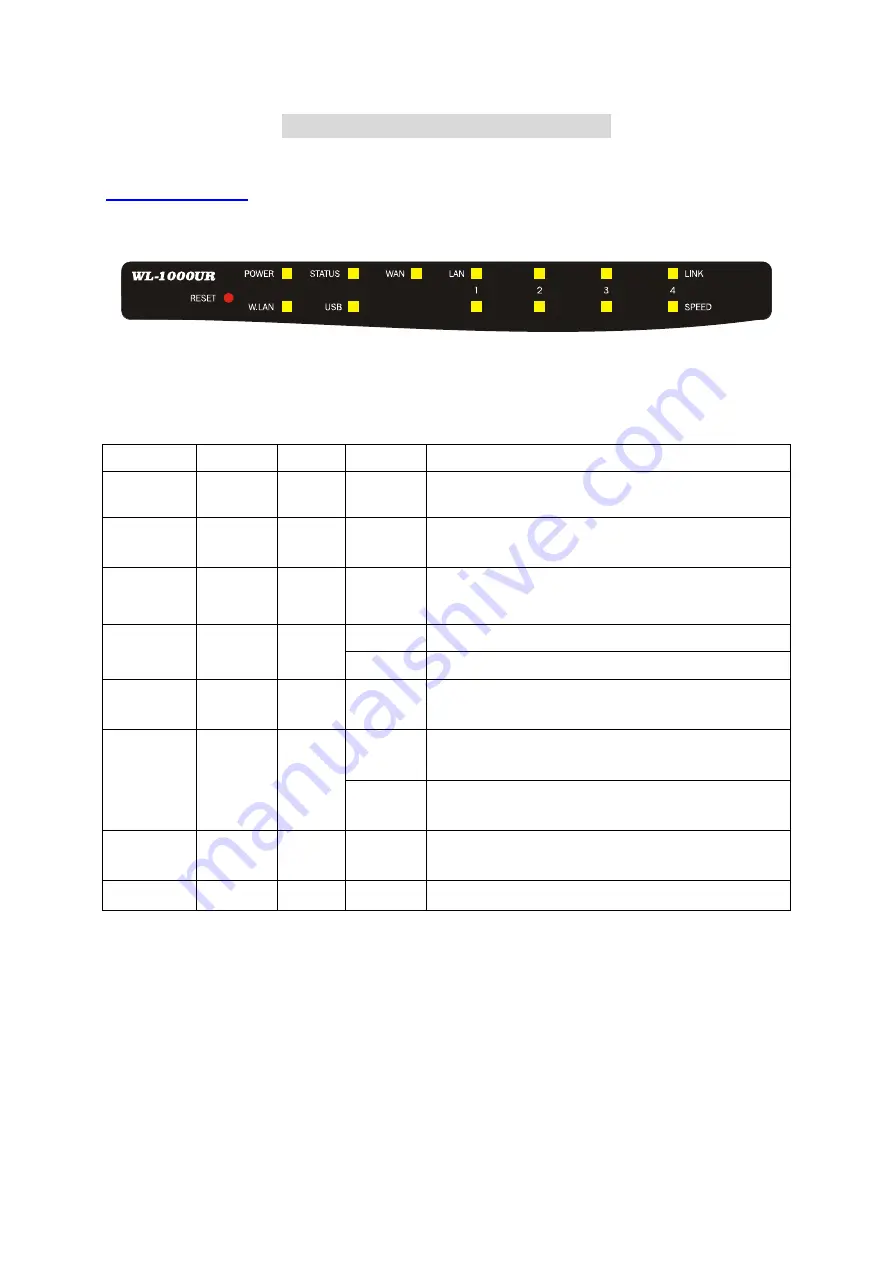
Figure 2-1 Front Panel
LED:
LED Function
Color
Status
Description
POWER
Power
indication
Green
On
Power is being applied to this product.
Status
System
status
Green Blinking
Status is flashed once per second to indicate system
is alive.
USB
USB port
activity
Green
On
The USB port is linked.
On
The WAN port is linked.
WAN
WAN port
activity
Green
Blinking
The WAN port is sending or receiving data.
W.LAN
Wireless
activity
Green
Blinking
Sending or receiving data via wireless
On
An active station is connected to the corresponding
LAN port.
Link/Act.
1~4
Link status Green
Blinking
The corresponding LAN port is sending or receiving
data.
10/100 Data
Rate
Green
On
Data is transmitting in 100Mbps on the
corresponding LAN port.
RESET
Button
To reset system settings to factory defaults
Summary of Contents for AirLive WL-1000UR
Page 1: ...1 AirLive WL 1000UR Broadband Router with Print Server User s Manual...
Page 15: ...15 4 4 Basic Setting 4 4 1 Primary Setup WAN Type Virtual Computers Press Change...
Page 27: ...27 Service Port Server IP Enable 21 192 168 1 1 V 80 192 168 1 2 V 1723 192 168 1 6 V...
Page 30: ...30 4 6 Firewall Settings...
Page 43: ...43 4 7 Advanced Settings 4 7 1 System Time...
Page 53: ...53 4 8 Maintenance...
Page 55: ...55 4 8 2 Firmware Upgrade You can upgrade firmware by clicking Firmware Upgrade button...
Page 63: ...63 2 Select Ports page Click Add Port 3 Select Standard TCP IP Port and then click New Port...
Page 65: ...65 6 Select LPR type lp lowercase letter in Queue Name And enable LPR Byte Counting Enabled...
Page 66: ...66 7 Apply your settings...
Page 68: ...68 2 Click New Forward 1 Enter the Pinter Name Comments then forward...
Page 86: ...86 3 Add and edit some settings...
Page 88: ...88 Choose View available Wireless Networks like below Advanced choose 123kk...
Page 91: ...91 5 Then Choose certificate like above...
Page 92: ...92 6 Then go to Authentication and first Remove EAP TLS and Add EAP TLS again...
Page 93: ...93 7 Go Network and Select 1 and ok...
Page 95: ...95 2 Then Install this certificate and finish 3 Setting on the router and client Router...


