background image

14

Yes, but it is not necessary to do so. The AVIAh comes ready to use. If you desire to format the HDD then first backup all of
the files contained in the "Systems Folder" of the AVIAh before formatting the hard drive (HDD) of this unit. After formatting
the HDD, make a "System Folder" on the AVIAh HDD and copy the back up files into the folder.

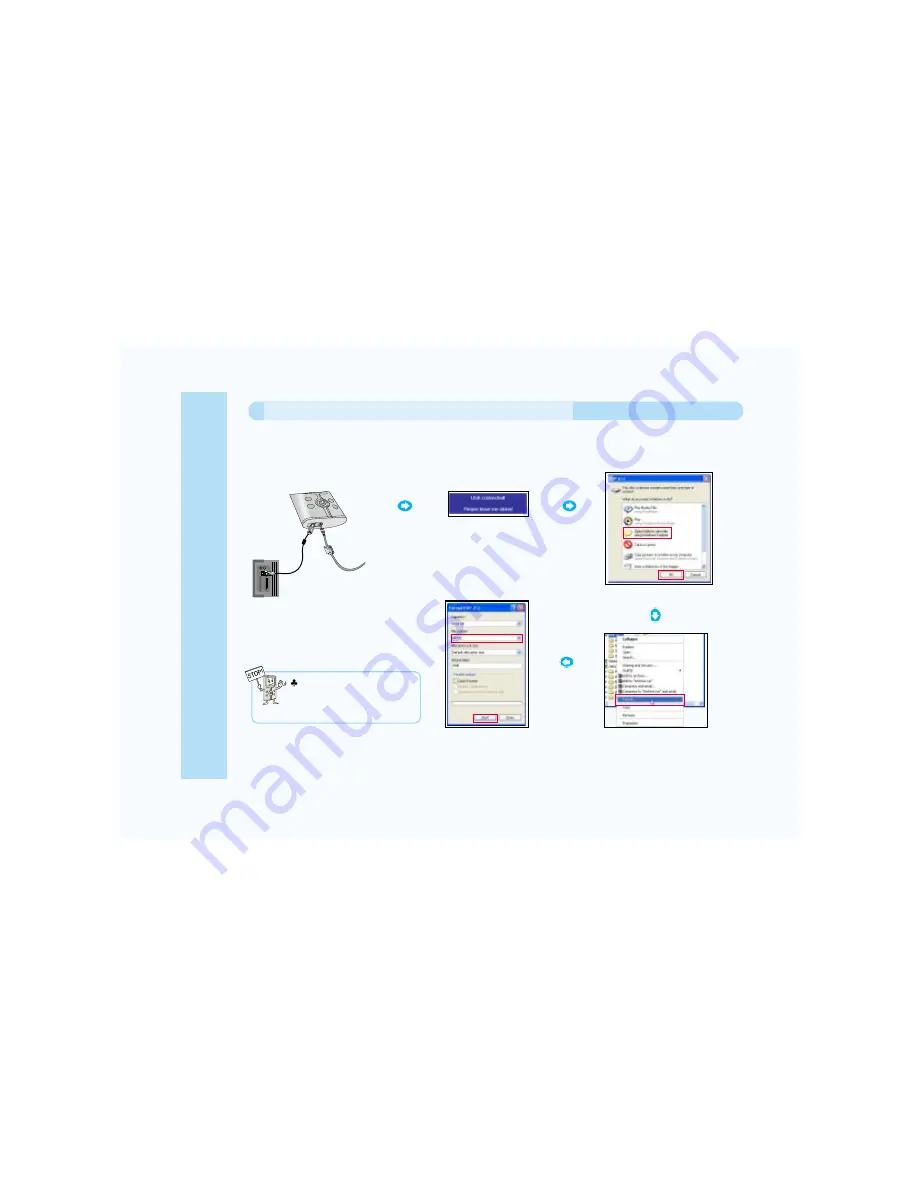
When formatting, select file

system as FAT for 2.5GB hard
disk AVIAh, and FAT32 for 5GB
AVIAh.

Connect the AVIAh to your PC
with the supplied USB cable.

Right Click on the AVIAh folder 
and select " 

FORMAT

".

This message will appear on the
screen of the AVIAh when
connected to the PC via USB.

Press " 

OK

".

Select the Capacity and File
System, then press " 

START

".

Can I format the AVIAh internal Hard Drive?

Before using

Summary of Contents for Aviah Portable Multimedia Recorder and Player

Page 1: ...f its features and operation will allow you to achieve optimum performance and enjoyment Please keep this manual for future reference The content of this manual is furnished for informational use only...

Page 2: ...yed on this Portable Multimedia Recorder Player TV will be clear and bright from any viewing angle The integrated OLED Organic Light Emitting Diode display is a revolution in display technology It off...

Page 3: ...ated audio video input and recording capability of the AVIAH allows you to connect to your DVD or VCR so you can take your favorite video recordings with you wherever you go Real Time Recorder Since t...

Page 4: ...ow do I download files 13 Can I format the AVIAh internal Hard Drive 14 My Portable Media Player is displaying a There is not enough HDD space message 15 16 Is it possible to see files other than mult...

Page 5: ...Image File 31 32 Can I change the Background Images of the On Screen Display 33 When Playing a Moving Picture File 34 36 When Playing Audio Files 37 39 Does the Portable Media Player have an Audio Eq...

Page 6: ...PRODUCT WARRANTY 63 Limited Warranty 64 65 Contents Other Functions Installing Windows 98 SE ME Driver 50 Upgrading Firmware 51 Installing TransC Software on your PC 52 Using AVIAh TransC 53 58 AVIAh...

Page 7: ...Video In Out Cable Battery USB Cable DC Adapter Earphone Ferrite Core Carrying Case Detachable Antenna for Outdoor Power Supply Cord User s manual Indoor Antenna Cable Ferrite Core Accessories are sub...

Page 8: ...CH Portable Multimedia Recorder AVIAh OUT IN DC IN 4 0V USB MIC REC DISP MODE OLED SCREEN VOLUME UP DOWN CHANNEL UP DOWN BATTERY JOG BUTTON MODE DISP AV IN OUT TV ANT EARPHONE USB DC IN ON OFF HOLD R...

Page 9: ...s product and keep this booklet for future reference Copying CD music video image files for sales purpose violates the copyright law Copying all or part of data art presentation protected by copyright...

Page 10: ...r switch on the unit remove the battery and then call your Purchase location for service When smoke or strange smells occur or foreign material is inserted turn off the power then call your Purchase l...

Page 11: ...unit into heating appliances such as a microwave or oven Do not damage the battery by sharp objects awl knife Do not short circuit the battery contacts Do not use this unit while driving or walking Yo...

Page 12: ...o the ON OFF position then release If using the AC adapter turn the power ON OFF using the Sliding ON OFF Switch AFTER the green lamp turns off If the system will not operate Pull the Sliding Switch t...

Page 13: ...e PC recognizes AVIAh as new hardware The AVIAh will appear as a logical HDD on your PC Select a folder or file to be copied from My Computer or File Search Drag and drop the file into the AVIAh HDD Y...

Page 14: ...Folder on the AVIAh HDD and copy the back up files into the folder When formatting select file system as FAT for 2 5GB hard disk AVIAh and FAT32 for 5GB AVIAh Connect the AVIAh to your PC with the su...

Page 15: ...tlined below Please connect Portable Media Player to your PC via the supplied USB cable The Portable Media Player will be recognized as a logical Hard Drive on you PC See example below My Portable Med...

Page 16: ...he DOS prompt type CHKDSK f f and press the ENTER key f is the Portable Media Players Drive Letter This drive letter may be different on your PC f tells Windows to fix any HDD problems After performin...

Page 17: ...et out of the Text File View Mode push down on the Joy stick The AVIAh will also automatically recognize UTF 8 UNICODE UNICODE BE text files However word wrap is not supported for UTF 8 UNICODE UNICOD...

Page 18: ...nal when recording via the antenna will be saved as A0000000 ASF whereas C0000000 ASF is for cable recordings Additional recordings will increase the file number by one The 3 digit numbers immediately...

Page 19: ...nd cable To connect cable antenna when viewing this unit To connect the telescoping antenna when viewing this unit Watch TV by installing the TV outdoor antenna telescoping antenna To connect the indo...

Page 20: ...om the unit as a precaution against the possibility of over discharging the battery Always dispose of spent batteries properly Never throw batteries in a fire as they could explode Always turn the uni...

Page 21: ...button adjusts the earphone volume level CH Button Fn While in TV mode Radio mode Channel Up Down can be selected While in VIDEO PLAY AUDIO PLAY mode While in Playback Mode Repeat Menu and Loop Repea...

Page 22: ...in Menu mode Cursor Key is used STOP Button While in VIDEO PLAY AUDIO PLAY mode This button is used to stop playback of a file While in Menu mode Cursor Key is used OK Button This button is used to se...

Page 23: ...nna The AVIAh reception quality will vary according to the proximity of the broadcast station The further away you are from a broadcast station the weaker your reception will be For watching TV indoor...

Page 24: ...ting can only receive public broadcasting signal While in the Area line item select indoors or outdoors After saving select a desired channel by pressing CH To modify Indoors and Outdoors Mode while w...

Page 25: ...telescoping antenna when there is a strong broadcast signal and for watching TV indoors connect the cable signal to the antenna terminal The cable tuner can receive analog signals it will not accept...

Page 26: ...ECAM B G Asia New Zealand Europe East Europe I PAL I II U K leland Hong Kong South Africa DK PAL D K SECAM D K East Europe China Africa Russia 1 Use the Jog button or direction to select Color System...

Page 27: ...ss the Button Select the Icon Manual Channel Setup PAL SECAM While in Area select ANT1 ANT2 ANT3 ANT4 After saving select a desired channel by CH This function allows you to delete the channel saved b...

Page 28: ...ng on the Search pull down menu If a station is found the search will stop 3 Press the OK button to store it 1 Use the Jog button or direction to select Skip 2 Push the Jog button to direction or dire...

Page 29: ...ave them to the unit s memory Select Auto program Select Area Select Start in Auto program Channel Search starts Area can be done in 4 modes ANT1 ANT2 ANT3 ANT4 There is a possibility for local set up...

Page 30: ...elect a desired channel Area can be done in 4 modes ANT1 ANT2 ANT3 ANT4 After saving select a desired channel by CH When there is a serious noise in the stereo signal setting Forced Mono or Stereo Noi...

Page 31: ...image When deleting an image file without previewing it first a confirmation warning question appears If the CH Button is pressed the following warning question appears Do you want to delete If you s...

Page 32: ...ce The Menu will disappear and the slide show function will run Select the Icon Press the Button When Viewing an Image File with the Slide Show Function When Viewing a Slide Show the Jog Button If the...

Page 33: ...en you save them the file names should be wall jpg and window jpg 3 wall jpg is shown as a background when you push the mode button It is also the background shown in the main menu window jpg is shown...

Page 34: ...MPEG4 DIVX XVID AVI ASF and WMV9 MODE After moving to a desired file pressing the OK Button will allow you to preview the file in a small screen in the upper left side When Playing a Moving Picture Fi...

Page 35: ...s pressed the following warning question appears Do you want to delete If you select YES and press the OK Button the corresponding file will be erased Larger files take longer to delete When deleting...

Page 36: ...ick button to you can advance the video frame by frame The file being played runs once then stops The file being played will be repeated All the files in the folder will be played repeatedly Files to...

Page 37: ...light the desired file Push the jog button to the direction Press OK Button As an audio file is played information on the selected audio file will appear in the upper part of the screen Will be played...

Page 38: ...selected While in the System Setup menu find the OLED Display On Off menu item Activating the OLED Off menu item will turn off the OLED the next time you activate an audio file for playback The OLED...

Page 39: ...ove Loop Repeat Function may not be available If there are audio file A mp3 and A txt file in the same folder together lyrics of the song can be displayed by using OK button after audio file playback...

Page 40: ...the Rock EQ Does the Portable Media Player have an Audio Equalizer 2 While a music file is playing you can also select the EQ manually As the file is playing push the REC button and the EQ selection w...

Page 41: ...he joystick to the left e To add another file to the playlist repeat the above procedure 5 How do I access the playlist a Highlight any folder Except for the return folder and push the CHANNEL button...

Page 42: ...pear Select YES to delete the playlist file 9 How do I play the files in my Playlist a Enter the Playlist mode by highlighting a folder and pushing the CHANNEL button b Highlight a file from the playl...

Page 43: ...the root directory of the portable Media Player Name the file PLAYLIST WPL 3 The WPL file is saved as a windows text file which the Portable Media player is not able to read at this time You will need...

Page 44: ...aximum of 24 hours Once the Portable Media Player reaches the end of the allotted recording time it will automatically stop recording In the Recording Time window if you select the Portable Media Play...

Page 45: ...ode the filename to be saved will be RADIO_0000 REC RADIO_0001 REC and so on After pushing the REC button a Please wait a moment message will appear as the Portable Media Recorder prepares to record A...

Page 46: ...ss Color Sharpness and Tint NTSC AV only to the levels you prefer Repeated pressing of the Button will exit you from the System Set Up Menu Press the Button Select the Icon Adjust your settings after...

Page 47: ...s on the Picture Adjustment menu While Watching TV AV When adjusting images the quick Image Adjusting Menu will be displayed so you can view the changes being made to the current image At this time if...

Page 48: ...ates subtitling on moving picture files The subtitle file should be in the same folder together with the moving picture file same file name smi or file name sami This mode allows Repeat Menu Setting o...

Page 49: ...o mode when 3 minutes elapses without signal reception the power will turn off automatically Automatically turns power off after a fixed time Time range can be set from 10 to 240 minutes None 10 20 30...

Page 50: ...or a driver installation At that point insert the supplied installation CD into CD ROM drive 1 Press the Next button 2 Press the Next button 5 Press the FINISH Button 4 Press the Next button 3 Input t...

Page 51: ...will be complete Press the Button Select the Icon Upgrading Firmware The downloaded firmware file should be saved in the System Folder If there is no firmware upgrade file the following screen will ap...

Page 52: ...d on the Installation CD Click the TransC icon on the installation CD to begin installation 1 Press the Next button 2 Press the Next button 3 Designate where you would like the program to be installed...

Page 53: ...1 Select Control Panel 2 Select Sound and Audio Devices 3 Select Hardware and press Video Codec 4 You can view Video Codec and Audio Codec installed in PC from the list AVIAh supports the following C...

Page 54: ...me Conversion Function mov qt mp4 AVI XviD format WMV format MP4 format DVD Conversion Function ifo vob AVI XviD format WMV format MP4 format Moving picture with box mark File supported in AVIAh Movin...

Page 55: ...h 4 Select AVI Format When running AVIAh TransC the following will be displayed in the screen 1 Select VCD MPEG AVI WMV ASF converter 2 Select Open VCD MPEG AVI WMV ASF VOB files Continues in the next...

Page 56: ...n File Format 6 Select Other Video Codec and press Config 8 Select the MP3 Codec then the Audio Bitrate Mode Sampling Audio Mode e g 128kBit s 32 000 Hz stereo After selecting specify in the Browse me...

Page 57: ...en the Codec installed onto your PC causes a problem only a portion of the file can be transformed Please install a stable and well recognized Codec onto your PC To change file formats such as RealVid...

Page 58: ...ing This will allow for better quality moving pictures If the transcoded moving picture quality is not acceptable set the resolution higher than normal which will allow for better quality moving pictu...

Page 59: ...crosoft ISO MPEG4 Supports up to Max Resolution 720 480 AVI DivX XviD etc Supports up to Max Resolution 720 480 WMV9 Supports up to Max Resolution CIF 352 288 Supports Resolution 352 240 288 3 Screen...

Page 60: ...ed by accident misuse abuse neglect fire flood lightning or other acts of nature 2 Damage caused during shipment or handling 3 If you drop or hit the unit This unit has a built in one inch hard drive...

Page 61: ...which can be determined by turning the equipment off and on the user is encouraged to try to correct the interference by one or more of the following measures Reorient or relocate the receiving anten...

Page 62: ...ding power switch is in the HOLD position If it is slide it out of the HOLD position to restore functionality to all the buttons The HOLD feature is used to disable the buttons in order to avoid accid...

Page 63: ...requesting repair for warranty service please present this warranty with the date of purchase recorded During the warranty period we will repair any defect in material occurred under normal conditions...

Page 64: ...d States of America and Canada Obtaining Warranty Service To obtain service on your product take the defective product to an authorized Ovideon service center or ship it freight prepaid to said servic...

Page 65: ...ation to the length of this warranty Exclusions to Warranty Ovideon s liability for any defective product is limited to the repair or at Ovideon s option replacement of the product Ovideon shall not b...

Page 66: ...Note 66...

Page 67: ...Note 67...

Page 68: ......

Reviews: