


13 Labeling tape cartridges
Attaching a bar code label to each tape cartridge enables the Library
and application software to identify the cartridge quickly, thereby
speeding up inventory time. Make it a practice to use bar code labels
on your tape cartridges.
IMPORTANT:
The misuse and misunderstanding of bar code technology can result
in backup and restore failures. To ensure that your bar codes meet
quality standards, always purchase them from an approved supplier
and never print bar code labels yourself.
LTO tape cartridges have a recessed area located on the face of the
cartridge next to the write-protect switch. Use only this recessed area
for attaching the adhesive-backed bar code label. Only apply labels as
designated.
14 Loading tape cartridges
You can use the mailslot to import and export tape cartridges. To load
or unload more tape cartridges at a time, you can remove the magazines
and load the cartridges into them. Use the front panel Operations >
Unlock Left Magazines option to release the left magazines. If
requested, provide the administrator password to access the magazines.
Pull both magazines straight out of the front of the Library.
The lower left magazine, which is designated by a white dot on the
lower right corner, has a three-slot mailslot in the front of the magazine.
Leave the three slots in the front of the magazine empty if you plan to
enable the mailslot.
Insert the tape cartridges into the magazines.
Replace the magazines in the Library.
Repeat for the right magazines.
15 Verifying the installation
Verify that the Library has the most up-to-date firmware revision and
upgrade the firmware if necessary. You can upgrade firmware from
the OCP using a USB flash drive or through the RMI.
To see the firmware revision of the Library on the front panel:
1.
Use the control keys to navigate to Info > Identity > Library.
2.
The Library Controller FW Revision field shows the Library
firmware revision.
16 Configuring additional features
The Library has many features to customize for your organization. See
the Addendum included with the product documentation and the 2U
Tape Library and 4U Tape Library user and service guide for more
information about these features and instructions for their configuration.
• Partitioning a Library into logical libraries.
• Configuring IPv6 networking.
• Enabling and configuring SNMP network management.
• Naming the Library.
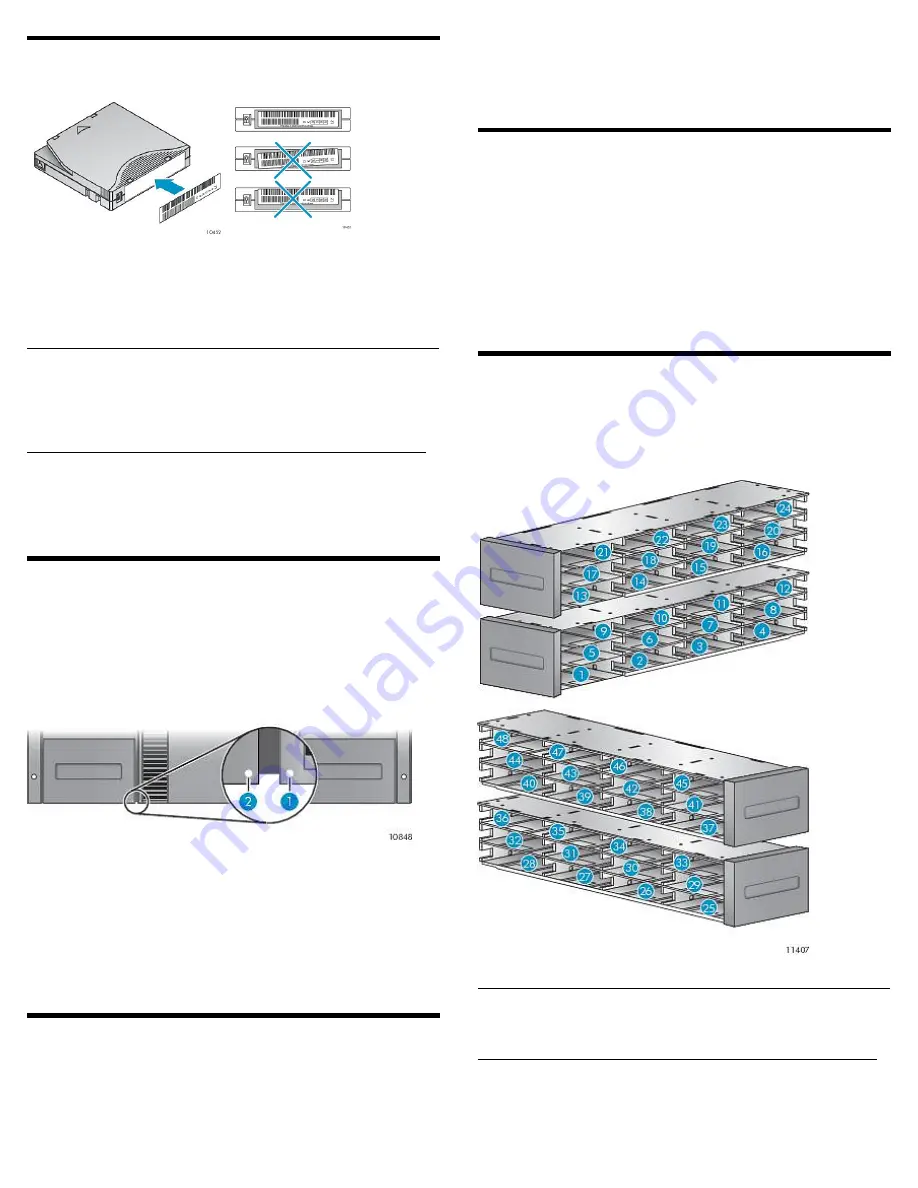
Slot numbering (without the mailslot
enabled)
To use the mailslot feature, leave the bottom slot in the front of the left
magazine empty. The rest of the slot numbers are adjusted as shown.
NOTE:
When the mailslot is enabled, the slots in the lower-left magazine
are numbered as below. All other slots are renumbered.
Page 8
Summary of Contents for NEO 400S
Page 10: ...OCP menu Page 10...


