background image

62


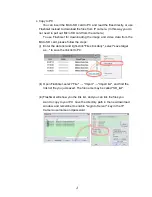
c. Copy to PC 

You can insert the Micro SD card to PC and read the files directly, or use 

FlashGet instead to download the files from IP camera. (In this way you do 

not need to pull out Micro SD card from the camera.) 

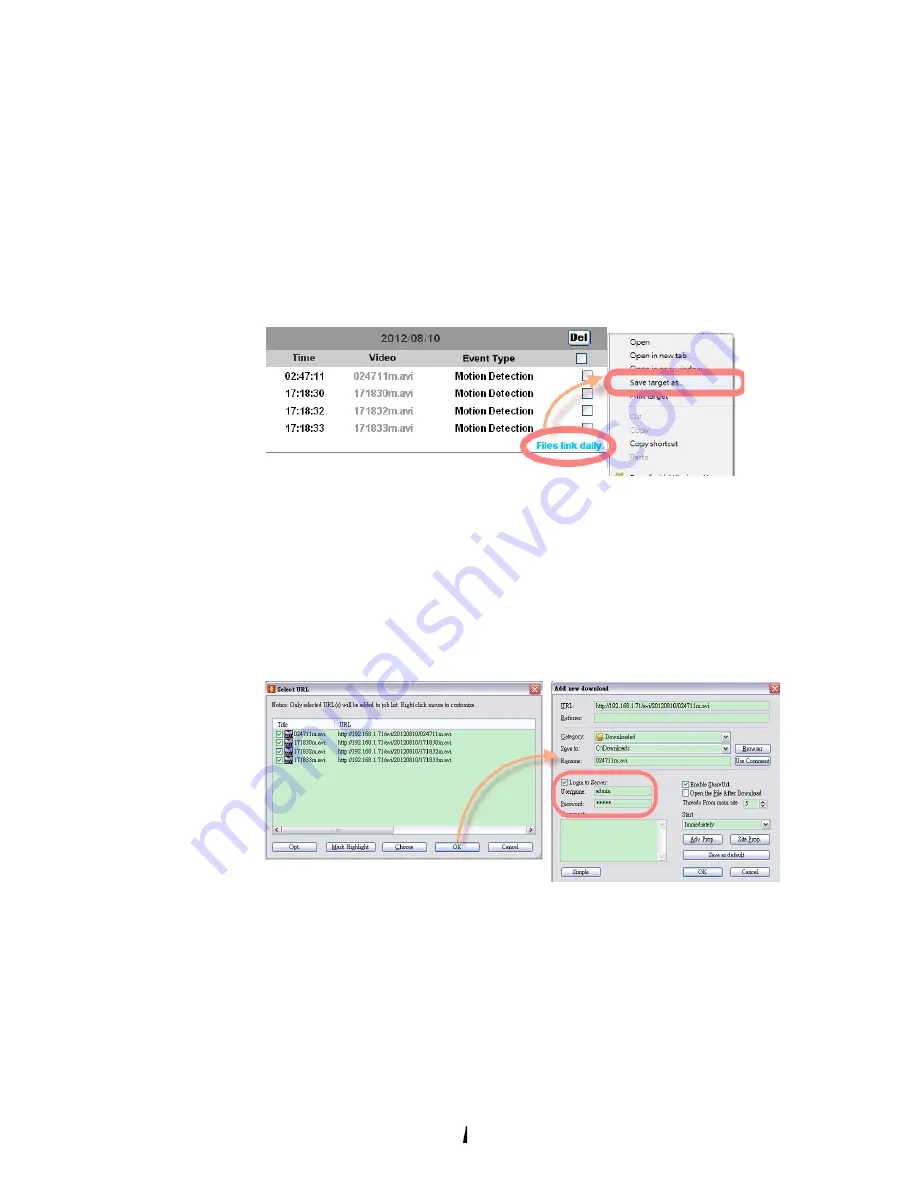
To  use  FlashGet  for  downloading  the  image  and  video  data  from  the 

Micro SD card, please follow the steps: 

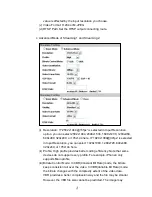
(i) 


(ii) 

Enter the data list and right-click "Files link daily", select "save target 

as..." to save the link list to PC. 


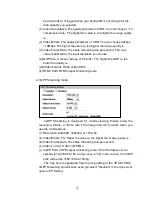
Open FlashGet, select "File"  → "Import" → "Import list", and find the 
link list file you just saved. The file name may be called "SD_list". 


(iii) FlashGet will show you the link list, and you can tick the files you 

want to copy to your PC. Give the directory path in the new download 

window, and remember to enable "Login to Server": key in the IP 

Camera username and password. 

Summary of Contents for OVC-5bvir

Page 1: ...User Manual WEATHERPROOF IP CAMERA ...

Page 2: ...CT THROUGH VENTILATION GRILLS CAUTION CAUTION RISK OF ELECTRIC SHOCK DO NOT OPEN CAUTION TO REDUCE THE RISK OF ELECTRIC SHOCK DO NOT REMOVE COVER OR BACK NO USER SERVICEABLE PARTS INSIDE REFER SERVICING TO QUALIFIED SERVICE PERSONNEL COPYRIGHT THE TRADEMARKS MENTIONED IN THE MANUAL ARE LEGALLY REGISTERED TO THEIR RESPECTIVE COMPANIES ...

Page 3: ...duct Installation 7 Monitor Setting 7 Hardware Installation 8 IP Assignment 10 Install ActiveX control 12 Live Video 18 IP Camera Configuration 20 System 21 Network 26 A V Setting 48 Event List 55 Network Configuration 64 I O Configuration 66 Factory Default 69 Micro SD Card Compatibility 70 ...

Page 4: ... application Product Specifications Main Features 5 Megapixel IR Bullet IP Camera External Vari focal lens adjustment 3D 2D Digital Noise Reduction Support Digital Wide Dynamic Range Power over Ethernet available IR LED Built in 25M available Mechanism IR Cut Filter Available H 264 M JPEG MPEG4 compression Micro SD card backup option Video Output IP66 3 Axis Bracket Management Support iPhone iPad ...

Page 5: ... 10 100 Base T Network Protocol HTTP HTTPS SNMP QoS DSCP Access list IEEE 802 1X RTSP TCP IP UDP SMTP FTP PPPoE DHCP DDNS NTP UPnP 3GPP SAMBA Bonjour Wireless Optional Wireless 802 11b g n Security WEP WPA PSK WPA2 PSK System Video Resolution 2592x1944 15fps 2048x1536 20fps 1920x1080 30fps 1280x720 30fps 640x480 30fps 320x240 30fps 176x144 30fps Video Adjust Brightness Contrast Hue Saturation Shar...

Page 6: ...ely Simultaneous Connection Up to 10 Micro SD card management option Recording Trigger Motion Detection IP check Network break down wire only Schedule DI Video Format AVI JPEG Video Playback Yes Delete Files Yes Client System requirement OS Windows 7 2000 XP 2003 Microsoft IE 6 0 or above Chrome Safari Firefox Mobile Support iOS 4 3 or above Android 1 6 or above Hardware Suggested Intel Dual Core ...

Page 7: ...7 III A Product Installation Monitor Setting 1 Right Click on the desktop Select Properties 2 Change color quality to highest 32bit ...

Page 8: ...cording to the network environment About I O setting please refer to chapter VII in User Manual I OConfiguration for detail 2 You can use 3 Axis bracket to adjust the angle of camera Please lock the screws tightly to fix the angle after adjusting 3 This IP camera is equipped with an external vari focal lens controller Please adjust ZOOM and then FOCUS as following picture until the image gets clea...

Page 9: ...nd make sure it s sealed 5 PoE Power Over Ethernet 802 3af PoE Switch is recommended Power over Ethernet PoE is a technology that integrates power into a standard LAN infrastructure To use PoE for powering please use the same cable and ethernet connector as what used for network connection and DC 12V power adapter is not needed ...

Page 10: ...rsions of IP installer Choose one as your need IPInstallerCht exe Chinese version IPInstallerEng exe English version 3 There are 3 kinds of IP configuration a Fixed IP Public IP or Virtual IP b DHCP Dynamic IP c Dial up PPPoE 4 Execute IP Installer 5 For Windows XP SP2 user the following message box may pop up Please click Unblock 6 IP Installer configuration ...

Page 11: ...the parameter and click Submit It will apply the change and reboot the Device 9 Please make sure that the IP address of your PC and IP Camera are on the same subnet The same Subnet IP CAM IP address 192 168 1 200 PC IP address 192 168 1 100 Different Subnets IP CAM IP address 192 168 2 200 PC IP address 192 168 1 100 To Change PC IP address Control Panel Network Connections Local Area Connection P...

Page 12: ...refer to Chapter V A 2 UserManagement D Install ActiveX control 1 To users of IE 6 0 above At the first time you access the camera via IE it will ask you to install the ActiveX component If the installation failed please check the security setting for the IE browser a Follow the steps IE Tools Internet Options Security Tab Custom Level Security Settings Find the option Download unsigned ActiveX co...

Page 13: ...13 1 2 3 4 5 When popup the following dialogue box click Yes ...

Page 14: ...ls Internet Options Security Tab Trusted sites Add the IP address and click OK In the site list you can key one single IP address or a LAN address For example if you add 192 168 21 all the IP address under 21 LAN will be regarded as trusted sites ...

Page 15: ...re below First Click the link Firstly please install Microsoft Visual C 2010 Redistributable Package x86 i ii The link conducts you to the Microsoft official site that you can download the tools Please select the language and click download In the pop up window please tick the first and the third file as the picture below Click Next to download both Microsoft NET Framework 4 Client Profile Web Ins...

Page 16: ...ws may ask you to reboot the PC when the installation finished b Then Click the second link Please click here to download the installation program which does not support IE browser to download Setup ActiveX After fininshing downloading execute the files to install ActiveX Then restart the browser ...

Page 17: ...lease use the search bar on the top right of the Windows Explorer ii Delete all the files named np_hoem_x dll They re the ActiveX control tools having been installed in your computer but the old version of ActiveX might not compatible with the new version of browser Therefore we delete them in order to install the latest ActiveX control iii Start your web browser and repeat the step 2 b Download t...

Page 18: ... address field It will show the following dialogue box Key in the user name and password The default user name and password are admin and admin When the IP Camera is connected successfully it shows the following program interface 1 Get into the administration page 2 Video Snapshot ...

Page 19: ...ecord Stop The video format is AVI Use Microsoft Media Player to play the recorded file 3 Mute Turn off the audio Click again to turn on it The mute button does not affect the playback recording video As long as the IP Camera to PC option in the audio setting is enabled all the audio will be recorded into the playback video even you click mute in the live page 4 Full Screen Full screen mode 5 ZOOM...

Page 20: ...20 V IP Camera Configuration Click to get into the administration page as below Click to back to the live video page ...

Page 21: ...nguages to choose from When you change the language it will show the following dialogue box for confirmation b OSD Setting Select a position where date time stamp text showing on screen Click Text Edit to adjust the OSD text contents Alpha means background transparency of the text If you select 100 the text stamp will be directly displayed on the live screen If you select 0 the text stamp will be ...

Page 22: ...s time Manual The date and time remain the same Server Time It shows current IPCam server time Date Format Select the date display format Time Zone Select your time zone It affects server time when you use NTP time Enable Daylight Saving Give the start and end daylight saving time ...

Page 23: ...he NTP Server is under WAN the camera must be set to access WAN Synchronize with PC s time In Date and Time column it shows your current PC time Click Apply to make the camera time the same with PC time Manual Key in the date and time and click Apply The date and time remain the same After you select Synchronize with PC s time or Manual and click Apply the selected mark will jump to this option ...

Page 24: ... page the camera will ask you to key in the username and password to log in Select No and then username and password are required to access the camera b Add user Type the user name and password then click Add Set The guest user can only browse the live video page and is not allowed to enter the configuration page c Click edit or delete in the user list to modify them The system will ask you to key...

Page 25: ... now b Reboot system re start the IP camera c Factory default delete all the settings in this IP camera d Setting Management User may download the current setting to PC or upgrade from previous saved setting i ii Setting download Right click the mouse button on Setting Download Select Save AS to save current IP CAM setting in PC Select saving directory Save Upgrade from previous setting Browse sea...

Page 26: ...at provides a much larger address pool than IPv4 which accounts for most of today s Internet traffic You can manually key in IPv6 address enable DHCPv6 and use automatically generated IPv6 address simultaneously i ii Manually setup the IPv6 address Key in Address Gateway and DNS DHCPv6 If you have a DHCPv6 server enable it to assign the IPv6 automatically The assigned IP address will be displayed ...

Page 27: ... computer the camera will automatically be detected and a new icon will be added to My Network Places i ii UPnP Port Forwarding When the camera is installed under a router Enable UPnP Port Forwarding to let the router open ports so that the video streams can be sent out from a LAN Set Web Port Http Port and RTSP port and make sure your router supports UPnPTM and the function has been activated Not...

Page 28: ...e and click Show icons for networked UPnP devises in the tasks column on the left of the page Windows may ask your confirmation for enabling the components Click Yes Now you can see the IP devise under the LAN Double click the icon to access the camera via web browser To disable the UPnP click Hide icons for networked UPnP devises in the tasks column ...

Page 29: ... Digest authentication mode the camera asks the user to give username and password before allows accessing The password is transmitted as clear text under basic mode which provides a lower level of security than under digest mode Make sure your media player supports the authentication schemes iii RTSP Port setup port for RTSP transmitting Default 554 iv RTSP Start and End Port in RTSP mode you may...

Page 30: ...en accessing the camera via ONVIF Select Enable then username and password are necessary iii RTSP Keepalive When the function is enabled the camera checks once in a while if the user who links to the camera via ONVIF still keeps connecting If the connection had been broken the camera stop transmitting video to user h Bonjour This function enables MAC systems to link to this IP camera Key in the na...

Page 31: ...connection status properties and device position like IP address of this IP Camera in the network map In the computer running Windows Vista or Windows 7 you can find LLTD through the path Call out the Control Panel Network and Internet Network and Sharing Center Click See full map ...

Page 32: ...nnection type it may cause connection error or disconnection error if you switch the protocol directly Therefore Http Https mode is necessary If you want to change from Http to Https please switch to Http Https mode first and then switch to Https mode Vise versa Https protocol has certificate verifying mechanism When the user access a website via Https the browser will check the certificate of tha...

Page 33: ... and click apply iii After you generate a certificate request if you choose to turn it to the trusted third party to verify please click Content and copy all the request content iv According to the certificate source there are two ways to install the ...

Page 34: ...o finish installed it After finishing installation you can click Content to call out and check the certificate content v To use Https to access camera open your browser and key in https IP address in the address bar Now your data will be transmitted via encrypted communications and the browser will check your certificate status If it shows you a warning message That means your certificate is self ...

Page 35: ...d SNMPv2 The term Community name in SNMPv1 and SNMPv2c can be roughly regarded as key The person who has the community name has the authority to read or edit the information of IP camera via SNMP Tick the box to enable SNMPv1 or SNMPv2c protocol and specify the community name for write read and write and read read only The user who use read community name to access the IP camera cannot modify any ...

Page 36: ...only the security name similar with community name in v1 v2c but the password in order to access the IP camera Please set security name authentication type authentication password encryption type encryption password of write and read respectively The security name can be any English characters and numbers and must be shorter than 31 bits The password must be 8 64 bits in length Different from in S...

Page 37: ...ds If you want to add the new user who has read authority key in correct security user name public key in authentication password of read security and key in encryption password of read security iii SNMPv1 SNMPv2 Trap Trap is a mechanism that allows the managed device to send messages to manager instead of waiting passively for polling from the manager Specify the trap event When those events happ...

Page 38: ...onnected again V3 Authentication Failed A SNMPv3 user account tries to get authentication but failed Due to incorrect password or community SD Insert Remove A Micro SD card is inserted or removed Example Open the MIB Browser Use SNMPv1 or SNMPv2 to access the camera When the SNMP setting is edited Manager s MIB Browser 192 168 40 159 will receive the trap message of setting change from IP Camera 1...

Page 39: ...xample IP address 192 168 50 151 161 are not allowed to connect to the camera but only 192 168 50 159 can access Note In the list allow condition must be ranked before deny condition For example if we exchange the sequence set Deny 192 168 50 151 192 168 50 161 for the first item and Allow 192 168 50 159 for the second item in the list the IP 192 168 50 159 turns out to be denied by the camera bec...

Page 40: ...em is 5 10 20 The item getting more bandwidth has lower probability to be delayed There is no difference between setting 0 0 0 or 63 63 63 because under these two setting the three items will get equal bandwidth 1 3 The three stream control the protocols respectively Live Stream Video and audio RTP RTSP Event Alarm FTP SMTP SAMBA SIP Management HTTPS HTTP SNMP Note The Management stream handles bo...

Page 41: ...use this function you need a device to build IEEE 802 1x LAN at first The EAPOL protocol support service identification and optional point to point encryption over the local LAN segment Please check what version of the authenticator and authentication server support This camera supports EAP TLS method Please enter ID password issued by the CA then upload related certificates ...

Page 42: ...c mail account For the mail setting please refer to Server settings b DDNS It supports DDNS Dynamic DNS service i ii Enable this service Key in the DynDNS server name user name and password iii Set up the IP Schedule update refreshing rate iv Click Apply v If setting up IP schedule update too frequently the IP may be blocked In general schedule update every day 1440 minutes is recommended ...

Page 43: ...ddns camddns com Register successfully Update Failed the name is already registered The user name has already been used Please change it Update Failed please check your internet connection Network connection failed Update Failed please check the account information you provide The server user name and password may be wrong ...

Page 44: ...either one or all of them a Mail Setting Set up the server address and account information of your e mail Click Apply to save the setting then use Test button to test the server connection A message box will tell you OK if it works and a test e mail will be sent to receiver s mail address b FTP Set up the server address and account information of your FTP Click Apply to save the setting then use T...

Page 45: ...e FTP server waits for the data transmission connection built by the user Make sure that the server supports the mode you select c Samba Select this option to send the media files via a network neighborhood when an event is triggered Click Apply to save the setting then use Test button to test the server connection A message box will tell you OK if it works and a test document will be created in t...

Page 46: ...ed in the camera the IP camera will use it to link to the Internet instead of wireless router a Status of Wireless Networks The camera scans and shows the SSID Mode Security and Signal Strength of wireless network here b Wireless Setting i ii Mode Infrastructure mode is used to link to the wireless router Ad hoc mode is used to link to the PC directly Domain and Channel options appear only in the ...

Page 47: ...u select 64 bit while 26 characters are allowed if selecting 128bit In ASCII type 5 characters are allowed if you select 64 bit while 13 characters are allowed if selecting 128bit iii Key Type In HEX type the key password can only be hexadecimal numbers In ASCII type the key password can be any letters and numbers Capital and lowercase letters are regarded as different iv Key 1 4 Key in the key pa...

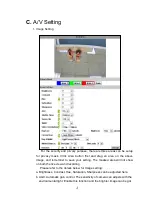
Page 48: ... image and remember to save your setting The masked area will not show on both the live view and recording Please refer to the details below for Image setting a Brightness Contrast Hue Saturation Sharpness can be adjusted here b AGC Automatic gain control The sensitivity of camera can adjusts with the environmental light Enable this function and the brighter image can be got ...

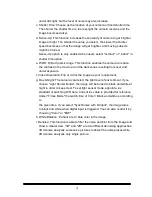
Page 49: ...e f Video Orientation Flip or mirror the image as your requirement g Day Night The camera can detect the light level of environment If you choose Light Sensor Mode the image will be turned to black and white at night in order to keep clear To set light sensor mode appoint a lux standard of switching D N here Current lux value is provided for reference Under Times Mode the switch time of Color Blac...

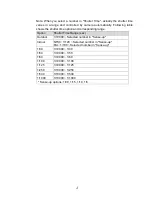
Page 50: ... 30 1 50 1 10000 1 50 1 60 1 10000 1 60 1 100 1 10000 1 100 1 125 1 10000 1 125 1 250 1 10000 1 250 1 500 1 10000 1 500 1 1000 1 10000 1 1000 Sense up options 1 30 1 15 1 10 1 5 Note When you select a number in Shutter Time actually the shutter time varies in a range and controlled by camera automatically Following table shows the shutter time option and corresponding range ...

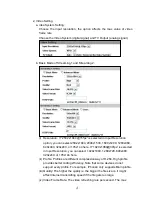
Page 51: ...x960 640x480 320x240 or 176x144 here If 1920x1080 30fps is selected in Input Resolution you can select 1920x1080 1280x720 640x480 320x240 or 176x144 here Profile Profiles are different compression way of H 264 High profile provides better coding efficiency Note that some devises do not support every profile For example iPhone4 only supports Main profile iii Quality The higher the quality is the bi...

Page 52: ...lected in Input Resolution you can select 1920x1080 1280x720 640x480 320x240 or 176x144 here Profile High profile provides better coding efficiency Note that some devises do not support every profile For example iPhone4 only supports Main profile iii Bitrate Control Mode In CBR Constant Bit Rate mode the bitrate keeps consistent all over the video In VBR Variable Bit Rate mode the bitrate changes ...

Page 53: ...Video Format H 264 or M JPEG ix RTSP Path RTSP output connecting route d 3GPP Streaming mode 3GPP Streaming is designed for mobile viewing Please lower the resolution bitrate or frame rate if the image flow isn t smooth when you use the mobile phone i ii Resolution 640x480 320x240 or 176x144 Video Bitrate The higher the value is the higher the image quality is iii Video Frame Rate The video refres...

Page 54: ...P Camera to PC To receive Audio from IP camera select Enable to start this function The Audio compression format can be choosing from 3 options You can also adjust the volume of 2 way audio b PC to IP Camera Tick chatting box in the browsing page then your voice can be propagated from PC to camera If Chatting and Save to SD card are enabled simultaneously the sound quality might be affected and be...

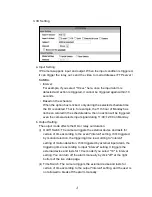
Page 55: ...ger the output devise or save video to FTP Micro SD card Samba If you select save to SD card the video or snapshot will be saved to Micro SD card If you also tick E mail FTP Samba of Log option the motion detection log will be sent to E mail FTP Samba simultaneously Intervel For example if you select 10 sec here once the motion is detected and action is triggered it cannot be triggered again withi...

Page 56: ... JPEG File Single File with Interval Setting Save single JPEG picture file when event happens JPEG Files with Record Time Setting Only when you select JPEG in streaming 1 video format of Video Setting this option can be enabled Select this option to save several JPEG picture files and the successive picture files cover a period of time according to the value you set in Record Time Setting c Record...

Page 57: ...D card is full This function is only enabled under wire connection e Network IP check The same with Network Dis connected function Network IP check is designed for avoiding video loss Even when the Ethernet cable is plugged the network might be sometimes not stable Key in the target IP address and interval The camera checks once in a while according to the setting interval time that if itself can ...

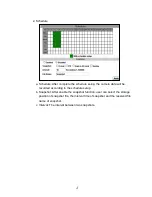
Page 58: ...a data will be recorded according to the schedule setup b Snapshot After enable the snapshot function user can select the storage position of snapshot file the interval time of snapshot and the reserved file name of snapshot c Interval The interval between two snapshots ...

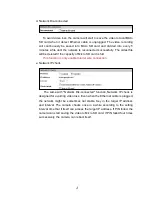
Page 59: ...uring 11 00 12 00 on Monday b Output Setting The output mode affects the DO or relay out duration i ii OnOff Switch The camera triggers the external devise and lasts for certain of time according to the event interval setting If it s triggered by motion detection the triggering time is according to interval setting of motion detection If it s triggered by external input alarm the triggering time i...

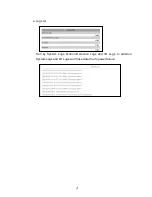
Page 60: ...60 4 Log List Sort by System Logs Motion Detection Logs and I O Logs In addition System Logs and I O Logs won t lose data due to power failure ...

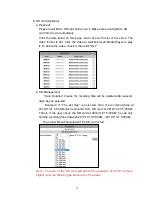
Page 61: ...nt Auto Deletion means the recoding files will be deleted after several days as you selected Example If The 2st day is selected then the recording files at 2012 11 21 5 00AM will be deleted from SD card at 2012 11 23 5 00AM That is if the user check the SD card at 2012 11 21 5 00AM he can only find the recording files between 2012 11 19 5 00AM 2012 11 21 5 00AM The oldest file will be deleted if t...

Page 62: ... card please follow the steps i ii Enter the data list and right click Files link daily select save target as to save the link list to PC Open FlashGet select File Import Import list and find the link list file you just saved The file name may be called SD_list iii FlashGet will show you the link list and you can tick the files you want to copy to your PC Give the directory path in the new downloa...

Page 63: ...63 iv Click OK to start download FlashGet is a free software that can be downloaded from FlashGet official website The example above is based on FlashGet ver 1 9 6 ...

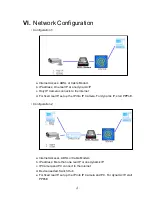
Page 64: ...to the internet d For fixed real IP set up the IP into IP Camera For dynamic IP start PPPoE Configuration 2 a Internet AccessL ADSL or Cable Modem b IP address More than one real IP or one dynamic IP c IP Camera and PC connect to the internet d Device needed Switch Hub e For fixed real IP set up the IP into IP Camera and PC For dynamic IP start PPPoE ...

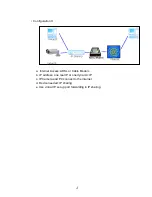
Page 65: ...ation 3 a Internet Access ADSL or Cable Modem b IP address one real IP or one dynamic IP c IP Camera and PC connect to the internet d Device needed IP sharing e Use virtual IP set up port forwarding in IP sharing ...

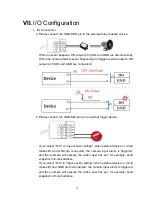
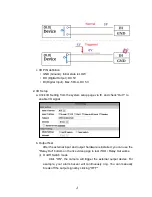
Page 66: ... pin to the external trigger device If you select N O in Input sensor setting when external devise or circuit makes DI and GND pin connected the camera input alarm is triggered and then camera will execute the action user has set for example send snapshot to E mail address If you select N C in Input sensor setting when external devise or circuit makes DI and GND pin disconnected the camera input a...

Page 67: ...check Out1 to enable I O signal b Output Test After the external input and output hardware is installed you can use the Relay Out bottom on the live video page to test if DO Relay Out works i OnOff Switch mode Click ON the camera will trigger the external output devise For example your alarm buzzer will continuously ring You can manually break off the output signal by clicking OFF ...

Page 68: ...68 ii Time Switch mode Click Pulse the camera will trigger the external output devise for several seconds The duration length is according to the interval setting in Output Setting ...

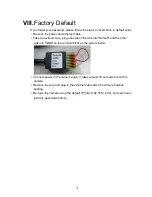
Page 69: ...e plug one side of the wire into Default and the other side into GND on the terminal block as the picture below Connect power to the camera again It takes around 30 seconds to boot the camera Remove the wire and plug in the ethernet cable after the camera finishes booting Re login the camera using the default IP http 192 168 1 200 and user name admin password admin ...

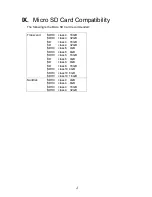
Page 70: ...scend SDHC class4 16GB SDHC class4 32GB SD class4 16GB SD class4 32GB SDHC class6 4GB SDHC class6 8GB SDHC class6 16GB SD class6 4GB SD class6 8GB SD class6 16GB SDHC class10 4GB SDHC class10 8GB SDHC class10 16GB SanDisk SDHC class4 4GB SDHC class4 8GB SDHC class4 16GB SDHC class4 32GB ...

Reviews: