background image


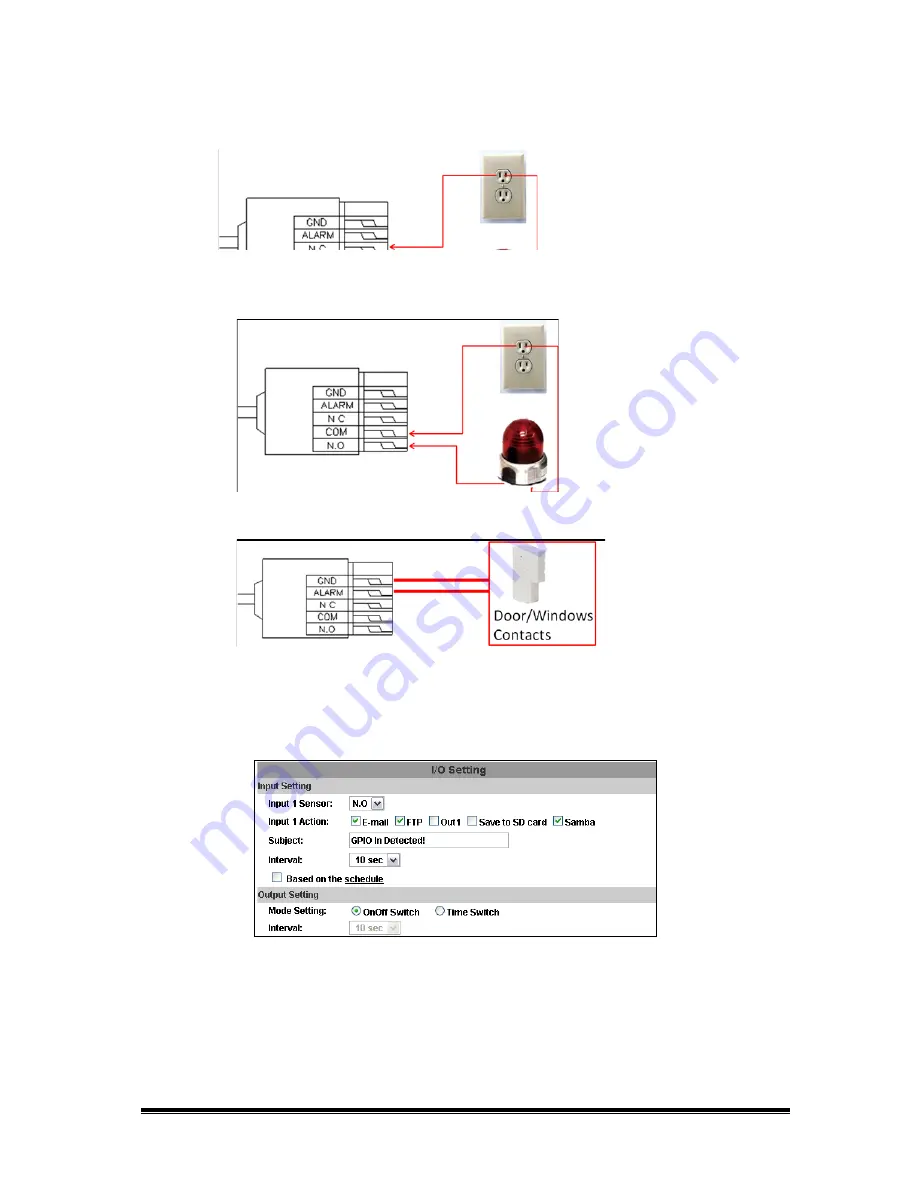
Or 


b. Please connect the GND &Alarm pin to the external Trigger Device. 


•  I/O Setup 

a. Click I/O Setting from the system setup page via IE, and check “Out1” to 

enable I/O signal. 


b. Click ON/OFF from the setup main page via IE to control relay out signal. 

Summary of Contents for OVC-2DVIR

Page 1: ...User Manual 3 AXIS VANDAL DOME IP CAMERA...

Page 2: ...THROUGH VENTILATION GRILLS CAUTION CAUTION RISK OF ELECTRIC SHOCK DO NOT OPEN CAUTION TO REDUCE THE RISK OF ELECTRIC SHOCK DO NOT REMOVE COVER OR BACK NO USER SERVICEABLE PARTS INSIDE REFER SERVICING...

Page 3: ...ITOR SETTING 5 B HARDWARE INSTALLATION 6 C IP Assignment 8 D Install ActiveX control 10 E Live Video 12 IV IP Camera Configuration 14 A System 15 B Network 18 C A V Setting 29 D Event List 36 V Networ...

Page 4: ...ser friendly interface it is an easy to use IP camera which is designed for security application Product Specifications Main Features Full HD 1080P 30fps real time 1 2 7 2Megapixel CMOS Sensor Digital...

Page 5: ...III Product Installation A MONITOR SETTING 1 Right Click on the desktop Select Properties 2 Change color quality to highest 32bit...

Page 6: ...ase refer to chapter V Network Configuration for IP Camera 4 IP Camera Instruction Remove the dome cover and you will see the structure as below 5 Connector Instruction Connect the camera with power a...

Page 7: ...be provided to the network device such as an IP phone or a network camera using the same cable as that used for network connection It eliminates the need for power outlets at the camera locations and...

Page 8: ...es for the IP installer a IPInstallerCht exe Chinese version b IPInstallerEng exe English version 3 There are 3 kinds of IP configuration a Fixed IP Public IP or Virtual IP b DHCP Dynamic IP c Dial up...

Page 9: ...then click OK It will apply the change and reboot the Device 9 Please make sure the subnet of PC IP address and IP CAM IP address are the same The same Subnet IP CAM IP address 192 168 1 200 PC IP ad...

Page 10: ...control For the first time to view the camera video via IE it will ask you to install the ActiveX component If the installation failed please check the security setting for the IE browser 1 IE Tools I...

Page 11: ...1 2 3 4 5 When popup the following dialogue box click Yes...

Page 12: ...in the address field It will show the following dialogue box Key in the user name and password The default user name and password are admin and admin When the IP Camera is connected successfully it sh...

Page 13: ...switch to full screen view Press Esc or double click the video again back to normal mode Right Click the mouse on the video it will show a pop up menu 1 Snapshot Save a JPEG picture 2 Record Start Re...

Page 14: ...IV IP Camera Configuration Click to get into the administration page Click to go back to the live video page...

Page 15: ...mplified Chinese to select When change it will show the following dialogue box for the confirmation of changing language b OSD Setting Select a position where date time stamp text showing on screen Mo...

Page 16: ...ts three different users administrator general user and anonymous user a Anonymous User Login Yes Allow anonymous login No Need user name password to access this IP camera b Add user Type the user nam...

Page 17: ...system re start the IP camera c Factory default delete all the settings in this IP camera d Setting Management User may download the current setting to PC or upgrade from previous saved setting i ii S...

Page 18: ...omatically Static IP Please type in IP address subnet mask gateway and DNS manually b IPv6 Assignment IPv6 is a newer numbering system that provides a much larger address pool than IPv4 which accounts...

Page 19: ...llow the Network Camera to open ports on the router automatically so that video streams can be sent out from a LAN There are three External port can be set Web Port Http Port and RTSP port To utilize...

Page 20: ...r Multicast is a bandwidth conservation technology This function allows several users to share the same packet sent from IP camera To use Multicast appoint IP Address and port here TTL means the life...

Page 21: ...tocol Secure Https can help protect streaming data transmission over the internal on the higher security level Https setting Before setting new request please remove old secure identification at Http...

Page 22: ...P camera you have to prepare a MIB browser or similar tools first SNMPv1 SNMPv2c and SNMPv3 can be enabled simultaneously i SNMPv1 and SNMPv2 The term Community name in SNMPv1 and SNMPv2c can be rough...

Page 23: ...tively The password must be 8 64 bits in length Different from in SNMPv1 and v2c the user have to create an account when using SNMPv3 In the account parameters key in the security name and password yo...

Page 24: ...mmunity SD Insert Remove A Micro SD card is inserted or removed c Access List Enable IP address filter can set IP address which can allow or deny to this camera There are two options single and range...

Page 25: ...attach to a LAN or WLAN The EAPOL protocol support service identification and optional point to point encryption over the local LAN segment Please check what version of the authenticator and authenti...

Page 26: ...account For the mail setting please refer to Mail and FTP settings b DDNS It supports DDNS Dynamic DNS service i ii Enable this service Key in the DynDNS server name user name and password iii Set up...

Page 27: ...ed Update Failed please check the account information you provide The server user name and password may be wrong 4 Server setting There are three choices of server types available Email FTP and SAMBA...

Page 28: ...c Samba Select this option to send the media files via a network neighborhood when an event is triggered...

Page 29: ...n be adjusted here The available values are 4 3 2 1 0 1 2 3 4 B AGC The sensitivity of the camera can adjust to the environmental lighting Enable this function for getting brighter image on low light...

Page 30: ...ty on environments presenting high levels of fog or smoke G Lens Distortion Correction Correct the image in the borders due to the lens angles The available values are OFF 1 2 3 4 5 6 7 8 H Video Orie...

Page 31: ...90 degrees 270 degrees or none On Corridor Mode please take note of the lens position If Corridor Mode is set as 90 degrees or 270 degrees the relation of the image and the camera would be as the fol...

Page 32: ...0x1080 1280x720 640x480 320x240 176x144 Quality There are 5 levels to choose Best High Standard Medium Low The higher the quality is the bigger the file size is It might affect Internet transmitting s...

Page 33: ...trate The quality adjustment of CBR You can choose 32kbps 8Mkbps The higher the value is the higher the image quality is v Video Frame Rate The video refreshing rate per second In Streaming 1 you can...

Page 34: ...i ii 3GPP mode fixed setting 176x144 resolution 5FPS MPEG4 format Enable or Disable 3GPP Streaming 3GPP Path 3GPP output connecting route...

Page 35: ...emote PC mic to IP Camera s external speaker a Audio from IP camera built in mic to local PC select Enable to start this function b Adjust Volume of audio c Check chatting in the browsing page then yo...

Page 36: ...igger the output device or save video to FTP Micro SD card Samba By selecting save to SD card the video or snapshot will be saved to the Micro SD card Also by ticking E mail FTP Samba on the Log optio...

Page 37: ...ight or out of focus the tampering detection will be triggered and send snapshot or video to mail FTP Samba SD card or trigger the external alarm For example Before Tampering Detection Tampering Trigg...

Page 38: ...xample The interval is set for 30 second the camera lens is covered during 10 40 sec At time point B the camera compares the view with time point A and sends an alarm when it founds that the lens is c...

Page 39: ...eo loss the camera will start to save the video to local SD card when it detect no network connection The video recording will continuously be saved into SD card and divided into every 10 minutes a fi...

Page 40: ...l be recorded according to the schedule setup b Snapshot After enable the snapshot function user can select the storage position of snapshot file the interval time of snapshot and the reserved file na...

Page 41: ...amera executes the action according to the interval you choose after triggered 4 Log List Sort by System Logs Motion Detection Logs and I O Logs In addition System Logs and I O Logs won t lose data du...

Page 42: ...the internet d For fixed real IP set up the IP into IP Camera For dynamic IP start PPPoE Configuration 2 a Internet AccessL ADSL or Cable Modem b IP address More than one real IP or one dynamic IP c I...

Page 43: ...IP Camera and PC connect to the internet d Device needed IP sharing e Use virtual IP set up port forwarding in IP sharing VI I O Configuration I O Connection Use the terminal block in the camera as b...

Page 44: ...e GND Alarm pin to the external Trigger Device I O Setup a Click I O Setting from the system setup page via IE and check Out1 to enable I O signal b Click ON OFF from the setup main page via IE to con...

Page 45: ...dome cover Press and hold the button as the picture below Connect power to the camera and do not release the button during the system booting It will take around 30 seconds to boot the camera Release...

Page 46: ...lass4 16GB SDHC class4 32GB SD class4 16GB SD class4 32GB SDHC class6 4GB SDHC class6 8GB SDHC class6 16GB SD class6 4GB SD class6 8GB SD class6 16GB SDHC class10 4GB SDHC class10 8GB SDHC class10 16G...

Reviews: