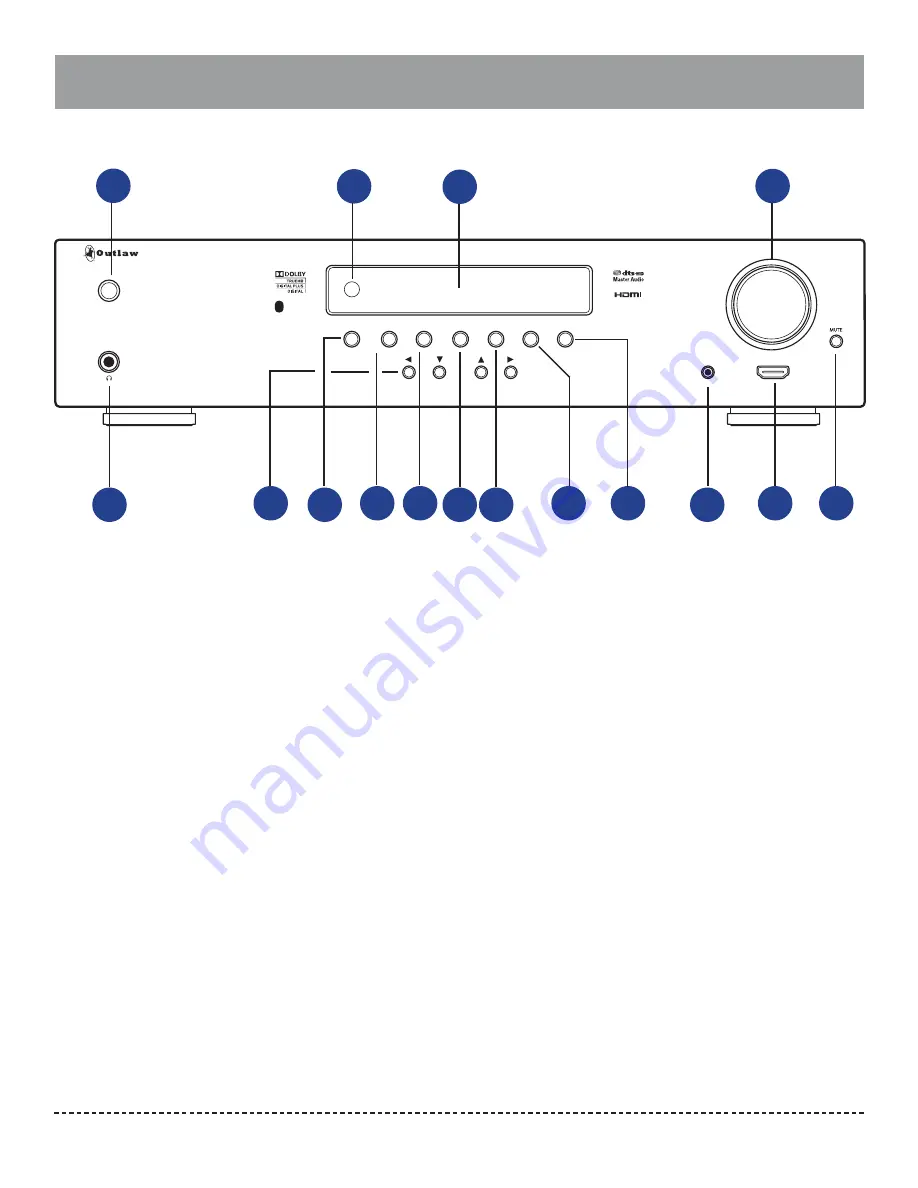
Model 976 Front Panel
Outlaw Audio
8
model 976
INFO
OSD
ENTER
SOURCE
TUNER
PSet
PSet
SET-UP MIC
STANDBY
TUNE
MODE
SURR
MODE
HDMI IN 6
VOLUME
6 IN 2 OUT
4Kx2K
Model 976
Front Panel controls
A
B
C
D
E
G
STANDBY power button
(see page 33)
Pressing this button brings the unit in and
out of standby. When the unit is on, the blue
ring around the button glows brightly and the
front panel display illuminates. When the unit
is in standby, the blue ring glows dimly, and
everything turns off except for the IR sensor and
circuitry.
IR Sensor
(see page 21)
The IR sensor receives commands from the
remote control. Do not block or cover it. If the
unit is inside a cabinet or behind tinted glass
doors, you may need to use an optional external
IR sensor.
Front panel display
(see page 12)
Indicates program source, DSP mode, tuner pre-
set and/or frequency, digital input, volume level,
and other preamp/processor/tuner operating
information. The display is dimmable.
Volume control
(see page 34)
Adjusts the volume level for the pre-outputs and
the headphone jack.
Headphone jack
(see page 38)
Connect a 1/4 inch phone plug (or an adaptor)
here for headphone listening.
A.
B.
C.
D.
E.
Cursor Arrows
(see pages 23, 26, 37, 39, and 40)
These buttons provide navigation control. The Up
and Down buttons also provide Tuner Preset Up
and Preset Down controls.
INFO button
Pushing this button causes the front panel dis-
play to show the input being monitored as well as
the incoming audio format.
TUNER button
(see pages 33 and 39)
This button selects the radio tuner. The front
panel display will show which band (AM or FM) is
active, and the frequency of the station currently
tuned. Pushing the button again will toggle
between AM and FM.
TUNE MODE
button (see page 41)
Toggles between stereo and mono FM tuning
modes when the tuner is selected source and the
FM band is selected.
OSD button
(see page 23)
This button provides access to the on-screen
setup menu.
Enter button
(see page 23)
When navigating the setup menu, pressing this
button will access sub-menus or select high-
lighted options.
F.
G.
H.
I.
J.
K.
SURR MODE button
(see pages 34-35)
Press this button repeatedly to activate matrix
surround sound modes and choose among the
various surround modes provided by the
Model 976. The modes that are available will
depend on whether you are listening to a
2-channel signal or a 5.1 or 7.1 signal, and also
on the loudspeaker confi guration you are using.
Source button
(see page 33)
This button cycles through the input sources.
Setup Mic jack
(see page 30)
Connect the setup microphone to this input jack
to use the automatic setup tool.
HDMI IN 6
(see page 19)
Front HDMI input, HD compatible. Connect the
HDMI output of HD sources.
MUTE button
(see page 34)
This button mutes the pre- outputs and the
headphone output.
L.
M.
N.
O.
P.
Before you connect any audio or video components
to the Model 976, it’s important to understand
how the diff erent buttons, switches, and connec-
tions work. The following two sections off er a brief
explanation of the front and rear panel components
of the Model 976.
F
H
I
J
K
L
M
N
O
P


