background image

35

Outdoor Lifestyles by Hearth & Home Technologies, Inc.  •  TWILIGHT-II-MOD  •  2290-900 Rev. C  •  7/12

12 

12 

Troubleshooting  

With proper installation, operation, and maintenance your gas appliance will provide years of trouble-free service.  If you do 
experience a problem, this troubleshooting guide will assist a qualifi ed service technician in the diagnosis of a problem and 
the corrective action to be taken. This troubleshooting guide can only be used by a qualifi ed service technician.  Contact 
your dealer to arrange a service call by a qualifi ed service technician.

A. Intellifi re Ignition System

Symptom

Possible Cause

Corrective Action

1. Pilot won’t light. 

The ignitor/module 
makes noise, but no 
spark.

A.  Incorrect wiring.

Verify “S” wire (white) for sensor and “I” wire (orange) for ignitor are 
connected to correct terminals on module and pilot assembly.

B.  Loose connections or electrical 

shorts in the wiring.

Verify no loose connections or electrical shorts in wiring from mod-
ule to pilot assembly. Verify connections underneath pilot assem-
bly are tight; also verify connections are not grounding out to metal 
chassis, pilot burner, pilot enclosure, mesh screen if present, or any 
other metal object. 

C.  Ignitor gap is too large.

Verify gap of igniter to right side of pilot hood. The gap should be 
approximately .17 in. or 1/8 in. (3 mm).

D.  Module.

Turn ON/OFF rocker switch or wall switch to OFF position. Remove 
ignitor wire “I” from module. Place a grounded wire about 3/16 in. (5 
mm) away from “I” terminal on module. Place ON/OFF rocker switch 
or wall switch in ON position. If there is no spark at “I” terminal module 
must be replaced. If there is a spark at “I” terminal, module is fi ne. 
Inspect pilot assembly for shorted sparker wire or cracked insulator 
around electrode. Replace pilot if necessary.

2. Pilot won’t light, 

there is no noise or 
spark.

A.  No power or transformer installed 

incorrectly.

Verify that transformer is installed and plugged into module. Check 
voltage of transformer under load at spade connection on module 
with ON/OFF switch in ON position. Acceptable readings of a good 
transformer are between 3.2 and 2.8 volts AC.

B.  A shorted or loose connection in 

wiring confi guration or wiring har-
ness.

Remove and reinstall the wiring harness that plugs into module. 
Verify there is a tight fi t. Verify pilot assembly wiring to module. Re-
move and verify continuity of each wire in wiring harness.  Replace 
any damaged components.

C.  Improper wall switch wiring.

Verify that 110/VAC power is “ON” to junction box.

D.  Module not grounded.

Verify black ground wire from module wire harness is grounded to 
metal chassis of appliance.

E.  Module.

Turn ON/OFF rocker switch or wall switch to OFF position. Remove 
ignitor wire “I” from module. Place ON/OFF rocker switch or wall 
switch in ON position. If there is no spark at “I” terminal module 
must be replaced. If there is a spark at “I” terminal, module is fi ne. 
Inspect pilot assembly for shorted sparker wire or cracked insulator 
around electrode.

3. Pilot sparks, but 

Pilot will not light.

A.  Gas supply.

Verify that incoming gas line ball valve is “open”. Verify that inlet 
pressure reading is within acceptable limits.

B.  Ignitor gap is too large.

Verify gap of igniter to right side of pilot hood. The gap should be 
approximately .17 in. or 1/8 in. (3 mm).

C.  Module is not grounded.

Verify module is securely grounded to metal chassis of appliance.

D.  Module voltage output / Valve/Pilot 

solenoid ohms readings.

Verify battery voltage is at least 2.7 volts. Replace batteries if volt-
age is below 2.7.

Summary of Contents for TWILIGHT-II-MOD

Page 1: ...d on the rating plate Installation and service of this appliance should be performed by qualified personnel Hearth Home Technologies suggests NFI certified or factory trained professionals or technicians supervised by an NFI certified professional Leave this manual with party responsible for use and operation DO NOT DISCARD WARNING Important operating and maintenance instructions included Read und...

Page 2: ... Ne Ne doit pas pas entre entre utilise utilise avec avec un un combustible combustible solide solide This This appliance appliance must must be be installed installed in in accordance accordance with with local local codes codes if if any any if if not not follow follow ANSI ANSI Z223 1 Z223 1 in in the the USA USA or or CAN CGA CAN CGA B149 B149 installation installation codes codes Installer In...

Page 3: ...stions 12 3 Maintenance and Service A Maintenance Tasks Homeowner 13 B Maintenance Tasks Qualified Service Technician 14 Installer Guide 4 Getting Started A Design and Installation Considerations 15 B Tools and Supplies Needed 15 C Inspect Appliance and Components 15 5 Framing and Clearances A Selecting Appliance Location 16 B Clearances 17 C Mantel and Wall Projections 18 6 Termination Locations ...

Page 4: ...IONS This warranty only covers Products that are purchased through an HHT authorized dealer or distributor A list of HHT authorized dealers is available on the HHT branded websites This warranty is only valid while the Product remains at the site of original installation Contact your installing dealer for warranty service If the installing dealer is unable to provide necessary parts contact the ne...

Page 5: ...perated in atmospheres contaminated by chlorine fluorine or other damaging chemicals Over firing can be identified by but not limited to warped plates or tubes rust colored cast iron bubbling cracking and discoloration of steel or enamel finishes and cracking or spalling of refractory or cementitious materials The Product is subjected to prolonged periods of dampness condensation ice or snow There...

Page 6: ...E This appliance is tested and approved as either supplemen tal room heat or as a decorative appliance It should not be factored as primary heat in residential heating calculations NOTICE This installation must conform with local codes In the absence of local codes you must comply with the National Fuel Gas Code ANSI Z223 1 latest edition in the U S A and the CAN CGA B149 Installation Codes in Can...

Page 7: ...sters or any combination thereof Materials that are reported as passing ASTM E 136 Standard Test Method for Behavior of Materials in a Vertical Tube Furnace at 750 ºC and UL763 shall be considered non combustible materials H Combustible Materials Specification Materials made of or surfaced with wood compressed pa per plant fibers plastics or other material that can ignite and burn whether flame pr...

Page 8: ...ly vented gas fu eled heating appliance or equipment The sign shall read in print size no less than one half 1 2 in in size GAS VENT DIRECTLY BELOW KEEP CLEAR OF ALL OB STRUCTIONS Inspection The state or local gas inspector of the side wall horizon tally vented gas fueled equipment shall not approve the installation unless upon inspection the inspector ob serves carbon monoxide detectors and signa...

Page 9: ...p is needed to properly install one HOT SURFACES Glass and other surfaces are hot during operation AND cool down Hot glass will cause burns DO NOT touch glass until it is cooled NEVER allow children to touch glass Keep children away CAREFULLY SUPERVISE children in same room as fireplace Alert children and adults to hazards of high temperatures High temperatures may ignite clothing or other flammab...

Page 10: ... is not present or help is needed to properly install one For more information refer to the instructions supplied with your decorative door or front G Remote Controls Wall Controls and Wall Switches Follow the instructions supplied with the control installed to operate your fireplace For safety Install a switch lock or a wall remote control with child protection lockout feature Keep remote control...

Page 11: ...o smell next to the floor because some gas is heavier than air and will settle on the floor WHAT TO DO IF YOU SMELL GAS DO NOT try to light any appliance DO NOT touch any electric switch do not use any phone in your building DO NOT CONNECT LINE VOLT AGE 110 120 VAC OR 220 240 VAC TO THE CONTROL VALVE Improper installation adjustment al teration service or maintenance can cause injury or property d...

Page 12: ...lt of the curing process of the paint Glass should be cleaned within 3 to 4 hours of initial burning A non abrasive cleaner such as gas appliance glass cleaner may be necessary See your dealer Metallic noise Noise is caused by metal expanding and contracting as it heats up and cools down similar to the sound produced by a furnace or heating duct This noise does not affect the operation or longevit...

Page 13: ...ean CAUTION Risk of Burns The fireplace should be turned off and cooled before servicing When properly maintained your fireplace will give you many years of trouble free service We recommend an nual service by a qualified service technician Doors Surrounds Fronts Frequency Annually By Homeowner Tools needed Protective gloves stable work surface Assess condition of screen and replace as necessary I...

Page 14: ...an be restored by periodic cleaning It is recommended that the glass rock media be rinsed thoroughly with water to remove dust and debris An easy method to clean the glass rock media is to place the contents of the bag into a container of water and mild dish soap Rinse thoroughly with clean water Drain water from container and allow the glass rock media to dry thoroughly before installing into the...

Page 15: ...iance and components from the packaging The decorative doors and fronts may be shipped in separate packages Report to your dealer any parts damaged in shipment particularly the condition of the glass Read all of the instructions before starting the instal lation Follow these instructions carefully during the installation to ensure maximum safety and benefit WARNING Risk of Fire or Explosion Damage...

Page 16: ...esign preference WARNING Risk of Fire The exterior side of the TWILIGHT II MOD CANNOT be recessed into the framing Figure 5 1 Appliance Locations GLASS EXTERIOR INSULATED ENVELOPE GLASS A B B D C 24 INCH MAX B GLASS FLUSH TO EXTERIOR INSULATED ENVELOPE GLASS E C NOTE Appliance may be installed flush on exterior interior or anywhere in between Any projection of the appliance interior or exterior mu...

Page 17: ...other than wood WARNING Risk of Fire Do not install appliance against vapor barriers or exposed insulation Prevent contact with sagging or loose insulation Locate and install appliance to all clearance specifications in manual The chase must be properly blocked to prevent blown insulation or other combustibles from entering and making contact with fireplace Failure to maintain airspace may cause o...

Page 18: ...teel studs concrete board etc Combustible and Non combustible Mantels Indoor only Figure 5 4 Clearances to a Combustible and or Non combustible Indoor Mantel Figure 5 5 Clearances to a Combustible and or Non combustible Indoor Mantel or Mantel Leg 12 11 10 9 8 7 6 13 5 8 12 5 8 11 5 8 10 5 8 9 5 8 8 5 8 7 5 8 HOOD NON COMBUSTIBLE BOARD SUPPLIED ON APPLIANCE INDOOR SIDE ONLY CEILING 35 3 4 MEASUREM...

Page 19: ...he appliance and termination 2 All mechanical air intakes within 10 feet of a termi nation must be a minimum of 3 feet below the appliance hood 3 All gravity air intakes within 3 feet of the appliance hood must be a minimum of 1 foot below the termination This appliance is approved for installation onto screened porches with the following guidelines Figure 6 1 Minimum Clearances for Appliance Open...

Page 20: ...e 7 1 It should overlap building paper to prevent water infiltration Figure 7 1 Positioning the Metal Hearth Strip METAL HEARTH STRIP UNDER EDGE OF APPLIANCE APPLY HIGH TEMPERATURE SEALANT 300 F 149 C min BOTH SIDES APPLIANCE EXTERIOR A Removing Non combustible Facing Ma terial Assembly The non combustible assembly is located on right hand side of appliance when looking from outdoor side of applia...

Page 21: ... to use wood shims Keep nailing tabs flush with the framing Secure the appliance to the framing by using nails or screws through the nailing tabs Placing Flashing and Sheathing Apply high temperature silicone sealant to corner edges of fireplace flange see Figure 7 3 Figure 7 3 Application of High Temperature Sealant Figure 7 4 Header Flashing Installation Install outdoor flashing header sheet met...

Page 22: ...tible sheath ing and MAY extend over the flashing behind non com bustible sheathing a maximum of 1 inch Use high temp silicone or sealant recommended by the manufacturer of the housewrap to seal between combustible sheathing house wrap and non combustible sheathing The sealant material used within 6 inches of the top and 1 inch on the sides of the fireplace surround must be approved to a minimum t...

Page 23: ...n of Non combustible Facing Material Outdoor Side Fire Risk Follow these instructions exactly Facing materials must be installed properly to prevent fire No materials may be substituted without authorization by Hearth Home Technologies Center and attach two top boards the two shorter pieces to the framing members See Figure 7 8 Attach the left and right side pieces to the framing mem bers See Figu...

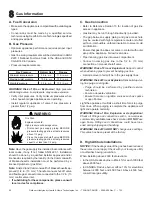
Page 24: ... solution DO NOT use open flame Fittings and connections could have loos ened during shipping and handling WARNING Risk of Fire DO NOT change valve settings This valve has been preset at the factory WARNING Risk of Fire or Explosion High pressure will damage valve Low pressure may cause explosion Verify inlet pressures Verify minimum pressures when other household gas appliances are operating Inst...

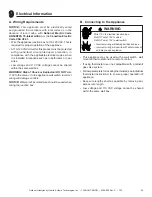
Page 25: ...ll box WARNING Risk of Shock or Explosion DO NOT wire 110V to the valve or to the appliance wall switch Incorrect wiring will damage controls NOTICE Waterproof insulated wire should be used when wiring the junction box 9 9 Electrical Information B Connecting to the Appliance Wire 110V to electrical junction box Do NOT wire 110V to valve Do NOT wire 110V to wall switch Incorrect wiring will damage ...

Page 26: ...N VALVE PLUG IN GROUND TO FIREPLACE CHASSIS I S C Intellifire Ignition System Wiring Wire the appliance junction box to 110 VAC for proper operation of the appliance WARNING Risk of Shock or Explosion DO NOT wire IPI controlled appliance junction box to a switched circuit Incorrect wiring will override IPI safety lockout Refer to Figure 9 1 Intellifire Pilot Ignition IPI Wiring Diagram This applia...

Page 27: ...stalled prior to gas line installation Wall Switch Position the wall switch in the desired position on a wall Run a maximum of 25 feet 7 8 m or less length of 18 A W G minimum wire and connect it to the appliance ON OFF switch pigtails NOTE If any of the original wire as supplied with the appliance must be replaced it must be replaced with the type 105o C rated wire Figure 9 2 Fan location SEE DET...

Page 28: ... Ground Junction Box Knockout Figure 9 5 Junction Box Wired to Wall Switch or BC10 GREEN WIRE INSIDE BOX 14 2WG COPPER GROUND ATTACHED TO GRN SCREW WITH GRN WIRE BLK WHT WHT BLK HEAT SHIELD E Junction Box Installation If the box is being wired from the OUTSIDE of the appliance Install the Romex connector not included with appliance in the side wrap Loosen two screws on the Romex connector feed the...

Page 29: ...um clearances Comply with all minimum clearances to combustibles as specified in this manual Overlapping materials could ignite and will interfere with proper operation of doors and louvers 10 10 Finishing 12 11 10 9 8 7 6 13 5 8 12 5 8 11 5 8 10 5 8 9 5 8 8 5 8 7 5 8 HOOD NON COMBUSTIBLE BOARD SUPPLIED ON APPLIANCE INDOOR SIDE ONLY CEILING 35 3 4 MEASUREMENTS FROM TOP EDGE OF THE OPENING MEASURED...

Page 30: ...gure 10 5 Fire Risk Water Intrusion Risk Hood is required Flashing and non combustible sheathing must be installed before facing materials Facing must be non combustible and seal tight to fireplace front Risk of Fire Non combustible clearances must be maintained Sheetrock wood or other combustibles must NOT be used as sheathing or facing in the non combustible zone See Sections 5 10 for proper cle...

Page 31: ...on top of exterior sheathing must be non combustible for a minimum of 10 7 8 inches above and on both sides of the exterior face of the appliance This non combustible finishing material can be up to a maximum of 6 inches thick 6 inches maximum horizontal overhang to allow for brick and stone alcoves See Figure 10 7 NOTE Combustible housewrap or building paper MUST NOT extend over the outside of no...

Page 32: ...ass rock media supplied with this fireplace Fireplace will not function properly Delayed ignition may occur F Glass Rock Media Kit WARNING Choking Hazard Keep glass rock media out of reach of children CAUTION Risk of Cuts Abrasions or Flying Debris Wear protective gloves and safety glasses during instal lation Sheet metal edges are sharp Cleaning the Glass Rock Media During shipment of the glass r...

Page 33: ...Interior Position glass assembly on bottom glass retainer bracket Tighten wing nuts on bottom glass retainer bracket Position top of glass assembly position top glass retainer bracket and secure with two wing nuts WARNING Risk of explosion DO NOT place glass rock media directly in front of the pilot assembly or between the burner tracks over the burner ports Improperly placed media may interfere w...

Page 34: ...using the instructions included with the accessory Use non combustible materials to cover the gap between the sheet rock and the appliance when applicable to the model NG LP TWILIGHT II MOD 3 16 in Full Open Removing Fixed Glass Assembly Exterior Remove vanity panel from appliance to expose glass latches Pull glass latch out to release Grasp glass assembly on sides and pull bottom toward you Slide...

Page 35: ...le is fine Inspect pilot assembly for shorted sparker wire or cracked insulator around electrode Replace pilot if necessary 2 Pilot won t light there is no noise or spark A No power or transformer installed incorrectly Verify that transformer is installed and plugged into module Check voltage of transformer under load at spade connection on module with ON OFF switch in ON position Acceptable readi...

Page 36: ... Verify cor rect pilot orifice is installed and gas inlet is set to pressure specifications Polish flame sensing rod with fine steel wool to remove any contaminants that may have accumulated on flame sensing rod C Module is not grounded Verify module is securely grounded to metal chassis of ap pliance Verify that wire harness is firmly connected to the module D Damaged pilot assembly or contami na...

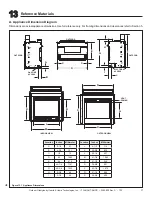
Page 37: ...er to Section 5 Figure 13 1 Appliance Dimensions A B C D C G H I J K L M N E ELECTRICAL ACCESS GAS LINE ACCESS Q VENT OPENING R P O F OUTDOOR OUTDOOR OUTDOOR INDOOR VIEW OUTDOOR VIEW Location Inches Millimeter Location Inches Millimeter A 2 1 4 57 J 4 1 2 114 B 4 3 4 121 K 32 5 8 829 C 1 2 13 L 36 1 4 921 D 43 1092 M 41 7 8 1064 E 24 610 N 21 1 2 546 F 46 7 8 1191 O 38 5 8 981 G 40 3 4 1035 P 42 1...

Page 38: ...ance please provide model number and serial number All parts listed in this manual may be ordered from an authorized dealer Stocked in Depot ITEM DESCRIPTION COMMENTS PART NUMBER 1 Outdoor Glass Assembly GLA OUTDOOR2 2 Pilot Shield 2290 109 3 Burner Assembly 2290 007 Y 4 Firebox Bracket Qty 2 req 2290 123 5 Glass Clip Qty 2 req 2087 121 6 Indoor Glass Assembly GLA 6TROC Y 7 Base Pan Assembly 2290 ...

Page 39: ... NG 2090 012 Y Pilot Assembly LP 2090 013 Y Pilot Tube 446 301 Y 10 2 12 Flex Tube Assembly 383 302A Y 10 3 Valve Plate Gasket 2087 112 10 4 Valve L Bracket 674 168 10 5 Valve Bracket 2087 117 10 6 Valve Assembly Bracket 2087 116 10 7 Flex Ball Valve Assembly 302 320A Y 10 8 ON OFF Rocker Switch Assembly 060 521A Y 10 9 Valve NG 593 500 Y Valve LP 593 501 Y 10 10 Wire Assembly 593 590A Y 10 11 Con...

Page 40: ...Glass Latch Assembly Pkg of 2 33858 2 Y Mesh Assembly Pre 0023001899 TWI II MESH Y Post 0023001899 MESH TWI EXT Y Non Combustible Boards set only 2108 030 Refractory Assembly SRV2290 070 Top Panel Inside 2086 127 Touch Up Paint Exterior SRV2087 999 A12 Interior TUP GBK 12 Trim Kit Black TL TRIM BK Cover Panel 2086 114MBK Deflector Panel 2086 136MBK Flashing 2087 159 Hood Exterior Side 2086 113MBK ...

Page 41: ..._________________________________ ________________________________________________________________________________ ________________________________________________________________________________ ________________________________________________________________________________ ________________________________________________________________________________ Printed in U S A Copyright 2012 DO NOT DIS...

Reviews: