background image

English 5

OPERATING INSTRUCTIONS

Using for the First Time

When  using  the  mixer  for  the  fi rst  time,  clean  the 

external  surface  with  a  soft  cloth.  Wash  the  mixing 

accessories  and  bowl  with  a  soft  sponge  and  mild 

detergent. Do not use abrasive cleaners such as 

alcohol, soap or solvents, as they may damage the 

product.

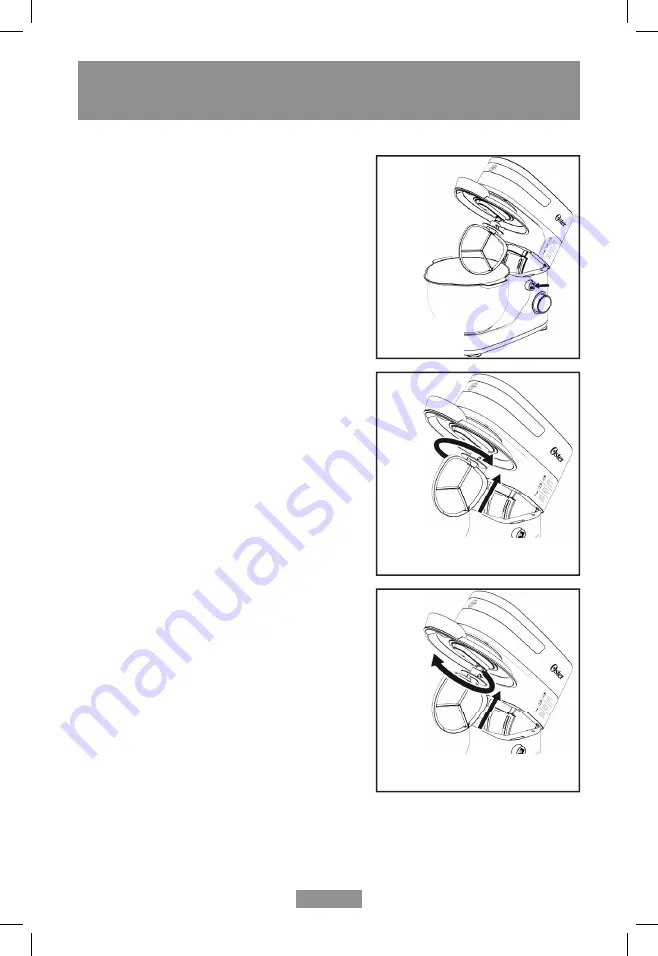
Tilting the Mixer Head

Tilting  allows  for  easier  handling  of  the  bowl  and 

beaters. Push the tilt release button to lift the mixer 

head until it clicks. With the mixer in this position, it is 

possible to remove or change the beaters, to remove 

or replace the splash guard, and to place or remove 

the  bowl. To  lower  the  mixer  head,  simply  push  tilt 

release  button  again  and  lower  it  until  it  locks  into 

place [see fi gure 1].

Mixing Accessories

Your mixer has 3 different types of mixing accessories: 

one for whisking, one for regular mixing and one for 

dough

Whisk 

– This is ideal for recipes that require light 

consistency  such  as  egg  whites,  whipped  cream, 

mousses, sauces, fi llings and others.

Beater

  –  This  is  perfect  mixing  batters  with  light 

consistency such as cakes, pies, gnocchi, purees and 

others.

Dough Hook

 – This is recommended for recipes with 

tougher consistencies such as cookie doughs, bread 

doughs, pizzas dough, pastries, and more.
To remove the beaters, push and turn it 

counterclockwise [see fi gure 2]. To replace it, position 

the beater on the push pin and turn clockwise until it 

locks into place [see fi gure 3].

Before assembling the mixer to use it, make sure it is unplugged and the speed selector is in 

the off “0” position.

Figure 1

Figure 2

Figure 3

Summary of Contents for FPSTSM3711

Page 1: ...nual Manual de Instrucciones PLANETARY STAND MIXER BATIDORA PLANETARIA PLEASE READ ALL INSTRUCTIONS BEFORE USING THIS APPLIANCE LEA TODAS LAS INSTRUCCIONES ANTES DE UTILIZAR ESTE ARTEFACTO MODELOS MOD...

Page 2: ...se haya ca do o haya sufrido cualquier otro desperfecto Si la batidora se da a ll vela al Centro de Servicio Autorizado Oster m s cercano para su inspecci n o reparaci n 8 NO use con una extensi n 9 E...

Page 3: ...ha sido dise ado para funcionar mediante un temporizador externo ni un sistema de control remoto 21 Este artefacto el ctrico no est destinado para ser usado por personas incluyendo ni os cuyas capaci...

Page 4: ...n de inclinaci n 5 Base de la batidora 6 Bot n de control de velocidad 7 Cable el ctrico con enchufe 8 Batidor pasa masas medianas y pesadas 9 Batidor para masas livianas 10 Batidor para claras de hue...

Page 5: ...a velocidad que sea mejor para su receta siempre comience a una velocidad m s baja y aumente lentamente hasta el m ximo deseado Arranque Suave Su batidora arranca suavemente para evitar que la masa se...

Page 6: ...oquee ver figura 1 Batidores Su batidora tiene 3 tipos de batidores diferentes para claras de huevo masas livianas y para masas medianas y pesadas Batidor para claras de huevo Adecuado para recetas co...

Page 7: ...ingredientes consulte la figura 4 08 Cuando termine ajuste el selector de velocidad a la posici n 0 09 Abra la batidora y si es necesario retire el exceso de la mezcla de los batidores con la esp tul...

Page 8: ...el eje de funcionamiento Se aconseja colocar el gancho para amasar y otros accesorios dentro del taz n Guarde el taz n sobre la placa de seguridad Mantenimiento El motor de su batidora ha sido cuidad...

Page 9: ...o siempre bata las papas hasta que quede un pur uniforme antes de agregar otros ingredientes Rinde 12 porciones Pastel Amarillo 2 tazas 375 g de harina para todo uso sin cernir 2 huevos grandes 1 taza...

Page 10: ...mezcla de leche y bata hasta que los ingredientes queden completamente mezclados durante aproximadamente de 2 min minutos A ada la harina restante 1 2 taza por vez y bata a velocidad 2 hasta que la m...

Page 11: ...he mixer becomes damaged take it to the nearest Authorized Oster Service Center for examination or repair 8 DO NOT use extension cord 9 The use of attachments not recommended or sold by the manufactur...

Page 12: ...ntrol system 21 This appliance is not intended for use by persons including children with reduced physical sensory or mental capabilities or lack of experience and knowledge unless they have been give...

Page 13: ...plash Guard 3 Stainless Steel Bowl 4 Tilt Release Button 5 Mixer Housing 6 Speed Control Knob 7 Power Cord with Plug 8 Dough Hook 9 Beater 10 Whisk 11 Spatula 12 Cord Wrap Area DESCRIPTION OF THE APPL...

Page 14: ...g Speed Control Knob Makes it easy to adjust the mixer to the correct speed for your recipe Always start at a slower speed then slowly increase to the desired maximum Soft Start Your mixer has a soft...

Page 15: ...and lower it until it locks into place see figure 1 Mixing Accessories Your mixer has 3 different types of mixing accessories one for whisking one for regular mixing and one for dough Whisk This is id...

Page 16: ...08 When done set the speed selector to the 0 position 09 Lift the mixer header and if necessary scrape any excess food from the beater with the spatula Tips Chilled ingredients such as butter and eggs...

Page 17: ...the shaft instead place the dough hooks and other attachments in the mixing bowl Store the bowl on the locking plate Maintenance The motor of your stand mixer has been carefully lubricated at the fac...

Page 18: ...h light and creamy always beat potatoes until fully mashed before adding additional ingredients Yield 12 servings Yellow Cake 2 cups 375 g unsifted all purpose flour 2 large eggs 1 cups 318 g granulat...

Page 19: ...2 cups flour sugar yeast and salt on speed 2 until blended Add milk mixture and mix until fully blended about 2 min minutes Add remaining flour 1 2 cup at a time and beat on speed 2 until mixture leav...

Page 20: ...o 2019 Sunbeam Products Inc All rights reserved One Year Limited Warranty please see insert for details www oster com P N 200761 Impreso en China Printed in China REV 00 La siguiente informaci n es pa...

Reviews: