4
5
b. Unplug charger before plugging or unplugging
appliance.
15. Do not lay metal objects across positive (+) and negative
(-) battery terminals, charger terminals or clipper terminals.
16. Use only the battery or battery pack supplied by the
manufacturer.
17. Do not discard exhausted battery packs into fire.
18. Store the charger, battery and clipper at room
temperature.
19. Remove the batteries if the appliance is to be stored
unused for a long period.
20. Exhausted batteries/ rechargeable batteries should not be
disposed of in the household waste. Dispose of them in a
completely discharged state in accordance with local legal
regulations.
SAVE THESE INSTRUCTIONS
HOUSEHOLD USE AND COMMERCIAL
USE
For animal clippers only:
The appliance is for trimming purposes only.
Animal shearers can only be use by trained personnel.
English
English
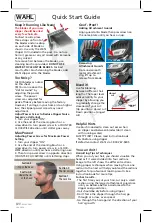
ABOUT THE CLIPPER
DO NOT USE THIS APPLIANCE UNTIL YOU HAVE READ THESE OPERATING INSTRUCTIONS
OPERATE ON VOLTAGE SPECIFIED ON APPLIANCE
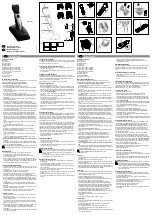
HOW TO CHARGE THE UNIT
Place clipper on charging stand or connect directly to the power supply cord. This clipper has one control LED
INDICATOR.
CHARGING WITH THE CHARGING STAND
1. Plug the power cord of the charging stand into an outlet with the rate voltage for your unit.
2. Plug the other end into the charging stand. Note that the cord will only fit into the charging stand
with the proper orientation.
3. Ensure that the switch on the unit is in the «OFF» (O) position.
4. Check the contacts of the clipper and the battery for foreign particles and contamination.
5. Insert the clipper into the charging stand so that the top of unit is facing you and the contacts
on the clipper are aligned with the contacts on the charging stand. The top of the unit is the side
with the switch (Figure 1).
6. While the unit is being charged, the LED will pulse green until fully charged. Once the battery is
fully charged, the LED will display a continuous green light and is ready for use.
7. If the LED light will not turn on, then re-insert the clipper into the charging stand and push down
gently on the clipper to engage the contacts.
Note:
If the LED does not turn on then there may be
dirt or grease on the contacts of the charging stand or clipper. Clean the contacts with an approved cleaning
solution and re-insert the clipper into the charging stand. If the LED still fails to turn on then follow the return
procedure under the warranty and service section.
8. The LEDs will stay on as long as the unit is in the charging stand.
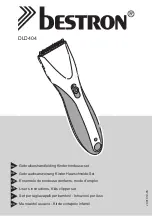
CHARGING A BATTERY USING THE CHARGING STAND
1. Check the contacts of the battery for foreign particles and contamination.
2. Insert the battery into the charging stand so that the contacts of the battery are aligned
with the contact of the charging stand (Figures 2 and 3).
3. Keep the battery in the charging stand for the recommended charging time: 100 minutes.
4. The battery is charging when the LED light is pulsing green. As soon as the battery is
fully charged, the green LED light will remain solid.
Figure 1
Clipper In Charger
Charging
Pulsing Green
Fully Charged
Solid Green
Clipper Off Charger
Battery Level <20%
Solid Red
Battery Level <10%
Pulsing Red
Faulty Battery
Quick Pulsing Red
Figure 3
Figure 2
076076-810_076076-910_078005-210_21ESFM2.indd 4-5
076076-810_076076-910_078005-210_21ESFM2.indd 4-5
5/27/21 10:35
5/27/21 10:35