One Stop Systems
OSS-EOS-2U-4I
| 22
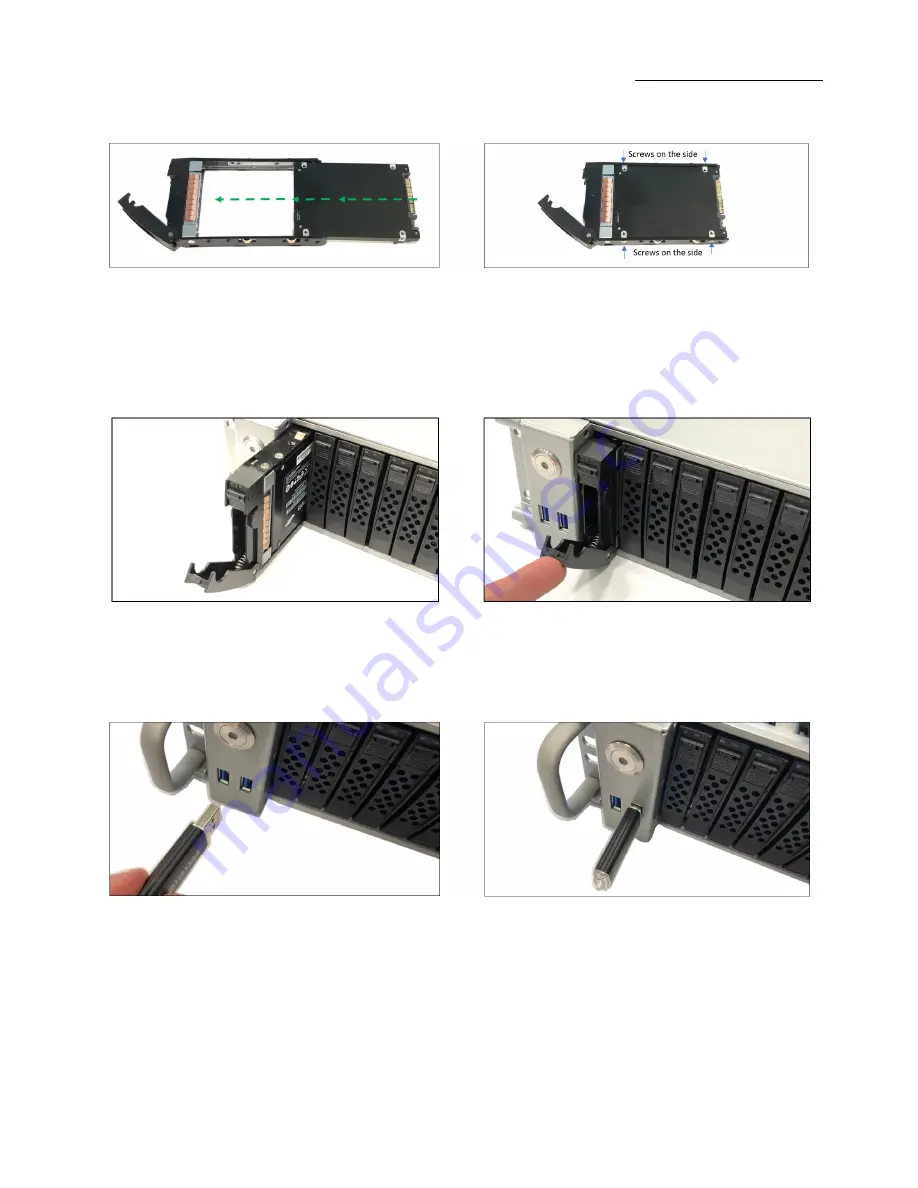
Place the hard drive tray on a flat, stable surface such as a desk, table, or work bench. Slide the hard drive (D) into the tray with the gold-
connector facing upward, see photos below.
Carefully align the mounting holes in the hard drive and the tray. Secure the hard drive using all four of the screws.
Insert the hard drive and drive carrier into its bay vertically, keeping the carrier oriented so that the release button is on the top. When the
carrier reaches the rear of the bay, the release handle will retract.
Using the thumb, push against the upper part of the hard drive handle. Push the hard drive into the hard drive bay as illustrated below, until
the hard drive clicks into the locked position.
2.7 Connect Input and Output devices
Plug in the USB thumb drive (containing the OS image) to the front USB Port.
Summary of Contents for OSS-EOS-2U-41
Page 1: ...User Manual 2U EOS Server Expansion Optimized Server SKU OSS EOS 2U 41 www onestopsystems com ...
Page 9: ...One Stop Systems OSS EOS 2U 4I 9 1 2 Overview ...
Page 10: ...One Stop Systems OSS EOS 2U 4I 10 ...
Page 11: ...One Stop Systems OSS EOS 2U 4I 11 1 3 Motherboard Layout ...
Page 12: ...One Stop Systems OSS EOS 2U 4I 12 1 4 Quick Reference ...
Page 13: ...One Stop Systems OSS EOS 2U 4I 13 1 5 Quick Reference Table ...
Page 14: ...One Stop Systems OSS EOS 2U 4I 14 ...
Page 25: ...One Stop Systems OSS EOS 2U 4I 25 Photo A1 Photo B ...
Page 26: ...One Stop Systems OSS EOS 2U 4I 26 Photo C Photo D ...


