OSO Solarcyl IM/SC2 Installation Manual Download Page 12

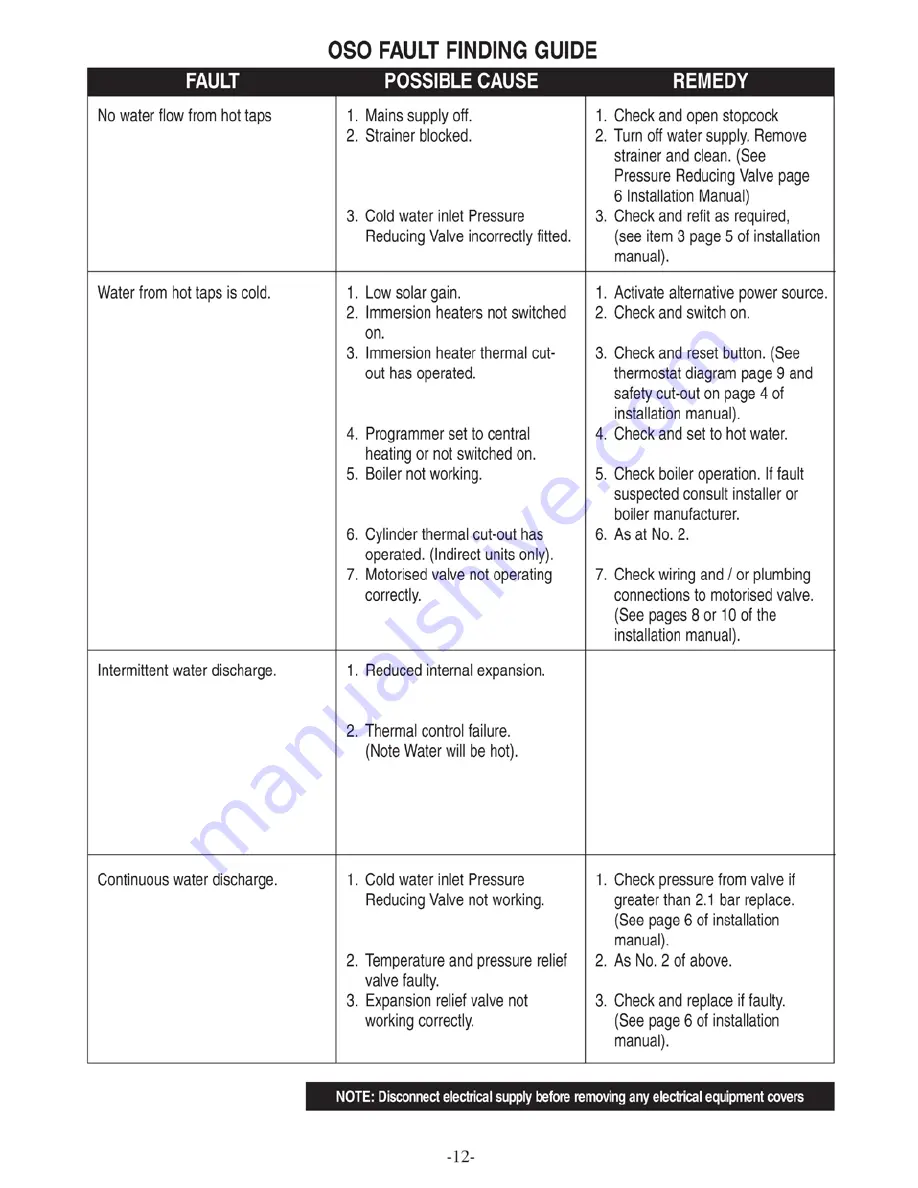
1.   Repressurize expansion vessel. 

  Follow recommissioning

   instructions on page 4.

 2.  Switch off power to immersion

  heater(s) and boiler supply to

  the unit. When discharge has

  stopped, check thermal

  controls, replace it faulty.

  Contact a competent person.

Summary of Contents for Solarcyl IM/SC2

Page 1: ...sed valve indirect only Components factory fitted Immersion heater s Thermostats thermal cut out Temperature and pressure relief valve Installation details The OSO unvented unit is designed for use wi...

Page 2: ...8 Cold Feed Tube Not supplied see Table 2 9 Hot Water Outlet 3 4 BSP 10 Flexible Hose 202108 12 Secondary Return Connection Blanking Plug 13 Elbow Drain Cock 250445 14 Cable Entry 15 Electrical Box 16...

Page 3: ...all close to the water heater using the enclosed mounting bracket Connect the expansion vessel hose to the T piece in the cold feed pipe to the cylinder Hot water supply 15 Connect the hot water suppl...

Page 4: ...before resetting the safety cut out or altering the thermostat setting isolate electrical supply to the unit prior to removal of the electrical box lid 3 Reduce thermostat setting and press the reset...

Page 5: ...s Failure to do this may result in irreparable damage to the controls and will invalidate the warranty 3 The MULTIBLOC can be fitted in any orientation to suit the installation as long as it is fitted...

Page 6: ...in reverse order Do not overtighten Expansion valve cartridge and seat Part No 214009 8 0 Bar Complete Expansion Valve Part No 510 505 8 0 Bar It is recommended that annually a competent person a Insp...

Page 7: ...r thermostat which is located in the upper electrical box The unit should be installed on an S or Y plan system Cylinder temperature control can also be achieved via the solar thermostat when the boil...

Page 8: ...an shown is based on the use of a 10 way Junction Box Honeywell Part no 42002116 001 Junction Box terminal 8 is switched live and if needed terminal 10 is pump live 8 FIGURE 4 SOLAR CONTROLLER WIRING...

Page 9: ...Automatic bypass Sensor Pocket Solar Collector 9...

Page 10: ...n shown is based on the use of a 10 way Junction Box Honeywell Part no 42002116 001 Junction Box terminal 8 is switched live and if needed terminal 10 is pump live 10 FIGURE 4 1 3 2 1 2 4 RESET Safety...

Page 11: ...Automatic bypass Sensor Pocket Solar Collector 11...

Page 12: ...on vessel Follow recommissioning instructions on page 4 2 Switch off power to immersion heater s and boiler supply to the unit When discharge has stopped check thermal controls replace it faulty Conta...

Page 13: ...Repressurize expansion ves sel Follow recommissioning instructions on page 4...

Page 14: ......

Page 15: ..._______________________ _____________________________________________________________________________ _____________________________________________________________________________ ____________________...

Page 16: ...of flats the number served should be limited to not more than 6 systems so that any installation discharging can be traced reasonably easily The single common discharge pipe should be at least one pip...

Reviews: