13
4.1 Commissioning and filling
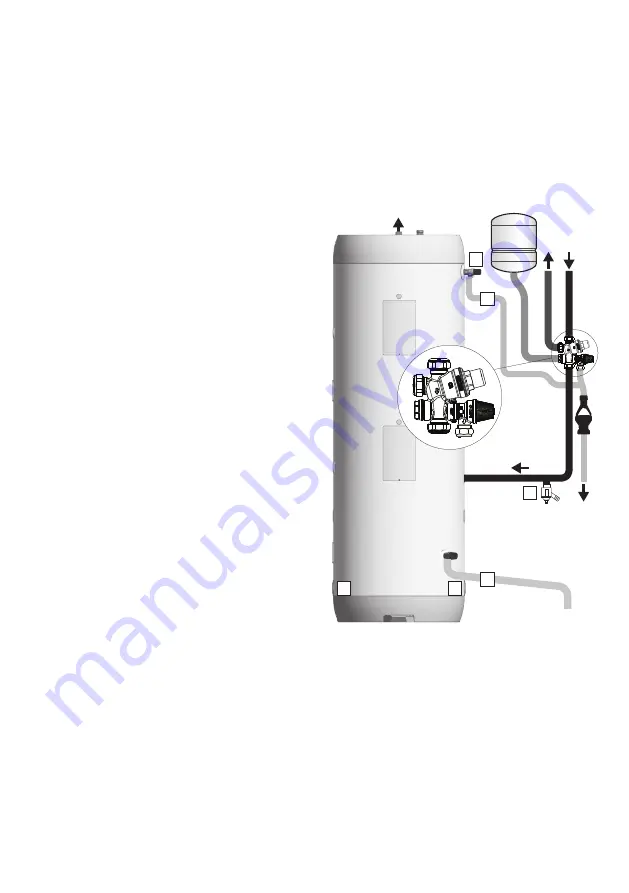
Upper vessel:
1. Check all connections for correct fitment
and tightness.
2. Open the hot water tap furthest away
from the water heater. Leave open.
3. Open the mains cold water supply stop
cock to fill the water heater. When water
flows evenly from the open tap without
any air locks, allow to run for a few min-
utes to flush through any dirt, swarf or
residue. Close the tap. Open successive
remaining hot taps to purge any remain-
ing air.
4. Check all water connections for leaks and
rectify if necessary.
5. For test purposes manually operate Tem-
perature and Pressure relief valve (7) to
ensure free water flow through discharge
pipe by turning knob counter-clockwise.
Ensure that the water flows freely to drain.
To close valve continue to turn knob
counter-clockwise until the valve shuts.
Lower vessel:
1. Check all connections for correct fitment
and tightness.
2. Fill the volume in accordance with instruc-
tions for the external heat source/heating
system. Ensure all air is purged from the
vessel to avoid air pockets, which may
cause inefficient or faulty operation.
4.2 Turning on the power
When the cylinder has been filled with water,
the power can be switched on. Turn on power
switch/circuit breaker.
4.3 Temperature adjustment of tap water
The outgoing hot water temperature from the
product to the taps will be the same as the set
temperature of the thermostat. For tempera-
ture adjustment, see section 5.1.1.
Since the water temperature in the product
can be up to 70°C it is strongly recommended
to include a mixer valve in the system to avoid
danger of scalding at the taps.
4.4 Control points (min. annually)
A) Check that all pipe connections to/from the
product are tight and not leaking. Tighten if
necessary.
B) Check that the power supply to the product
4. COMMISSIONING
4.5 Draining
Lower vessel:
If an external heat source is fitted, follow the emp-
tying instructions for this product. Otherwise,
drain by disconnecting a pipe from one of the two
lower connections (5). After draining refit the pipe
properly before filling up.
Upper vessel:
A) Disconnect the power supply.
B) Shut off incoming cold water supply.
C) Open a hot water tap to the maximum, leave
open (prevents vacuum).
D) Drain the vessel through drain cock (6). Note
is not at risk of exposure to mechanical, ther-
mal or chemical damage.
C) Check that any discharge pipe (4) from
the safety valve overflow is kept uninterrupt-
able, undamaged and frost-free sloping to the
drain.
D) Check that the product is positioned level
vertically and horizontally.
4
7
4
5
5
6


