background image


LMD9014 LCD MONITOR                          User Manual


23


Chapter 7    Supplying the power   

An Anton/Bauer or V-mount type of battery pack (Optional units) or an external DC power supply can be 
used to power this monitor. 
 

u


Using the Anton/Bauer type of battery pack   
1.


Install the Anton/Bauer type of battery pack. 

2.


Insert the battery pack. And slide it in the direction of the arrow. 

To  remove  the  battery  pack,  slide  it  in  the  opposite  direction  to  the  one  in  which  it  was 
attached while keeping the release lever on the battery holder pulled down all the way. 


u


Using a V-mount type of battery pack   

Caution:

 These servicing instructions are for use by qualified service personnel only. To reduce the risk 

of  electric  shock,  do  not  perform  any  servicing  other  than  that  contained  in  the  operating  instructions 
unless you are qualified to do so. 

1.


Remove the battery holder. 

2.


Loosen the six screws (length 10mm X M3) of the V-mount type battery holder to unpack it. 

3.


Fix the bottom of V-mount type battery holder with four screws (length 9mm X M3) supplied 
with the holder. 

4.


Install the accessory battery mount terminal block. 

5.


Fasten the other of V-mount type battery holder with four screws (length 10mm X M3) on the     
original position. 

6.      Insert the battery pack. And side it in the direction of the arrow. 

To  remove  the  battery  pack,  slide  it  in  the  opposite  direction  to  the  one  in  which  it  was 
attached while keeping the release lever on the battery holder pulled down all the way. 
 

u


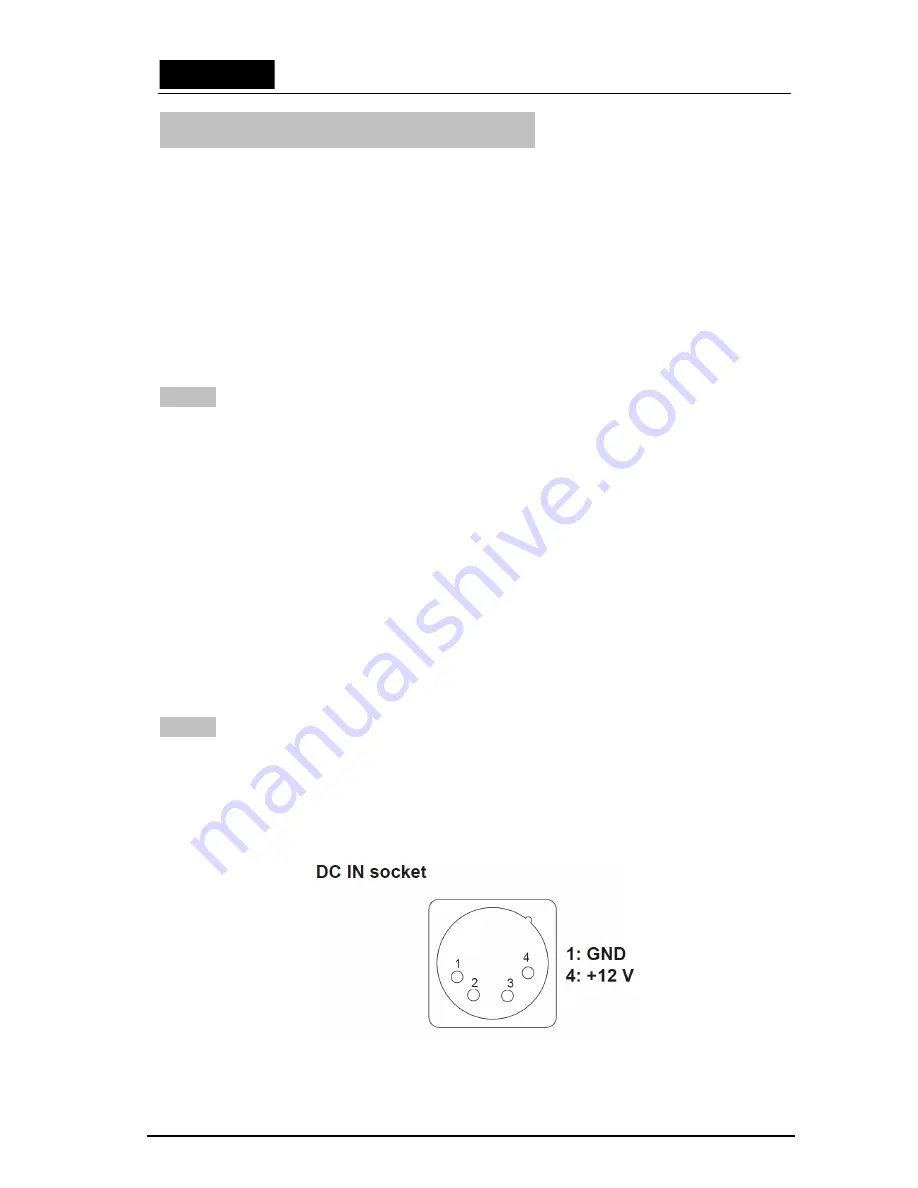
  Connect the external DC power supply to the DC IN socket on this unit. 

Caution: 

If an external DC power supply is used, then check the ratings of the external DC power supply 
so that they are compatible with those of this unit. 
Check the pin arrangement of the DC output terminal of the external DC power supply and those 
of the DC IN socket of this unit so that their polarities are correctly arranged. 
If +12V are supplied to the unit’s GND terminal by mistake, this may cause fire or injury.   


Summary of Contents for LMD9014

Page 1: ...LMD9014 USER MANUAL ...

Page 2: ...ITOR Version V020000 Release Date 2010 4 23 COMPANY NAME OSEE Americas Ltd CONTACT INFORMATION 43218 CHRISTY STREET FREMONT CA 94538 Toll Free 866 625 6106 Tel 510 996 4499 Fax 510 996 4492 Email info oseeamericas com Web www oseeamericas com ...

Page 3: ...owing device types l LMD9014 HSC l LMD9014 SC l LMD9014 V The images of LMD9014 HSC are adopted in the following descriptions Any of the different specifications between the device types are elaborated Before reading the manual please confirm the device type ...

Page 4: ...k Button Descriptions 7 4 3 1 ENTER BUTTON 7 4 3 2 USER1 USER3 BUTTON 7 4 3 3 MENU BUTTON 9 4 4 Rear Panel 9 Chapter 5 Main Menu Structure 11 5 1 STATUS Sub menu 11 5 2 VIDEO Sub menu 11 5 3 AUDIO Sub menu 12 5 4 MARKER Sub menu 14 5 5 OSD Sub menu 15 5 6 USER CONTROL Sub menu 18 5 7 USER CONFIG Sub menu 19 Chapter 6 Technical Specifications 20 Chapter 7 Supplying the power 23 Chapter 8 Warranty f...

Page 5: ...gnal Embedded Audio Support 4 or 8 Channels Audio Meter VU PPM H V Delay Under Scan Safe Area Marker Aspect Ratio Blue Only Tally 1 Pair Audio Monitoring via Headphone Jack Built in speaker Support COLOR temperature correction Support Dynamic UMD and TSL and IMAGE VIDEO protocols Waveform and Vectorscope display for SDI signal Support OSD TALLY SPLIT TALLY Support LED TALLY Support SD ASPECT When ...

Page 6: ... power cord is damaged turn off the power immediately It is dangerous to use the unit with a damaged power cord It may cause fire or electric shock 11 Unplug this apparatus during lighting storms or when unused for long periods of time 12 Disconnect the power cord from the AC outlet by grasping the plug not by pulling the cord 13 Should any solid object or liquid fall into the cabinet unplug the u...

Page 7: ...le damage to the LMD9014 internal components 3 Connect required cables for signal input and output Please note that power must be applied to the LMD9014 for all outputs to be activated For BNC connections use 75Ω rated connectors 4 Connect A C Mains power using the included power cord Please ensure an Earth ground present to ensure proper operation of the unit Fasten the power protect accessory 5 ...

Page 8: ...Audio Meters Levels for the audio For LMD9014 SC and LMD9014 V only two meters on the left side 5 UMD The MAIN Menu provides settings to customize the UMD In Monitor Display text area to show a line of characters numbers and or some symbols 6 Speakers Audio may be selected for monitoring through the left and right speakers 7 Time Code The de embedded time code from the HD SD SDI source displays in...

Page 9: ...is set OFF UMD won t be displayed The same applies to the display of METER 3 The main menu can still be displayed but the value of parameter relating to image is not adjustable and the value of parameter relating to the display effect can be adjustable 4 2 Front Panel Controls 1 Power On Off Switch When the indicator in the power switch is in green it indicates that power is on When the indicator ...

Page 10: ...epeatedly the button function will circle as follows Blue only mono color mode 9 Audio Selection and MUTE button Audio Selection press to select the monitoring audio of the corresponding monitor Mute press to mute the sound MUTE will show a continuous flickering lasting for 10S To cancel the mute function press the button again Press the button repeatedly the button function will circle as follows...

Page 11: ...typical 0 Note To regulate the option DEFAULT use the reset item in video 1 2 of the main MENU You can reset the following parameters of BRIGHTNESS CONTRAST SATURATION SHARPNESS and HUE 4 3 2 USER1 USER3 BUTTON Press the USER1 USER3 buttons on the front panel it will display the following table The table will disappear after 3 seconds without operation USER FUNCTION USER 1 H V DELAY OFF USER 2 SD ...

Page 12: ... l SAFE MARKER l AREA MARKER l OSD CONTROL l MON SOURCE And each option will be specified as follows u H V DELAY H V V H OFF Function horizontal vertical blank vertical blank horizontal blank or no blank u SD ASPECT Change the aspect ratio of the picture between 4 3 and 16 9 Only used for CVBS and SD SDI input signal For more information please refer to Chapter 5 6 u WFM DISP It is used to check t...

Page 13: ...ENTER to set some value Ø Step 4 Press MENU to return You can follow the same step to set other parameters In a word when you set a parameter the buttons of ENTER MENU and will be used frequently The function of each button is listed below ENTER Enter the sub menu and set the value of a parameter MENU Return to the super menu with no saving up or down Switch the options in the same menu Note in al...

Page 14: ...DB 9 Male Pin 1 CH1 R Pin 6 CH1 G Pin 2 Pin 7 Pin 3 Pin 8 Pin 4 Pin 9 Pin 5 GND Tally Light Color Screen 1 PIN1 PIN6 Red GND Open Green Open GND Amber GND GND IN A HD SDI SDI Analog Composite Input IN B HD SDI SDI Analog Composite Input 12V DC from Power Supply Four External Audio Connectors TALLY IN DB 9 Male Battery Holder ...

Page 15: ...able parameters and values show in blue 5 1 STATUS Sub menu The STATUS Sub menu is used to display the current status of the unit The following items are displayed Parameters Input Signal CVBS SD SDI HD SDI Display Value FORMAT O O O IN A 1080I60 COLOR TEMP O O O D65 MON SOURCE O O O MET 1 SCAN O O O NORMAL SD ASPECT O O O 16 9 MODEL O O O LMD9014 HSC This Sub menu can t be entered only displays i...

Page 16: ...olor temperatures values selected in COLOR TEMP NOTE When adjusting the item displays of BRIGHTNESS HUE and R GAIN B OFFSET move to the lower part of the screen 5 3 AUDIO Sub menu PARAMETERS Input Signal Domain Range NOTE CVBS SD SDI HD SDI AUDIO 1 5 AUDIO MON O O O ON OFF Used for headphone The default of left panel is set to ON others is set to OFF AUDIO MON can be only set from OFF to ON a reve...

Page 17: ...he input signal from INA connector it is used to assign the audio channel for right audio meter 1 display from among EBD1 EBD16 and EXT1L EXT2R For LMD9014 V only four options EXT1L EXT2R IN A MET 2 L O O O EBD3 The similar as INA meter 1 AUDIO 3 5 IN A MET 2 R O O O EBD4 The similar as INA meter 1 IN A MET 3 L O O O EBD5 The similar as INA meter 1 Only used for LMD9014 HSC IN A MET 3 R O O O EBD6...

Page 18: ...ed for LMD9014 HSC AUDIO 5 5 IN B MET 3 R O O O EBD6 The similar as INB meter 1 Only used for LMD9014 HSC IN B MET 4 L O O O EBD7 The similar as INB meter 1 Only used for LMD9014 HSC IN B MET 4 R O O O EBD8 The similar as INB meter 1 Only used for LMD9014 HSC 5 4 MARKER Sub menu PARAMETERS Input Signal Domain Range NOTE CVBS SD SDI HD SDI SAFE MARKER1 O O O ON OFF Select ON to enable the safe area...

Page 19: ...he input signal format on the top left of the screen ON Always displayed AUTO OFF Displayed for about 10 seconds after change OFF Hidden WFM VT DISP X O O VECTOR WFM OFF VECTOR Displays vectorscope WFM Displays waveform OFF not to display TC DISP X O O ON OFF ON Displays the time code OFF not to display UMD DISP O O O ON OFF ON Displays UMD OFF not to display OSD TLY DISP 1 O O O ON OFF OSD TLY MO...

Page 20: ... tally is enabled RGY Red yellow or green tally signals are indicated at both the bottom left and bottom right corners of the screen near UMD RG Red tally is shown at the bottom left of the screen and green is shown at the bottom right GR Green tally is shown at the bottom left of the screen and red is shown at the bottom right 2 LED TLY DISP Use this setting to enable or disable the LED Tally Whe...

Page 21: ...TSL v3 1 protocol setting when controlling the UMD from a TSL tally controller or other controlling device which utilizes the TSL v3 1 protocol The UMD ID must be set for each screen in conjunction with the controlling device n LOCAL The static UMD is set by the local unit The others of UMD Protocol can be set by Local and the corresponding protocols 7 UMD ID The UMD ID identifies each screen to t...

Page 22: ...ds to a LOW state and open circuit corresponds to a HIGH state This mode requires the UMD Tally Mode parameter to be set Consult Image Video documentation for further information n Image Video 422 Use the Image Video 422 setting to control Image Video tally states via the Image Video serial protocol This mode requires the UMD Tally Mode parameter to be set Consult Image Video documentation for fur...

Page 23: ...the color bar for one minute The color bar also can be canceled by pressing the button button ENTER button or MENU button 5 7USER CONFIG Sub menu PARAMETERS Input Signal Domain Range NOTE CVBS SD SDI HD SDI VECTOR REF O O O 100 CB 75 CB Used to set the reference value of the vectorscope 100 CB 100 color bar 75 CB 75 color bar OSD CONTROL O O O ON OFF Except STATUS it controls the switch of all OSD...

Page 24: ... x 4 6 x 7 8 219 5 x 118 x 198mm Power Consumption 12VDC 10 watts 3 8 Amps max CE UL complied supply included Operating Temperature 0 C to 70 C Inputs 2 Auto sensing HD SDI SD SDI Analog Composite inputs BNC 2 pairs External analog audio inputs Signal Format LMD9014 are compatible with the following Signal Formats Product Number Signal Formats LMD9014 HSC NTSC PAL 480i 59 94 576i 50 1035i 59 94 10...

Page 25: ...30P 1080 30P 1080P30 1080 29 97P 1080P29 97 1080 25P 1080 25P 1080P25 108024P 1080 24P 1080P24 1080 23 97 1080P23 97 1080 24PsF 1080 24PsF 1080sF24 1080 23 97PsF 1080Sf23 97 1035 60I 1035 60I 1035I60 1035 59 94I 1035I59 94 720 60P 720 60P 720P60 720 59 94P 720P59 94 720 50P 720 50P 720P50 720 30P 720 30P 720P30 720 29 97P 720P29 97 720 25P 720 25P 720P25 720 24P 720 24P 720P24 720 23 97P 720P23 97...

Page 26: ...LCD MONITOR User Manual 22 Dimensions Front View Unit mm Side View Unit mm LMD9014 POWER SCAN MENU ENTER IN A B MUTE BLUE MONO USER1 USER3 USER2 Rear View Unit mm AUDIO CH1 CH2 VIDEO R L IN B IN A DC IN 12V 2A ...

Page 27: ...ength 10mm X M3 of the V mount type battery holder to unpack it 3 Fix the bottom of V mount type battery holder with four screws length 9mm X M3 supplied with the holder 4 Install the accessory battery mount terminal block 5 Fasten the other of V mount type battery holder with four screws length 10mm X M3 on the original position 6 Insert the battery pack And side it in the direction of the arrow ...

Page 28: ...the first consumer only and proof of purchase is necessary to honor the warranty If there is no proof of purchase provided with a warranty claim osee reserves the right not to honor the warranty set forth above Therefore labor and parts may be charged to the consumer What the warranty does not cover 1 Any product on which the serial number has been defaced modified or removed 2 Damage deterioratio...

Reviews: