background image

3

Congratulations on your purchase of a quality Orion telescope.

 Your new SkyView Pro 80mm ED EQ is 

an exceptional instrument for observing and imaging astronomical objects. The ED glass of the objec-
tive lens ensures you’ll enjoy star, Moon, and planetary images with far less color distortion than seen in 
standard refractors. Other features, such as the smooth Crayford focuser, precision machined lens cell, 
and deluxe aluminum focusing wheels also attest to the overall high quality of the telescope. With the 
sturdy SkyView Pro equatorial mount, you’ll be able to enjoy steady viewing of thousands of the night 
sky’s fascinating celestial targets.
These instructions will help you set up, properly use, and care for your telescope. Please read them over 
thoroughly before getting started.

table of contents


1.  Unpacking. . . . . . . . . . . . . . . . . . . . . . . . 3


2.  Parts List. . . . . . . . . . . . . . . . . . . . . . . . . 3


3.  Assembly  . . . . . . . . . . . . . . . . . . . . . . . . 3


4.  Balancing the Telescope . . . . . . . . . . . . . 5


5.  Using Your Telescope . . . . . . . . . . . . . . . 6


6.  Setting Up and Using the  


  Equatorial Mount. . . . . . . . . . . . . . . . . . . 8


7.  Astronomical Observing . . . . . . . . . . . . 12


8.  Terrestrial Observing  . . . . . . . . . . . . . . 15


9.   Astrophotography. . . . . . . . . . . . . . . . . 15

  10.  Care and Maintenance . . . . . . . . . . . . . 17
  11.  Specifications . . . . . . . . . . . . . . . . . . . . 17

1. unpacking

The SkyView Pro 80mm ED EQ will arrive in one box; be care-
ful unpacking the box. We recommend keeping the box and all 
original packaging. In the event that the telescope needs to be 
shipped to another location, or returned to Orion for warranty 
repair, having the proper box and packaging will help ensure 
that your telescope will survive the journey intact.
Make  sure  all  the  parts  in  the  Parts  List  are  present.  Be 
sure to check each box carefully, as some parts are small. 
If  anything  appears  to  be  missing  or  broken,  immediate-
ly  call  Orion  Customer  Support  (800-676-1343)  or  email 
[email protected] for assistance.

2. Parts list

Box #1: optical tube assembly and accessories

Qty.  

Description

1   

Tripod 

1   

Equatorial mount

1   

Tripod support tray

1   

Central support shaft (attached to tripod)

1   

Tube ring mounting plate 

2   

Tube rings with mounting screws

1   

Counterweight shaft

1   

Counterweight

2   

Slow-motion control knobs

1   

R.A. axis rear cover

2   

Latitude adjustment L-bolts

1   

Optical tube assembly

1   

25mm Sirius Plössl eyepiece, 1.25" barrel diameter

1   

10mm Sirius Plössl eyepiece, 1.25" barrel diameter

1   

2" Star diagonal with 1.25" adapter

1   

Finder scope

1   

Finder scope bracket with O-ring

1   

Dust cover (attached to optical tube)

1   

Camera adapter (attached to optical tube)

1   

Small crescent wrench

3. assembly

Assembling the telescope for the first time should take about 
30 minutes. No tools are needed other than the provided cres-
cent wrench. All screws should be tightened securely, but be 
careful not to over-tighten or the threads may strip. Refer to 
Figure 1 during the assembly process.
During assembly (and anytime, for that matter), do not touch 
the surfaces of the lenses of the telescope, finder scope, or 
eyepieces with your fingers. The optical surfaces have delicate 
coatings on them that can easily be damaged if touched inap-
propriately. Never remove any lens assembly from its housing 
for any reason, or the product warranty and return policy will 
be voided.

Warning: 

Never look directly at the Sun 

through your telescope or its finder scope—even 

for an instant—without a professionally made 

solar filter that completely covers the front of 

the instrument, or permanent eye damage could 

result. Young children should use this telescope 

only with adult supervision.

Summary of Contents for SKYVIEW Pro 80mm ED EQ

Page 1: ...ED EQ Equatorial Apochromatic Refractor Telescope 9884 Customer Support 800 676 1343 E mail support telescope com Corporate Offices 831 763 7000 89 Hangar Way Watsonville CA 95076 OrionTelescopes com...

Page 2: ...knob Right ascension lock knob Right ascension slow motion control knob Counterweight shaft Counterweight Counterweight lock knob Toe saver Eyepiece 1 25 Adapter Finder scope Finder scope bracket 1 4...

Page 3: ...ppears to be missing or broken immediate ly call Orion Customer Support 800 676 1343 or email support telescope com for assistance 2 Parts List Box 1 Optical Tube Assembly and Accessories Qty Descript...

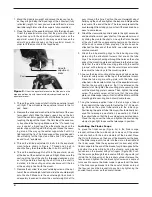
Page 4: ...the interior of the knob to connect them properly The knobs can be attached to either end of the shafts use whichever end is most convenient 9 Attach the tube mounting rings to the tube ring mounting...

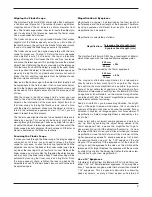
Page 5: ...o the right ascension R A axis the telescope should be balanced on the declination Dec axis already if you have properly centered the 1 4 20 mounting block on the optical tube relative to the tube rin...

Page 6: ...ocusing without any image shift that typical rack and pinion designs experience If you find that the focus knobs are too tight or too loose you can make adjustments to the focuser tension by using the...

Page 7: ...turns for now Refocus the finder scope on a distant object by threading the objective lens cell in or out of the finder scope body Precise focusing will be achieved by focusing the finder scope on a...

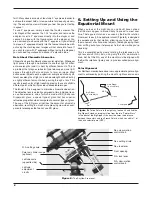
Page 8: ...hat has superior refractive properties when compared to normal types of glass The use of this ED glass minimizes the amount of chromatic aberration resulting in a much more pleasing view when com pare...

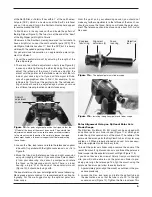
Page 9: ...al observing More precise polar alignment is recommended for astropho tography For this we suggest using the optional polar axis finder scope From this point on in your observing session you should no...

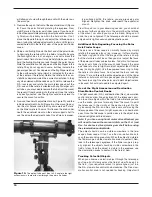
Page 10: ...es Additional Note Regarding Focusing the Polar Axis Finder Scope The polar axis finder scope is normally focused by simply rotating the eyepiece focus ring However if after adjusting the focus ring y...

Page 11: ...lock lever and position the telescope as accurately as possible in declination so it is parallel to the R A axis as shown in Figure 1 Re tighten the lock lever 2 Loosen one of the thumb screws on the...

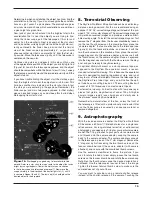
Page 12: ...be a major leap into the world of amateur astronomy This section is intended to get you ready for your voyages through the night sky Site Selection Pick a location away from street lights and bright y...

Page 13: ...th two high quality Sirius Pl ssl eyepieces a 25mm which gives a magnification of 24x and a 10mm which gives a magnification of 60x Other eyepieces can be used to achieve higher or lower powers It is...

Page 14: ...s most favorable at these times With good conditions you may see a salmon colored disk with some distinct dark patches and you might be able to spot a whitish polar ice cap To see surface detail on Ma...

Page 15: ...an eyepiece into the diagonal secure it with the thumb screw on the diag onal and you re ready for daytime viewing An optional altazimuth mount or a sturdy camera tripod as opposed to the SkyView Pro...

Page 16: ...ed The T ring and camera adapter are not needed since the camera is expos ing through its own lens Any camera lens with a focal length between 35mm and 400mm is appropriate On the top of one of the tu...

Page 17: ...r Then apply some cleaning fluid to a tissue never directly on the optics Wipe the lens gently in a circular motion then remove any excess fluid with a fresh lens tissue Oily fingerprints and smudges...

Page 18: ...sonville CA 95076 If the product is not registered proof of purchase such as a copy of the original invoice is required This warranty does not apply if in Orion s judgment the instrument has been abus...

Reviews: