13
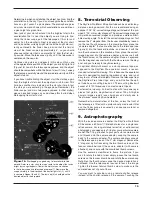
ber for this is Megrez (mag. 3.4), which is the star in the “Big
Dipper” connecting the handle to the “dipper”. If you cannot
see Megrez, then you have fog, haze, clouds, smog, light pol-
lution or other conditions that are hindering your viewing (see
Figure 15).
cooling the telescope
All optical instruments need time to reach “thermal equilib-
rium” to achieve peak performance. When moved from a
warm indoor location to cooler outdoor air (or vice-versa), a
telescope needs time to cool to the outdoor temperature. The
bigger the instrument and the larger the temperature change,
the more time will be needed.
Allow at least 30 minutes for your SkyView Pro 80mm ED EQ
to equilibrate. If the scope has more than a 40° temperature
adjustment, allow an hour or more. In the winter, storing the
telescope outdoors in a shed or garage greatly reduces the
amount of time needed for the optics to reach thermal equi-
librium. It also is a good idea to keep the scope covered until
the Sun sets so the tube does not heat greatly above the tem-
perature of the outside air.
let Your Eyes Dark‑adapt
Do not expect to go from a lighted house into the darkness
of the outdoors at night and immediately see faint nebulas,
galaxies, and star clusters - or even very many stars, for that
matter. Your eyes take about 30 minutes to reach perhaps
80% of their full dark-adapted sensitivity. Many observers
notice improvements after several hours of total darkness. As
your eyes become dark-adapted, more stars will glimmer into
view and you will be able to see fainter details in objects you
view in your telescope. Exposing your eyes to very bright day-
light for extended periods of time can adversely affect your
night vision for days. So give yourself at least a little while to
get used to the dark before you begin observing.
To see what you are doing in the darkness, use a red-filtered
flashlight rather than white light. Red light does not spoil your
eyes’ dark adaptation like white light does. A flashlight with a
red LED light is ideal, or you can cover the front of a regular
incandescent flashlight with red cellophane or paper. Beware,
too, that nearby porch and streetlights and automobile head-
lights will spoil your night vision.
Eyepiece selection
By using eyepieces of varying focal lengths, it is possible to
attain many magnifications with the SkyView Pro 80mm ED
EQ. The telescope comes with two high-quality Sirius Plössl
eyepieces: a 25mm, which gives a magnification of 24x, and
a 10mm, which gives a magnification of 60x. Other eyepieces
can be used to achieve higher or lower powers. It is quite com-
mon for an observer to own five or more eyepieces to access
a wide range of magnifications. This allows the observer to
choose the best eyepiece to use depending on the object
being viewed. At least to begin with, the two supplied eye-
pieces will suffice nicely.
Whatever you choose to view, always start by inserting your
lowest power (longest focal length) eyepiece to locate and
center the object. Low magnification yields a wide field of
view, which shows a larger area of sky in the eyepiece. This
makes acquiring and centering an object much easier. If you
try to find and center objects with high power (narrow field of
view), it’s like trying to find a needle in a haystack!
Once you’ve centered the object in the eyepiece, you can
switch to higher magnification (shorter focal length eyepiece),
if you wish. This is especially recommended for small and
bright objects, like planets and double stars. The Moon also
takes higher magnifications well.
Deep-sky objects, however, typically look better at medium
or low magnifications. This is because many of them are
quite faint, yet have some extent (apparent width). Deep-sky
objects will often disappear at higher magnifications, since
greater magnification inherently yields dimmer images. This
is not the case for all deep-sky objects, however. Many galax-
ies are quite small, yet are somewhat bright, so higher power
may show more detail.
The best rule of thumb with eyepiece selection is to start
with a low power, wide field, and then work your way up in
magnification. If the object looks better, try an even higher
magnification. If the object looks worse, then back off the
magnification a little by using a lower power eyepiece.
astronomical objects
Now that you are all set up and ready to go, one critical deci-
sion must be made: what to look at?
a. the Moon
With is rocky and cratered surface, the Moon is one of the
most interesting and easy subjects to view with your scope.
The best time to view it is during its partial phases when
shadows fall on the craters and canyon walls to give them
definition. While the full moon may look like a tempting target,
it is not optimal for viewing. The light is too bright and surface
definition is low.
Figure 15.
Megrez connects the Big Dipper’s handle to it's “pan”.
It is a good guide to how conditions are. If you can not see Megrez
(a 3.4 mag star) then conditions are poor.


