


12
Installation and U
ser’s Guide
9
Installation and U
ser’s Guide
2.3.3. CONTRAST
Adjust visual color contrast.
Press Contrast Knob, CONTRAST OSD will be displayed on the screen.
Rotate it clockwise: Contrast increase.
Rotate it counterclockwise: Contrast decrease.
Press it again, return to default value (80).
Adjustable range: 0~100%, default: 80.
2.3.4. CHROMA
Adjust visual color chromaticity.
Press Chroma Knob, CHROMA OSD will be displayed on the screen.
Rotate it clockwise: Chroma increase.
Rotate it counterclockwise: Chroma decrease.
Press it again, return to default value (50).
Adjustable range: 0~100%, default: 50.
2.3.5. ASPECT
Switch the aspect ratio of screen.
Whenever Aspect button is pressed, aspect ratio will be switched as follows.
4:3->16:9->OFF.
Default: OFF.
2.3.6. MENU
Activate and exit the OSD menu.
Press MENU button, OSD menu will be displayed on the screen.
Rotate Chroma knob clockwise: move down.
Rotate Chroma knob counterclockwise: move up.
Press Chroma knob: select value or enter into sub-menu.
2.3.7. SCAN
Switch the scan mode of monitor
Whenever Scan button is pressed, scan mode will be switched as follows.
Normal->Over->Zoom.
Default: Normal.
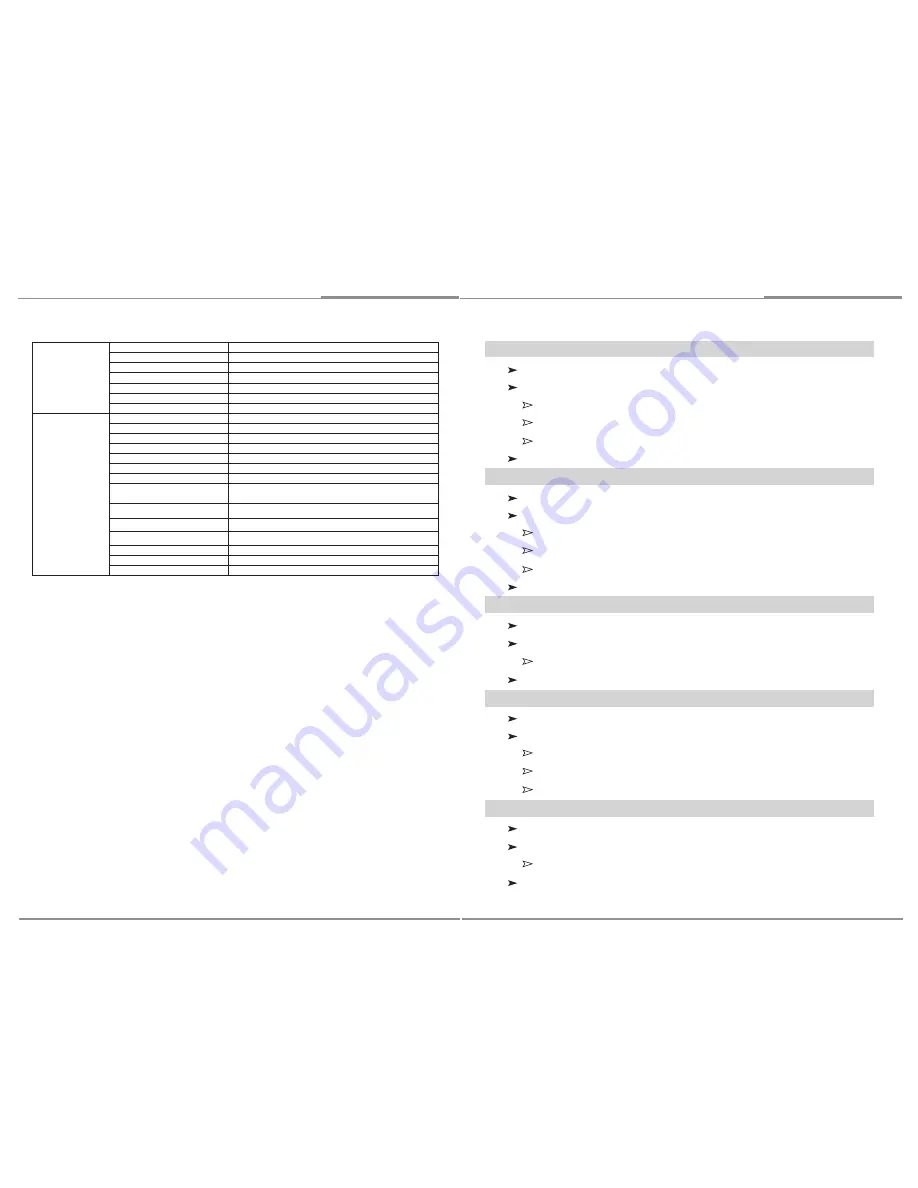
PIN 4
default: G ONLY
PIN 9
default: B ONLY
PIN 11
default: MONO
PIN 12
default: MARKER
PIN 13
default: ASPECT
PIN 14
default: SCAN
PIN 15
default: HV DELAY
SETUP
EXIT
Return to Level 1
FORMAT DISPLAY
AUTO / ON / OFF, default: AUTO
TIMECODE
OFF / LTC / VITC1 / VITC2, default: OFF
KEY LOCK
LOCK / UNLOCK, default: UNLOCK
PICTURE DEALY
NORMAL / FAST / FASTEST, default: NORMAL
BACKLIGHT
0% ~ 100%, default 80%
CHARACTER DISPLAY
ON / OFF, default: OFF
LOCATIONS
CENTER TOP / CENTER BOTTOM,
default: CENTER TOP
ENTER
USER ASSIGN
SIZE
SMALL / LARGE, default: SMALL
COLOR
YELLOW / RED / BLACK, default: YELLOW
FACTORY DEFAULT
PROCEED / CANCEL, default: CANCEL
RESTORE USER CONFIG
PROCEED / CANCEL, default: CANCEL
LOAD USER CONFIG
PROCEED / CANCEL, default: CANCEL


