22
23
6. Maxim DL Essentials needs
to know how fast the tele-
scope moves in right ascen-
sion (R.A.) and declination
(Dec.) when the autoguider
commands are issued. To do
this, the software will cali-
brate the mount by moving it
back and forth on each axis.
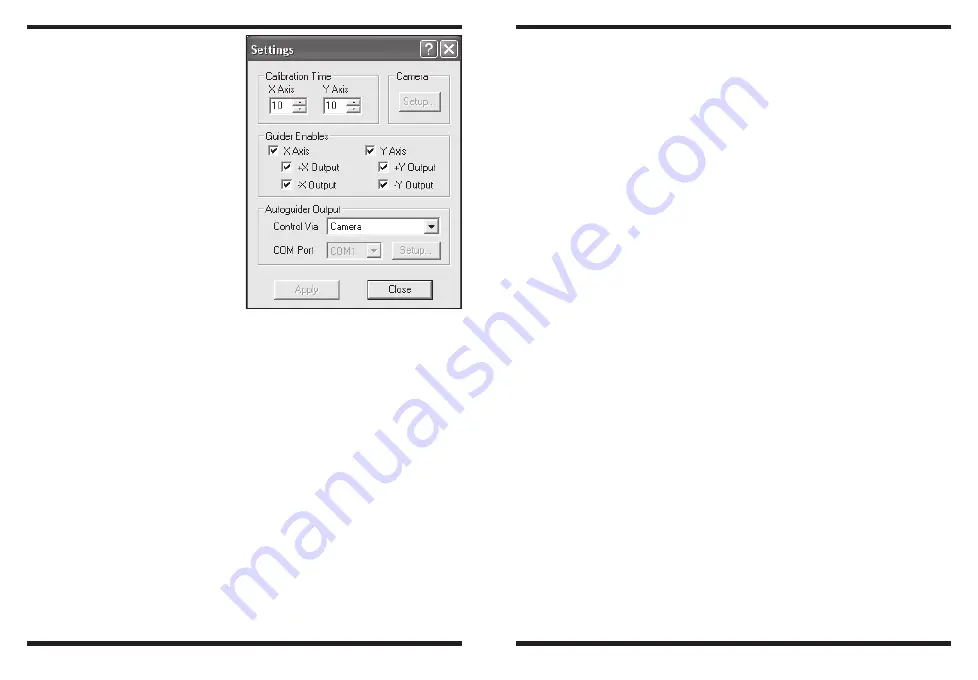
The
Calibration Time deter-
mines how long it activates
the motors each time. The
default value is 10 seconds.
Make sure all of the
Guider
Enables boxes are checked
(Figure 13).
7. For
Autoguider Out-
put, set Control Via to
Camera.
8. Click
Apply. You can leave
this dialog box open, or
Close it if you wish. On the
Guide tab, set to Expose, and click the Start button. A single image
will be taken. Ensure that a well-focused bright star (near the actual
object to be imaged) appears in the image. If not, adjust the guide
scope and try again. Make sure the star is not close to the edge of
the camera’s field of view or it may drift out during calibration.
Note: The algorithm can be confused if another star appears in the
frame; to minimize this risk, calibrate on an isolated bright star.
9. Now, set to
Calibrate, and click the Start button. A series of five
exposures will be taken; each time the telescope will be moved
slightly. If the telescope does not move, check the Settings.
10. The star should move in an “L” shape. If it does not move enough,
a warning message will appear. The recorded positions will be dis-
played in the scrolling log, along with any error messages.
Note: If the star does not move far enough, or moves too far (i.e.
the star leaves the field), the duration of the calibration move
commands can be adjusted by clicking the Settings command
and changing the Calibration Time fields (measured in seconds).
A longer calibration time will increase the motion of the star; a
shorter time will decrease the motion. Typical values range from
five to ten seconds, depending on the correction speed, focal
length, and pixel size.
11. Once you have successfully calibrated, switch to the
Track mode.
Click
Start, and watch the star. It should move to the center of the
small track box, and whenever it drifts off it should be pulled back
again. Also the tracking errors will be displayed in the scrolling log
(Figure 14).
12. If the star bounces back and forth, reduce the aggressiveness for
that axis. If it corrects too slowly, increase the aggressiveness.
Changes to the aggressiveness settings take effect immediately.
Care and Maintenance
When the SSAG is not in use, the cover cap should be replaced on
the end of the nosepiece. This prevents dust from accumulating on the
SSAG’s optical window. The optical window should only be cleaned
if significant dust builds up for if the window is touched. Any quality
optical lens cleaning tissue and optical lens cleaning fluid specifically
designed for multi-coated optics can be used to clean the glass sur-
face of the SSAG’s optical window. Never use regular glass cleaner
or cleaning fluid designed for eyeglasses. Before cleaning with fluid
and tissue, blow any loose particle off the surface with a blower bulb
or compressed air. Then apply some cleaning fluid to a tissue, never
directly on the optics. Wipe the optical surface gently in a circular
motion, then remove any excess fluid with a fresh lens tissue. Use cau-
tion, rubbing too hard may cause scratches.
Figure 13.
The autoguide
Settings
window controls the
Calibration
Time in each axis, movement in both
axis, and the
Autoguider Output
connection to your mount.


