4
to gain access to the threaded holes for the cooling accelera-
tor fan attachment.
Connecting the 190mm Mak-Newt to a Mount
The 190mm Mak-Newt requires a pair of tube rings and a
dovetail mounting plate compatible with large Orion mounts,
such as the Sirius or Atlas EQ-G. The optical tube is compat-
ible with 235mm I.D. tube rings (available from Orion).
Balancing the 190mm Mak-Newt can be achieved by sliding
the dovetail mounting plate forward or backward within the
mount’s dovetail holder. You can also move the telescope for-
ward or backward within the tube rings. The tube rings offer
the most adjustment range. Loosen the tube ring clamps
slightly and slide the telescope tube forward or backward as
needed to reach optimum balance, then retighten the tube
ring clamps. Rotating the telescope to achieve a comfortable
eyepiece angle is done in the same fashion. Simply loosen the
tube ring camps just enough to allow the optical tube to rotate
within the tube rings. Tighten the tube ring clamps securely
once you have reached the desired eyepiece orientation.
Imaging with the 190mm Mak-Newt
The Premium 190mm Maksutov-Newtonian Astrograph is
ideal for just about any imaging camera, from small webcam
or planetary imagers, to DSLRs and large CCD cameras. The
Maksutov-Newtonian optics reduce the coma and field cur-
vature, which allows you to utilize the entire imaging area of
your camera without the need to crop the edges of your astro-
images.
Imaging equipment is often much heavier than an eyepiece.
The Crayford focuser is capable of handling the weight of your
CCD or DSLR camera. Adding tension to the focuser drawtube
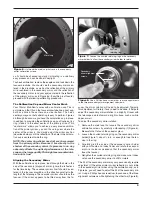
(Figure 2) will increase the amount of weight the focuser can
handle. Install your camera onto the supplied camera adapter
on the focuser during the day. Check the focuser for any slip-
page. If the focuser drawtube slides under the weight of the
camera, you will need to add more tension to the focuser.
Using a DSLR Camera
To attach a DSLR camera, all you will need is the appropri-
ate T-ring for the make and model of your camera, and the
supplied camera adapter. Simply attach the T-ring to the cam-
era body and thread the 2" prime focus camera adapter into
the T-ring. Insert the barrel of the camera adapter into the
focuser’s 2" eyepiece holder and secure it with the eyepiece
thumbscrew.
Using a CCD Imager
Most CCD imagers will have a 1.25" or 2" barrel ready to
attach directly to your telescope like an eyepiece. No adapter
is required. Simply insert the barrel of the CCD camera into
the 1.25" or 2" eyepiece holder and secure the camera with
the silver thumbscrew lock.
Collimating the Optics
(Aligning the Mirrors)
Collimating is the process of adjusting the mirrors so they are
aligned with one another. Your telescope’s optics were aligned
at the factory, and should not need much adjustment unless
the telescope is handled roughly. Accurate mirror alignment is
important to ensure the peak performance of your telescope,
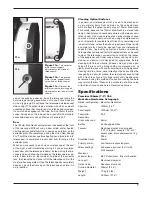
Figure 5.
Collimating the optics.
(a)
When the mirrors are properly aligned, the view down the focuser drawtube should look like this
(b).
Here, the secondary mirror is centered under the focuser, but it needs to be adjusted (tilted) so that the entire primary mirror is visible
(c)
. The secondary mirror is correctly aligned, but the primary mirror still needs adjustment. When the primary mirror is correctly aligned,
the “dot” will be centered, as in
(d)
.
a.
c.
b.
d.


