5
so it should be checked regularly. Collimating is a relatively
easy process and can be done in daylight.
To check collimation, remove the eyepiece and look down the
focuser drawtube. You should see the secondary mirror cen-
tered in the drawtube, as well as the reflection of the primary
mirror centered in the secondary mirror, and the reflection of
the secondary mirror (and your eye) centered in the reflection
of the primary mirror, as in Figure 5a. If anything is off-center,
proceed with the following collimating procedure.
The Collimation Cap and Mirror Center Mark
Your 190mm Mak-Newt comes with a collimation cap. This is
a simple cap that fits on the focuser drawtube like a dust cap,
but has a hole in the center and a silver bottom. This helps
center your eye so that collimating is easy to perform. Figures
5b through 5d assume you have the collimation cap in place.
In addition to providing the collimation cap, you’ll notice a tiny
ring (sticker) in the exact center of the primary mirror. This
“center mark” allows you to achieve a very precise collima-
tion of the primary mirror; you don’t have to guess where the
center of the mirror is. You simply adjust the mirror position
(described below) until the reflection of the hole in the collima-
tion cap is centered inside the ring.
NOTE: The center ring sticker need not ever be removed
from the primary mirror. Because it lies directly in the
shadow of the secondary mirror, its presence in no way
adversely affects the optical performance of the tele-
scope or the image quality. That might seem counterintui-
tive, but it’s true!
Aligning the Secondary Mirror
With the collimation cap in place, look through the hole in the
cap at the secondary (diagonal) mirror. Ignore the reflections
for the time being. The secondary mirror itself should be cen-
tered in the focuser drawtube, in the direction parallel to the
length of the telescope. The secondary mirror should face the
focuser. If the mirror appears to be tilted away from the fo-
cuser, the mirror rotation will need to be adjusted. Typically,
this adjustment will rarely, if ever, need to be done. It helps to
adjust the secondary mirror rotation in a brightly lit room with
the telescope pointed toward a bright surface, such as white
paper or wall.
To adjust the secondary mirror rotation:
1. Remove the metal cap that covers the secondary mirror
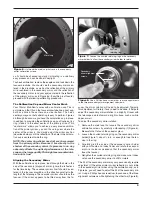
collimation screws by carefully unthreading it (Figure 6).
Be careful not to touch the corrector glass.
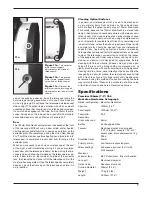
2. Loosen the knurled retaining ring on the secondary mirror
holder (Figure 7) about ¼ turn, or enough to free the ten-
sion in the ring.
3. Carefully grab the inside of the secondary mirror holder
with your thumb and index finder and rotate the second-
ary mirror holder as needed so that the secondary mirror
faces the focuser.
4. Retighten the knurled retaining ring and make sure it does
not cause the secondary mirror to shift or rotate.
The tilt of the secondary mirror may very occasionally require
adjustment. If the entire primary mirror reflection is not visible
in the secondary mirror when using the collimation cap, as in
Figure 5c, you will need to adjust the tilt of the secondary mir-
ror. Using a Phillips head screwdriver, loosen one of the three
alignment setscrews while tightening the other two (Figure 8).
Figure 6.
Unthread the metal cap that covers the secondary
mirror collimation screws.
Figure 7.
Loosen the knurled retaining ring on the secondary
mirror holder to allow the secondary mirror holder to rotate.
Figure 8.
Use a Phillips head screw driver to make adjustments
to the three secondary mirror alignment setscrews.
Metal cap
Secondary
mirror alignment
screws
Knurled
retaining ring


