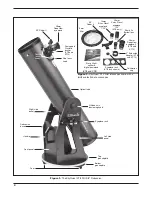
background image

4

2. Telescope Assembly

Assembly of the Dobsonian Base

Now that you have unpacked the boxes and familiarized your-
self with all the parts in front of you, it’s time to begin assembly. 
The optics of the telescope are already installed in the tube, so 
most of the required assembly concerns the Dobsonian base.
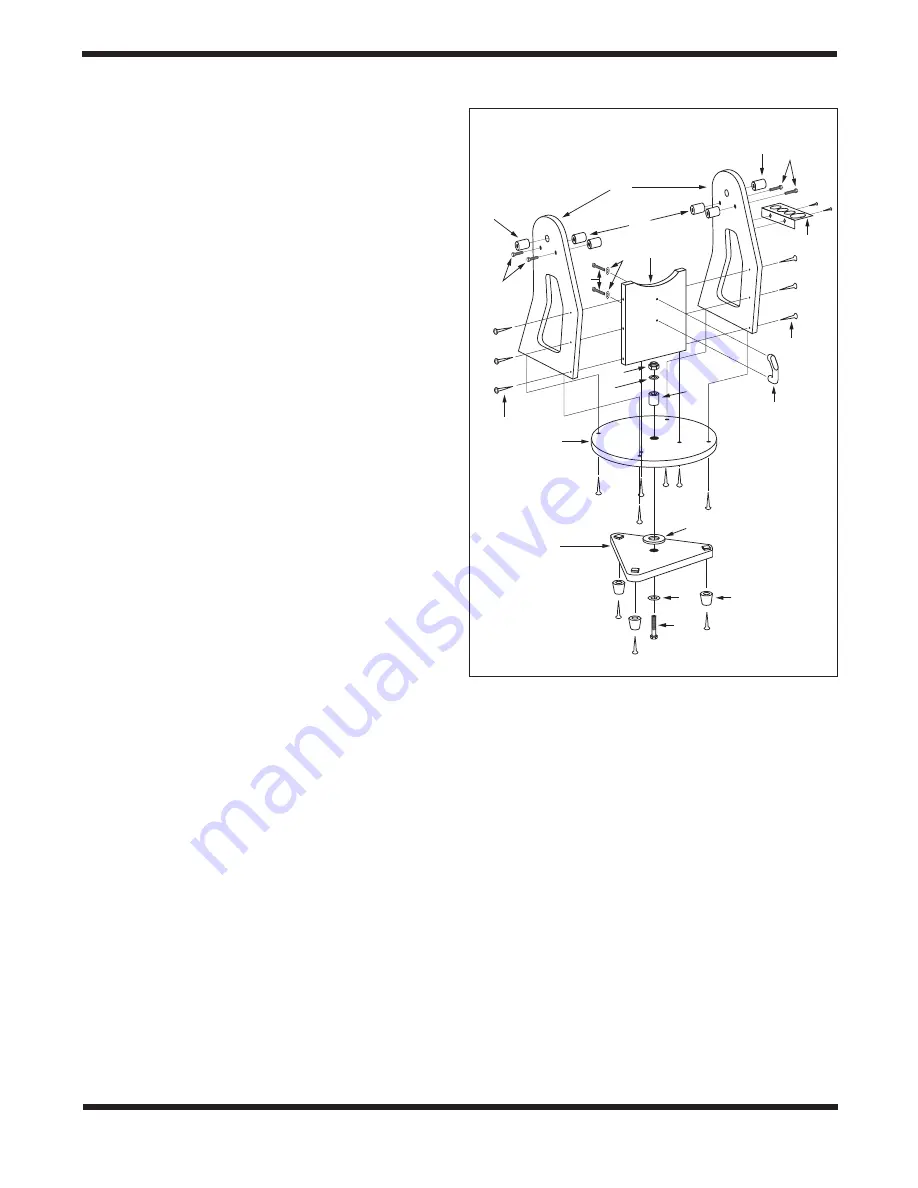
Refer to 

Figure 3 during base assembly. The base needs to be 

assembled only once, unless you disassemble it for long-term 
storage. The assembly takes about 30 minutes and requires a 
Phillips screwdriver, two included crescent wrenches, and the 
included hex key(s).
Note: When tightening the base assembly screws, tighten 
them until firm, but be careful not to strip the holes by 
over-tightening. If you use an electric screwdriver, do the 
final tightening with a standard screwdriver to avoid strip-
ping.

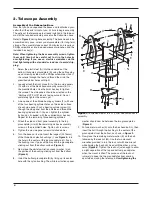
1.  Screw the plastic feet (A) into the underside of the 

bottom (triangular) groundplate (B) using the self-tapping 
wood screws provided, with a Phillips screwdriver. Insert 
the screws through the feet and thread them into the 
predrilled starter holes until tight.

2.  Loosely attach the front brace (C) to the two side panels 

(D) with six of the black base assembly screws (E) in 
the predrilled holes. Use the 4mm hex key to tighten 
the screws. The side panels should be oriented so the 
“SkyQuest XT PLUS” label is facing outward. Do not 
completely tighten the screws yet.

3.  Line up one of the altitude bearing cylinders (F) with one 

of the four bearing cylinder holes on the inside surface 
of each side panel. Push a bearing cylinder screw (G) 
through the side panel from the outside and thread the 
bearing cylinder onto it 

. You can tighten the cylinder 

by hand or, if needed, with the supplied 4mm hex key. 
Repeat for the remaining three bearing cylinders.

4.  Attach the side and front panel assembly to the top 

groundplate (H) with the remaining six base assembly 
screws in the predrilled holes. Tighten all six screws.

5.  Tighten the six side panel screws installed earlier.
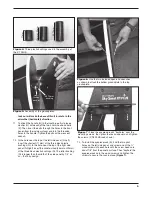
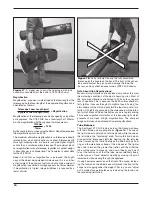
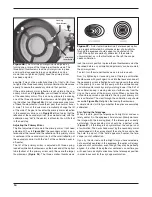
6.  Turn the base on its side. Insert the longest (33.75mm) 

of the three black plastic bushings (I, see 

Figure 4) into 

the hole in the center of the top groundplate (H). Push 
the bushing in so it goes all the way into the groundplate, 
sticking out from the bottom surface (

Figure 5).

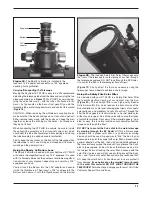
7.  Now place the white low-friction spacer washer (J) on 

the portion of the bushing sticking out from the bottom 
(Figure 5).

8.  Install the bottom groundplate (B) by lining up its center 

hole with the nylon bushing. The white low-friction spacer 

washer should now be between the two groundplates 
(

Figure 5).

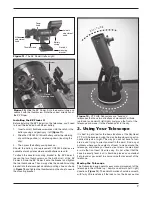
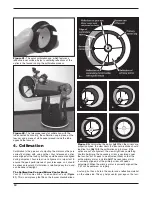
9.  Put one metal washer (K) onto the hex head bolt (L), then 

insert the bolt through the bushing in the center of the 
groundplates from the bottom, as shown in 

Figure 3.

10.  Now place the remaining metal washer (K) on the bolt, 

followed by the lock nut (M). Use the two crescent 
wrenches provided to turn the lock nut with one wrench 
while holding the hex bolt’s head with the other, or vice 
versa (

Figure 6). Tighten the lock nut just enough to allow 

a slight separation of the top and bottom groundplates 
when the mount is lifted. The purpose of the lock nut 
is merely to keep the two groundplates from coming 
apart when moving the telescope

Over-tightening the 

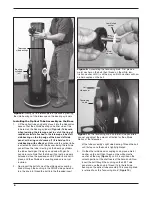
Figure 3. 

Exploded view of the XT PLUS Dobsonian base 

assembly.

L

K

A

J

B

H

M

K

D

R

R

G

G

E

Q

C

O

F

E

S

N

I

Left

Right

Summary of Contents for 8974 XT8 PLUS

Page 1: ...tus Corporate Offices 89 Hangar Way Watsonville CA 95076 USA Providing Exceptional Consumer Optical Products Since 1975 Copyright 2013 2014 Orion Telescopes Binoculars All Rights Reserved No part of t...

Page 2: ...anel Front panel Handle Dobsonian base Top groundplate Bottom groundplate 28mm DeepView eyepiece 2 XT8 and XT10 2 Extension adapter XT8 and XT10 10mm Sirius Pl ssl eyepiece 1 25 25mm Sirius Pl ssl eye...

Page 3: ...diately call Orion Customer Support 800 676 1343 for assistance Parts List Box 1 Optical Tube Assembly and Accessories Qty Description 1 Optical tube assembly 1 Dust cover 1 10mm Sirius Pl ssl eyepiec...

Page 4: ...panel from the outside and thread the bearing cylinder onto it You can tighten the cylinder by hand or if needed with the supplied 4mm hex key Repeat for the remaining three bearing cylinders 4 Attach...

Page 5: ...The latter bushing R is longer than the width of the side panel by 1 4 or so that s by design 13 To install the eyepiece rack S find the two pilot holes on the left side panel and screw one of the woo...

Page 6: ...e knob to thread the bolt into the threaded insert of the tube assembly s right side bearing Thread the bolt until it stops and the knob is lightly tightened 3 On the other altitude axis coupling knob...

Page 7: ...cal objects at night This way you will not have to fum ble around trying to orient yourself in the dark Find a spot outdoors where you have plenty of room to move around the telescope and where you ha...

Page 8: ...ows one to make very tiny focusing increments for ultra precise focusing To focus insert an eyepiece into the focuser and secure it with the thumbscrew s Now slowly rotate one of the coarse focus knob...

Page 9: ...power knob see Figure 11 clockwise until you hear the click indicating that power has been turned on Look through the back of the reflex sight with both eyes open to see the red dot Position your eye...

Page 10: ...through On nights of good seeing the atmosphere will be still and will yield the least amount of dis tortion On nights of poor seeing the atmosphere will be turbu lent which means different densities...

Page 11: ...that permits daytime viewing of our nearest star the Sun Figure 20 The white light filter uses high quality Baader Astro Solar safety film which reduces the transmission of the Sun s radiation to a sa...

Page 12: ...lescope ready for collimation with the tube oriented horizontally the collimation cap in place on the focuser and a piece of white paper placed inside the tube opposite the focuser Figure 23 Collimati...

Page 13: ...secondary mirror and the reflection of the secondary mirror and your eye centered in the reflection of the primary mirror as in Figure 23a If anything is off center as in Figure 23b proceed with the...

Page 14: ...primary You can tell this easily with the collimation cap and mirror center mark by simply watching to see if the dot of the collimation cap is moving closer or farther away from the ring on the cent...

Page 15: ...t Focal Ratio f 5 9 Focuser 2 Crayford dual speed 11 1 accepts 2 eyepieces and 1 25 eyepieces with included adapter Optical tube material Rolled steel Eyepieces 10mm Sirius Pl ssl 1 25 barrel dia 28mm...

Page 16: ...trument has been abused mishandled or modified nor does it apply to normal wear and tear This warranty gives you specific legal rights It is not intended to remove or restrict your other legal rights...

Reviews: