


Page 6
changes. If the screw reaches the end of it’s travel you can
usually hear a faint clicking. You will not damage the preset by
over turning it as slippage occurs. The preset screw will not fall
out and may in some cases need a number of turns to set the
correct speed so keep turning.
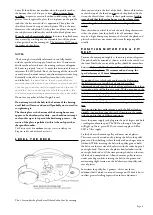
Setting the 33.3rpm.
When setting the speed, place the arm
on the centre track of a record so that the cartridge is tracking
the grooves this ensures that the drag of the cartridge is taken
into account. Speed variations of up to plus or minus 2% are
quite common on decks and the dc motor is capable of plus or
minus 0.1% accuracy. Use the strobe disc provided to set the
speed (full instructions are on the card).
Click the rotary switch to the 2nd click clockwise and set
45rpm speed
so that the platter rotates at 45 (or 78 rpm if you
wish) using the same procedure as for 33rpm.
The dc motors are slightly noisy to begin with and are never
completely silent in comparison to a/c motors. This is thought
to be due to a different type of precious metal brush. Having
said this they still sound a great deal better in performance
terms.
Like most turntable manufacturers we recommend that you
leave the turntable running between changing records as this
reduces the belt wear that occurs with constant stopping and
starting.
N O T E S O N M O T O R & S P E E D S E T T I N G
-Do not use the power supply for anything other than the dc
motor or the power supply is highly likely to be irreparably
damaged and you could also damage the equipment you are
plugging it into.
-The circuit will take at least 4 days to fully run in and sound
it’s best. For this reason it is best to do a final speed check at
the end of this period.
The speed stability of your deck will be excellent once
everything has settled down in a listening session.
When checking speed
- ensure that the power supply and
switch box have been plugged in for at least 3 hours. The
platter also needs to run for 5 minutes with the cartridge on
the record for at least 10 seconds.
It is highly preferable to keep the transformer plugged in at all
times (unless you are away on holiday) because it takes a good
3 hours to warm up from cold and run at it’s best. When in
stand by mode the control box draws a negligible current so
you needn’t worry about your electricity bill.
F I N A L S E T U P O F T O N E A R M
Refer to your tonearm installation and fitting instructions
and use the following only as a rough guide on issues specific
to the turntable.
VERY IMPORTANT NOTE - Do not use
the serrated washer supplied with some Origin Live arms
- it is only meant for non-metalic armboards and degrades
Origin Live decks very significantly.
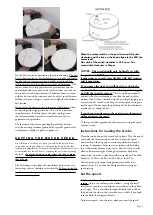
VTA (vertical tracking adjustment)
To allow the cartridge needle to track at the correct angle it is
important that the base of the arm is at the correct height in
relation to the platter - this can be set by rotating the chrome
threaded VTA adjuster supplied with the deck for Origin Live
and Rega derived arms. One complete turn of the adjuster
clockwise raises the arm 1mm.
Set the arm fastening tightness
It is best to experiment with the tightness of the large base nut (if
fitted) by listening to music. This may seem laborious but you will
be richly rewarded as this adjustment makes a big difference to
performance.
IMPORTANT TIP
: For Origin Live
dual pivot
arms tighten the
arm bottom nut fairly hard, but for OL1, Rega and Silver arms use
minimum tension on the fastening nut.
Fit the arm cable clip
Pass the arm cable through the cable clip and fasten in position
with the nut & bolt supplied. Leave a slight droop on it so that
it isn’t “tight”. The clip fastens to the underside of the plinth
using the hole near the rear foot. This is helpful to “earth”
vibration in the cable. The earth lead should be connected to
the earth of your pre-amplifier or amplifier. This earth lead is
best separated slightly from the arm signal leads so do not wind
it around them for best performance.
U P G R A D E S
It is possible to upgrade the turntable
Further upgrades would be
DC200 motor in the case of the Aurora and Calypso
Upgrade Transformer - (Sovereign comes with this
included as standard)
M A I N T E N A N C E O F D E C K
It aids performance to clean all the running surfaces every 3
months or so with mentholated or surgical spirit.
To clean the deck, use a damp soft lint free cloth and wipe
gently – if you have grease marks etc then you can use a
general-purpose anti-smear, car window cleaner such as
Autoglym Fast glass, but only if necessary – wax furniture
polish is to be avoided . Do not spray directly on the turntable
as it may clog up the cartridge etc but rather spray onto a
soft polishing cloth and then use it on the turntable. Do not
use tissue paper or kitchen cleaning paper towels as paper is
abrasive and can put faint scratches in the polished surface.
If you do get minor abrasions on the surface then you can
remove them using a fine car paint abrasive polish such T-
cut or Autoglym paint renovator - this is especially usefull to
remove stubborn grease marks on the platter.
It is wise to keep the packing box that the turntable came in so that
you can transport the deck securely.
The deck is not prone to going out of tune - we recommend
that you check the sub chassis damper is tensioned lightly onto
the plate every 2 years or so as the damping can compress a
little over time.
Depending on your use of the deck, the belt should ideally be
replaced every 2 years or so.


