


Page 5
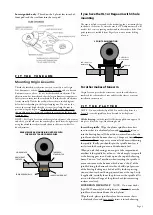
Set the belt tension by positioning the motor housing. The belt
has an ideal tension for best performance - too tight and motor
bearing friction increases causing possible speed instability
and increased wear plus a decrease in sonic performance. The
correct distance is not hypercritical to performance and the
above dimensions may need to be increased after a year of use
due to belt stretch. Experiment with different distances if you
wish for best sound but you may need to adjust speed between
different distance settings, as speed varies slightly with different
belt tension.
Do not plug the power supply into mains conditioners, filters
or anything with surge protection - this can be disastrous
to performance. It will not harm the pod, to plug it into
the aforementioned items but it almost always results in
performance degradation.
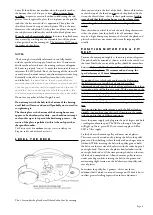
The location of the motor pod should preferably be kept
away from strong electromagnetic fields typically generated by
transformers, amplifiers, power supplies etc.
S E T T I N G T H E M O T O R S P E E D
You will need to set the motor speed yourself. In the first 24 hours
of use from starting up the motor, the speed tends to drift but then
settles down permanently. To burn in the regulator board components
we recommend at least 24 hours of running the motor before setting
the speed -
the platter bearing also takes time to bed in so motor
running in should be carried out with platter turning (no faster
than 45rpm).
The thin output wires from the transformer only carry a very
low voltage and are therefore safe to handle. Voltages inside the
transformer are dangerous so the transformer case should not
be unscrewed or opened.
When the rotary switch on the pod is turned fully anti-
clockwise and the line on the knob aligns to the LED, the
motor is off.
One click of the switch clockwise is 33.3 rpm - The
second click clockwise is 45rpm
NOTES: The speed should only be finally set with
the pod in it’s FINAL position and at normal room
temperature as speed varies slightly with belt tension
and temperature.
If you move the pod, you will need to re check the
speed and if necessary correct it, by repositioning the
pod till the speed is correct.
This is a quick operation if
you leave the platter spinning as you slide the pod to adjust
tension. Also it is best checked with the cartridge dragging on a
centre track of a record as the drag can affect speed setting to a
small degree. Do not move the pod beyond the ideal distances
mentioned in “fitting the belt”.
If you change transformer to the upgrade transformer you
will need to reset the speed.
If the speed drifts significantly then correct it using the speed
adjuster screws.
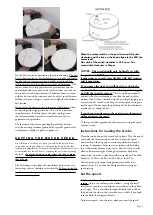
Instructions for reading the strobe
Place the strobe disc on the record to be played. Play the record
and watch the relevant ring on the disc. Adjust the speed
until marks on the ring appear stationary while the record is
rotating. It sometimes helps to stare at infinity whilst doing
this as the marks become easier to see. You can see the strobe
effect in fluorescent light, although an ordinary bulb held
about 2 feet from the strobe disc will also work fine. The bulb
flickers at 50 Hz in the EEC and 60 Hz in the USA.
You can purchase bayonet fitting fluorescent bulbs to fit
normal lamps. Try to shut out daylight when carrying out
speed setting.
Set the speed
Set the switch on the pod to the first click i.e. 33 rpm
setting.
Adjust the motor speed as follows: using the small
screwdriver, turn the speed adjuster screw shown in the photo
for 33 rpm. This is accessible through the hole in the side of
the pod and the slots in the screw heads are visible if you look
into the holes (See diagram below).
To increase speed, turn the screw clockwise until the speed


