background image

4    

844·674·4461

[email protected]

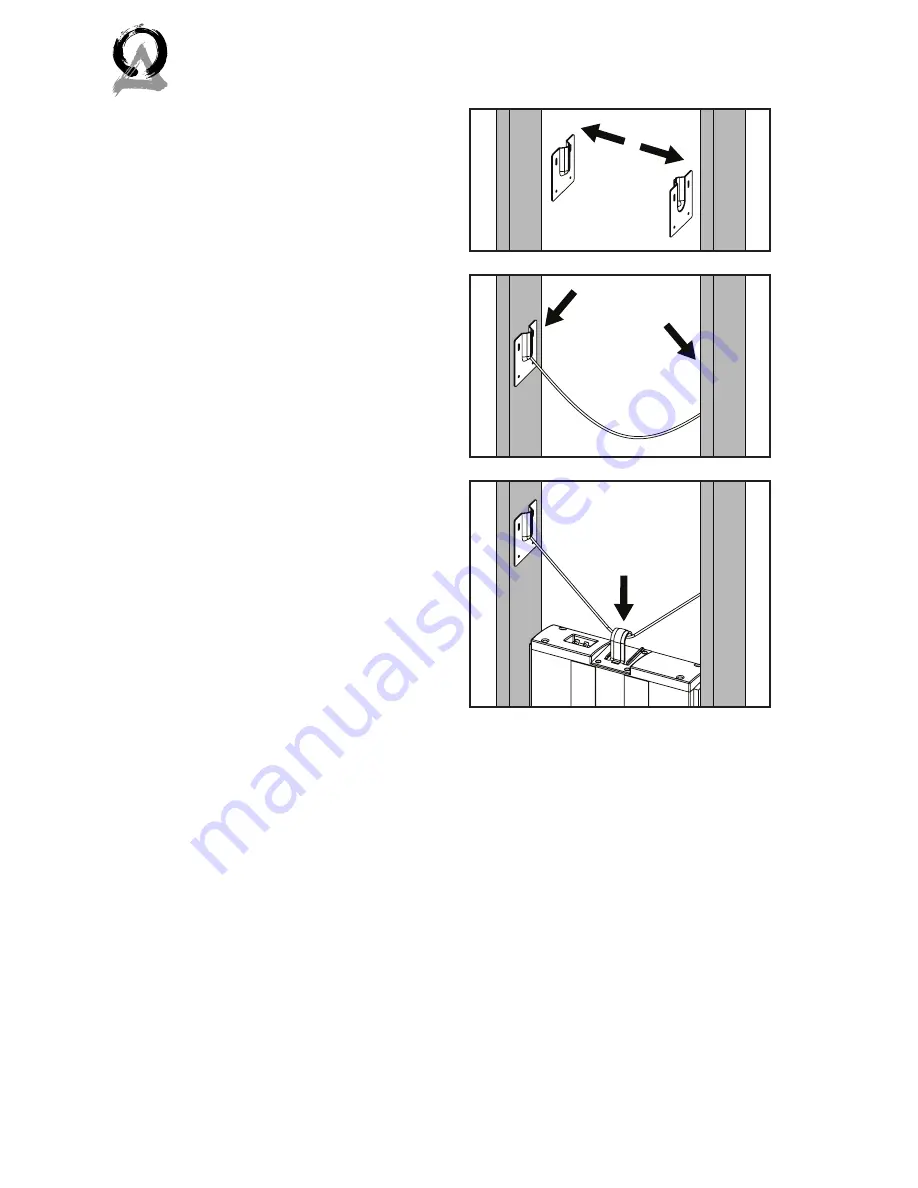
2) Installing the 

Enclosure

Using the 8 provided screws, 

attach the two mounting brack-

ets to the studs so that they are 

facing each other. Once every-

thing’s installed, the distance 

between the bottom of the sub-

woofer and the bottom of the 

bracket will be about 49”. So 

when you know how far off the 

floor the subwoofer should be, 

add that number to 49”, and in-

stall the brackets at that height. 

For example, if you want the 

subwoofer to be about a foot 

off the floor, install the bottom 

of the brackets about 61” (49” + 

12”) off the floor.

Insert the ends of the suspen-

sion cable into the mounting 

brackets. Hang the enclosure 

from the suspension cable. 

There are several ends on one 

side of the suspension cable so 

that you can adjust the height 

of the enclosure.

Figure 4.1: Suspension Install

Summary of Contents for CSUB10N

Page 1: ...Installation Manual Model CSUB10N CSUB10NCE V 1 1 10 IN WALL SUBWOOFER ...

Page 2: ... the Enclosure 4 3 Attach the Wire to the Enclosure 5 4 Drywall 5 Baffle Instruction 6 Installation Requirements and Recommendations 6 CSUB10N What s Included 6 Required Tools Items 7 Baffle Installation 8 1 Installing the Subwoofer Baffle 8 2 Painting the Grille 9 3 Mounting the Grille 9 4 Making Amplifier Adjustments 10 Specifications 12 Technical Assistance 13 Warranty 14 Limited Lifetime Warra...

Page 3: ...on booklet covers the necessary information for a smoothinstallationofyourComposerSubwooferenclosure CSUB 10NCE including thetoolsyouwillneed step by stepinstructions for installation and all warranty information The instructions for the baffle CSUB10N aren t included in this manual but can be found with the baffle or online at www originacoustics com If for any reason you experience problems or i...

Page 4: ...horter the run the smaller the wire size you can use however you can never go wrong by using a thicker gauge Wire Length Recommended Gauge Feet Meter 0 100 0 30 18 50 150 15 45 16 100 30 14 Speaker Wire Recommendations Location The location of your subwoofer s will have a large impact on sound quality For best results install the subwoofer so the bot tom is close to the ground and in either corner...

Page 5: ...ast two conductors one that can be identified as the positive and the other as the negative All two conductor wires have some means of identifying which conductor is which but at times this identification may be subtle It s crucial that you keep track of which wire you use for positive and negative Typically if the wires are colored red and black or copper and silver but sometimes other col ors or...

Page 6: ...o when you know how far off the floor the subwoofer should be add that number to 49 and in stall the brackets at that height For example if you want the subwoofer to be about a foot off the floor install the bottom of the brackets about 61 49 12 off the floor Insert the ends of the suspen sion cable into the mounting brackets Hang the enclosure from the suspension cable There are several ends on o...

Page 7: ... or bottom of the enclosure Push on the end of the connector and insert the wire 4 Drywall The drywall is now ready to go up The placeholder plate should not be removed until the subwoofer is installed Install the dry wall to the edge of the plate but do not tape or mud the gap The gap should not be larger than 3mm The drywall screws should be no further apart than 12 or 8 along the edge Figure 5 ...

Page 8: ...et covers the necessary information for a smooth installation of your Composer Subwoofer baffle CSUB10N including the tools you will need step by step instructions for in stallation troubleshooting tips for any errors that may occur and all warranty information This manual assumes you ve already in stalledtheenclosure anddoesn tcoverthoseinstallationsteps The instructions for the enclosure CSUB10N...

Page 9: ...M CSUB10N CSUB10NCE INSTALLATION MANUAL Required Tools Items Screwdriver that can hold hex wrench 1 Optional Tools Items Can of spray paint Can of compressed air For painting the grille For painting the grille Figure 7 1 Tools ...

Page 10: ...e terminals are sized differently to assure that they get connected to the proper woofer terminals Insert the baffle into the enclo sure Make sure it s right side up by keeping an eye on the orientation of the logo Use the four screws to firmly attach the baffle to the enclosure but do not overtighten We recommend testing the system at this time to ensure the subwoofer is installed and working pro...

Page 11: ...o match the color you need Before painting carefully remove the thin cloth on the underside of the grille Lightly spray the front of the grille with the paint from a distance being careful not to plug any of the holes Diluting the paint with paint thinner will lessen the risk of filling any holes If a hole is plugged use a can of compressed air to open it Once the paint is dry put the cloth back o...

Page 12: ...ou may want to try set ting the crossover closer to 100Hz about 1 o clock on our SubA150 amp 2 Phase adjustment should come next This adjustment can have a subtle effect but it is definitely worth doing You won t need to sweat getting it exact the important thing is to avoid getting it really wrong When tuning by ear a If you are using a home theater receiver during set up there will be section as...

Page 13: ...ter An inex pensive SPL meter works fine or you can download a free app for use on your phone f Sorry but the music CD with constant bass won t work here You will need to use a test CD 3 Volume will complete your subwoofer amplifier set up When tuning by ear Play some source material that has bass content you are familiar with Simply adjust the vol ume until the bass level sounds in balance with t...

Page 14: ... 254mm Frequency Response 30Hz 250Hz Impedance 8Ω Power Handling 100 500 watts Sensitivity 88dB Amplifier Requirements SUBA500 SUBA150 Cutout Dimensions 10 55x 10 55 268 x 268mm Dimensions Enclosure 3 5 x 13 x 44 88 x 330 x 1120mm Dimensions Enclosure w Grille 14 15 x 14 15 360 x 360mm Dimensions Baffle 3 5 x 13 x 44 88 x 330 x 1120mm Dimensions Baffle w Grille 3 5 x 13 x 44 88 x 330 x 1120mm Dime...

Page 15: ...cs com Ifyouarehavingtechnicaltrouble pleaseincludethemodelnum ber and briefly explain what steps you took to resolve the problem in your email or be prepared to answer these questions over the phone If you are considering returning the product it s required that you contact Origin Acoustics prior to any return attempts This way we can determine if the issue can be resolved without returning the p...

Page 16: ... dealer If the product is determined to be defective it will be repaired or replaced at Origin Acoustics discretion If the product must be replaced yet it is no longer manufactured it will be replaced with a model of equal to or greater value that is the most similar to the original If this is the case installing the replacement model may require mounting modifications Origin Acoustics will not be...

Page 17: ...ed dealer Damage caused by improper installation Normal wear maintenance and environmental issues Damage caused by voltage inputs in excess of the rated maximum of the unit Damage inflicted during the return shipment Before making any return attempts it is required that you first contact Origin Acoustics Return product to Origin Acoustics or your dealer either in person or by mail It s preferable ...

Page 18: ... 2016 Origin Acoustics All copyrighted trademarked and patented elements mentioned herein are the sole property of Origin Acoustics ...

Reviews: