background image


Installation 


Location for installation 

The driver has been designed and manufactured to be installed 
within another device. Install them in a well-ventilated location that 
provides easy access for inspection. The location must also satisfy 
the following conditions: 


• 

Inside an enclosure that is installed indoors (provide vent holes) 

• 

Operating ambient temperature 0 to +55 °C (+32 to +131 °F) 
(non-freezing) 

• 

Operating ambient humidity 85% or less (non-condensing) 

• 

Area that is free of explosive atmosphere or toxic gas (such as 
sulfuric gas) or liquid 

• 

Area not exposed to direct sun 

• 

Area free of excessive amount of dust, iron particles or the like 

• 

Area not subject to splashing water (rain, water droplets), oil (oil 
droplets) or other liquids 

• 

Area free of excessive salt 

• 

Area not subject to continuous vibration or excessive shocks 

• 

Area free of excessive electromagnetic noise (from welders, 
power machinery, etc.) 

• 

Area free of radioactive materials, magnetic fields or vacuum 

• 

1000 m (3300 ft.) or lower above sea level 


Installation method 

The driver is designed so that heat is dissipated via air convection 
and conduction through the enclosure. Install the driver onto an 
appropriate flat metal plate having excellent vibration resistance and 
heat conductivity. [made of aluminum, 200×200×2 mm 
(7.87×7.87×0.08 in.) or equivalent] When two or more drivers are to 
be installed side by side, provide 20 mm (0.79 in.) and 25 mm (0.98 
in.) clearances in the horizontal and vertical directions, respectively. 
When installing the driver in an enclosure, use two screws (M4; not 
supplied) to secure the driver through the mounting holes. 

20 (0.79)
or more

150 (5.91)

25 (0.98) or more

35 (1.38)


Unit: mm (in.) 


Note 

• 

Install the driver in an enclosure whose pollution 
degree is 2 or better environment, or whose degree of 
protection is IP54 minimum. 

• 

Do not install any equipment that generates a large 
amount of heat or noise near the driver. 

• 

Do not install the driver underneath the controller or 
other equipment vulnerable to heat. 

• 

If the ambient temperature of the driver exceeds 
55 °C (131 °F), improve the ventilation condition. 

• 

Be sure to install the driver vertically (vertical 
position). 

Connection 


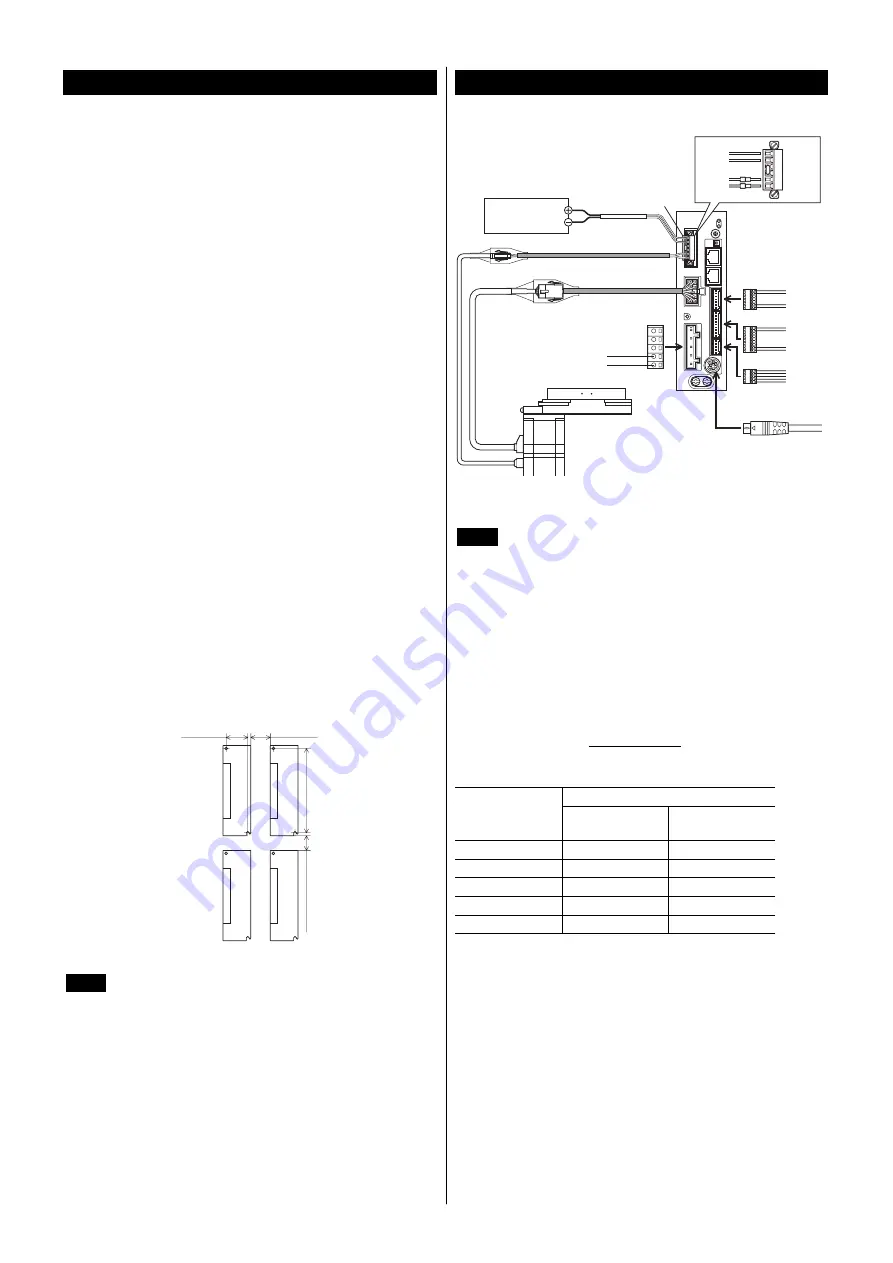
Connection example 

Cable for motor

Cable for electromagnetic brake

CN1 connector

24 VDC±5%

0.75 A or more

24 VDC power supply

CN1

Output 
signals

Input 
signals

Sensor 
signals

2

2

2

• 

• 

• 

• 

CN2

CN3

CN5

CN8

CN9

Main power supply

Single-phase 100-120 V 

or

Single-phase 200-240 V

1

CN4

OPX-2A

 or 

MEXE02

3

Black

-

+

White

MB1
MB2

24 V+
24 V-


∗1 

Lead wire for main power supply: AWG16 to 14 (1.25 to 2.0 mm

2

∗2 

Lead wire for I/O signals: AWG26 to 20 (0.14 to 0.5 mm

2

∗3 

Lead wire for CN1: AWG28 to 16 (0.08 to 1.25 mm

2


Note

• 

Have the connector plugged in securely. Insecure 
connections may cause malfunction or damage to the 
actuator or driver. 

• 

Do not wire the power supply cable of the driver in the 
same cable duct with other power lines or motor 
cables. Doing so may cause malfunction due to 
noise. 

• 

When cycling the power or plugging/unplugging the 
connector, turn off the power and wait for the 
CHARGE LED to turn off. Residual voltage may 
cause electric shock. 

• 

When installing the actuator to a moving part, use an 
accessory flexible cable offering excellent flexibility. 
Refer to the USER MANUAL for details. 


Power supply current capacity 

Power supply current capacity 

Model 

Single-phase 

100-120 V 

Single-phase 

200-240 V 

DG85 

2.4 A or more 

1.5 A or more 

DG130 

3.6 A or more 

2.3 A or more 

DG200 

5.9 A or more 

3.7 A or more 

EAS4 

2.4 A or more 

1.5 A or more 

EAS6 

3.6 A or more 

2.3 A or more 

Summary of Contents for LSD-AD

Page 1: ...い http www orientalmotor co jp 規格 CE マーキング この製品は EN 規格にもとづいて CE マーキング 低電圧指令 EMC 指令 を実施しています 適用規格 EN 61800 5 1 設置条件 EN 規格 機器組み込み 過電圧カテゴリー II 汚損度 2 感電保護 クラス I 低電圧指令 この製品は 機器組み込み型です IT 配線系統では使用できません 製品は 筐体内に設置し 人の手が触れられないようにしてくだ さい 製品に人の手が触れられるときは 必ず保護接地をしてください アクチュエータ ドライバの保護接地端子は 確実に接地してくだ さい 漏電遮断器 RCD で感電保護を行なうときは タイプ B の漏電 遮断器をドライバの電源側に接続してください 配線用遮断器 MCCB は EN または IEC 規格適合品を使用し てください モーターケーブルや電源...

Page 2: ...運転を行なわないでください モーターやギヤ部が破損するおそれがあります EAS4 ボールねじリードピッチ 12 mm で垂直上向きの押 し当て原点復帰運転を行なう場合 負荷質量を 4 kg 未満に してください 負荷質量が 4 kg 以上になると 機械的ストッパ位置まで押し切れず 原点復帰の停止精度にばらつきが発生します 準 備 製品の確認 次のものがすべて揃っていることを確認してください 不足したり破 損している場合は お買い求めの支店 営業所までご連絡ください ドライバ 1 台 CN1 用コネクタ 6 ピン 1 個 CN3 用コネクタ 5 ピン 1 個 CN5 用コネクタ 5 ピン 1 個 CN8 用コネクタ 9 ピン 1 個 CN9 用コネクタ 7 ピン 1 個 コネクタ結線レバー CN3 用 1 個 電動アクチュエータ用ドライバ 取扱説明書 本書 1 部 アクチュエータとドライバの...

Page 3: ...設定 0 終端抵抗設定スイッチ TERM RS 485 通信で制御するときに使用してく ださい RS 485 通信の終端抵抗 120 Ω を設定します 出荷時設定 OFF DC24 V 電源入力端子 CN1 24V ドライバの制御用電源を接続します DC24 V 電源 電源 GND 回生抵抗サーマル入力 端子 CN1 TH1 TH2 回生抵抗 RGB100 を接続します 回生抵 抗を接続しないときは TH1 端子と TH2 端 子を短絡させてください 電磁ブレーキ接続端子 CN1 MB1 MB2 電磁ブレーキ用ケーブルのリード線を接続 します MB1 電磁ブレーキ 黒 MB2 電磁ブレーキ 白 モーターコネクタ CN2 アクチュエータを接続します 名 称 機 能 回生抵抗接続端子 CN3 RG1 RG2 回生抵抗 RGB100 を接続します 主電源入力端子 CN3 L N ドライバの主電源...

Page 4: ...は コントローラや他の熱に弱い機器の下側に設 置しないでください ドライバの周囲温度が 55 C を超えるときは 換気条件を 見直してください ドライバは 必ず垂直 縦位置 に設置してください 接 続 接続例 䊝䊷䉺䊷 䉬䊷䊑䊦 㔚 䊑䊧䊷䉨 䉬䊷䊑䊦 CN1 䉮䊈䉪䉺 DC24 V 5 0 75 Aએ DC24 V㔚Ḯ CN1 ജାภ ജାภ 䉶䊮䉰ାภ 2 2 2 3 㤥 MB1 MB2 24 V 24 V CN2 CN3 CN5 CN8 CN9 ਥ㔚Ḯ න 100 120 V 䉁䈢䈲 න 200 240 V 1 CN4䋺OPX 2A 䉁䈢䈲MEXE02 1 主電源用リード線 AWG16 14 1 25 2 0 mm2 2 入出力信号用リード線 AWG26 20 0 14 0 5 mm2 3 CN1 用リード線 AWG28 16 0 08 1 25 mm2 重要 コネクタは確実に接続し...

Page 5: ... に繰り返される運転には 回生抵抗 RGB100 を使用してください ᛶ RGB100 AWG22 CN1䈱TH1䇮TH2 ሶ䈻 150 C䋨N C 䋩 CN3䈱RG1䇮RG2 ሶ䈻 AWG18 R䋺150 Ω 重要 回生抵抗を接続するときは 必ずジャンパー線を CN1 用 コネクタから外してください 回生抵抗の許容消費電力を超えたときは サーモスタット がはたらいて 回生抵抗器過熱のアラームが発生します 回生抵抗器過熱のアラームが発生したときは 電源を切 り 異常の内容を確認してください CN3 被覆剥き長さ 8 9 mm 䉮䊈䉪䉺 䊧䊋䊷䉕 䈚ਅ䈕 䈭䈏䉌䊥䊷䊄 䉕ᝌ 䈜䉎 8㨪9 mm 䉮䊈䉪䉺 䊧䊋䊷 マイナスドライバでも結線できます 刃先幅 3 0 3 5 mm のマイナスドライバで挿入口を押したまま リー ド線を挿入してください 䊙䉟䊅䉴䊄䊤䉟䊋䈪 䈚䈢䉁䉁䇮 䊥䊷䊄 䉕ᝌ 䈜...

Page 6: ...システムでお使いの場合は バッテリ BAT01B を接続してください バッテリをドライバのバッテリコネクタ CN10 に接続し 電源を投入すると バッテリの充電が始まります 約 32 時 間で完了します 周囲温度が 20 C の場合 䊋䉾䊁䊥㔚ḮGND 䊋䉾䊁䊥㔚Ḯ ജ ᧂ 設 定 ภᯏ ቯ䉴䉟䉾䉼䋨ID䋩 ᛶ ቯ䉴䉟䉾䉼䋨TERM 䋩 䊄䊤䉟䊋ᱜ㕙 䊄䊤䉟䊋ᐩ㕙 ㅢାㅦᐲ ቯ䉴䉟䉾䉼䋨SW2䋩 ᯏ ቯ䉴䉟䉾䉼䋨SW4䋩 㩷 No 1䋺ภᯏ ภ䉕 ቯ㩷 㩷 No 2䋺䊒䊨䊃䉮䊦䉕 ቯ 重要 スイッチを設定するときは 必ずドライバの電源を切ってくだ さい 電源が投入されている状態で設定しても 有効になり ません プロトコル 機能設定スイッチ SW4 の No 2 で RS 485 通信のプロトコルを設 定します 出荷時設定 OFF SW4 No 2 プロトコル ON Modbus RTU モ...

Page 7: ...重要 No 1 No 2 の片方だけを ON にすると 通信エラーが発生す る場合があります 点 検 運転後は 定期的に次の項目について点検することをおすすめし ます 異常があるときは使用を中止し お客様ご相談センターにお 問い合わせください 点検項目 ドライバの開口部が目詰まりしていないか ドライバの取付ねじや接続部に緩みがないか ドライバに埃などが付着していないか ドライバに異臭や異常がないか 重要 ドライバには半導体素子が使われています 静電気などに よって半導体素子が破損するおそれがあるため 取り扱い には注意してください 一般仕様 保護等級 IP10 周囲温度 0 55 C 凍結しないこと 湿 度 85 以下 結露しないこと 高 度 海抜 1000 m 以下 使用環境 雰囲気 腐食性ガス 塵埃のないこと 水 油が直接かからないこと 周囲温度 25 70 C 凍結しないこと 湿 度...

Page 8: ...換算値 設定値 換算値 リード mm 6 6 分解能 最小移動量 mm 600 0 01 1000 0 006 電子ギヤ A 5 1 電子ギヤ B 3 1 座 標 モーター回転方向 側 CW 反モータ側へ移動 側 CW 反モータ側へ移動 位置 step 1000 10 mm 0 0 mm 運転速度 Hz 10000 100 mm s 1000 6 mm s 運転 データ 加速 減速 レート ms kHz 設定値 1 0 001 ms kHz 1000 10 m s 2 1000 6 m s 2 JOG 運転速度 Hz 10000 100 mm s 1000 6 mm s JOG 加速 減速 レート ms kHz 設定値 1 0 001 ms kHz 1000 10 m s 2 1000 6 m s 2 運 転 JOG 起動速度 Hz 600 6 mm s 500 3 mm s 原点復帰方法...

Page 9: ...点復帰開始 ソフトウェアリミット step ストローク 100 300 ストローク 3 mm 8388607 100663 284 mm 座 標 ソフトウェアリミット step 200 2 mm 8388608 100663 296 mm 工場出荷時 およびデータ初期化時の値です 重要 EAS4 で垂直上向きの押し当て原点復帰運転を行なう場合 負荷質量を 4 kg 未満にしてください 負荷質量が 4 kg 以上になると 機械的ストッパ位置まで押し切れず原点復帰の停止精度にばらつきが発生します 押し当て原点復帰オフセット量は 次の値より大きくしてださい 初期値のままで押し当て原点復帰を行なうと テーブルがゴ ムストッパに当たった状態になり 原点復帰精度に悪影響があります EAS4 は 2 mm 設定値 0 メカ端から 200 step 移動 以上 EAS6 は 5 mm 設定値 300 メカ...

Page 10: ...ンターまでご連絡ください と は 日本その他の国におけるオリ エンタルモーター株式会社の登録商標または商標です Copyright ORIENTAL MOTOR CO LTD 2012 http www orientalmotor co jp ȝ ץ նȮሻՠˁᜪ ץ ɿ ʝʃɁȧಘюᴥଆ ᝈˁÐÈÓȞɜɕȧҟႊժᑤȺȬᴦ း ک ȺɁ ץ ᭉᜓขȾɿ ʝʃ ɲʽʂʕɬɁᜪ ץ ɥȧ ఖɁ ک նᴥི ᴦ TEL 0120 911 271 ʟɭ ʵʓɿ ʝʃ ՙ ᩖ ࢲஓ 9 00ᵻ18 30 ᛏֿȾᩜȬɞȝ ᝈȺɁ੫ᚓᄑȽȧᄾᝬ ᴥᣮᝈ ི ᴦ ూ TEL 0120 925 410 FAX 0120 925 601 ջաࠎ TEL 0120 925 420 FAX 0120 925 602 TEL 0120 925 430 FAX 0120 925 603 ȝ റȧᄾᝬʅʽʉ ՙ ᩖ ࢲ...

Page 11: ...a component to be installed within another device Overvoltage category II Pollution degree 2 Protection against electric shock Class I Low Voltage Directives The product is a type with machinery incorporated so it should be installed within an enclosure This product cannot be used with cables normally used for IT equipment Install the product within the enclosure in order to avoid contact with han...

Page 12: ...eated frequently connect an accessory regeneration unit RGB100 sold separately The overvoltage alarm will generate depending on the operating condition When the overvoltage alarm has generated review the operating conditions or connect the regeneration unit RGB100 Do not perform push motion operation with the DGⅡ Series Doing so may result in damage to the motor or gear part When performing sensor...

Page 13: ...ia RS 485 communication The termination resistor 120 Ω of RS 485 communication can be set Factory setting OFF 24 VDC power supply input terminal CN1 24V Connects the driver control power supply 24 VDC power supply input Power supply GND Regeneration resistor thermal input terminal CN1 TH1 TH2 Connects the regeneration unit RGB100 sold separately If no regeneration unit is connected short the TH1 a...

Page 14: ...in Note Install the driver in an enclosure whose pollution degree is 2 or better environment or whose degree of protection is IP54 minimum Do not install any equipment that generates a large amount of heat or noise near the driver Do not install the driver underneath the controller or other equipment vulnerable to heat If the ambient temperature of the driver exceeds 55 C 131 F improve the ventila...

Page 15: ...he regeneration unit RGB100 To RG1 and RG2 terminals on CN3 To TH1 and TH2 terminals on CN1 Regeneration unit RGB100 150 C 302 F Normally closed AWG22 AWG18 R䋺150 Ω Note Before connecting the regeneration unit be sure to remove the jumper wire from the CN1 connector If the current consumption of the regeneration unit exceeds the allowable level the thermostat will be triggered and a regeneration u...

Page 16: ...32 hours to fully charge the battery at an ambient temperature of 20 C 68 F Battery power ground Battery power input Not used Setting Address number setting switch ID Termination resistor setting switch TERM Driver front face Driver bottom face Transmission rate setting switch SW2 Function setting switches SW4 No 1 Set the address number No 2 Set the protocol Note Be sure to turn off the driver po...

Page 17: ...y use and contact your nearest Oriental Motor sales office During inspection Check for a blocked opening of the driver case Are any of the driver mounting screws or connection loose Is there attachment of dust etc on the driver Are there any strange smells or appearances within the driver Note The driver uses semiconductor elements Handle the driver with care since static electricity may damage se...

Page 18: ...erted value Setting value Converted value Ball screw lead mm 6 6 Resolution Minimum travel amount mm 600 0 01 1000 0 006 Electronic gear A 5 1 Electronic gear B 3 1 Coordination Motor rotation direction Positive direction CW The linear slide table moves to opposite the motor side Positive direction CW The linear slide table moves to opposite the motor side Position step 1000 10 mm 0 0 mm Operating...

Page 19: ... Note When performing sensorless return to home operation upward in a vertical direction with the EAS4 type keep the load mass to be less than 4 kg If the load mass is 4 kg or more the actuator cannot push up to the position of the mechanical stopper causing variation in the stopping accuracy of return to home Set the value of the position offset of home seeking to be the following value or larger...

Page 20: ...d other countries Copyright ORIENTAL MOTOR CO LTD 2012 Please contact your nearest Oriental Motor office for further information Technical Support Tel 800 468 3982 8 30 A M to 5 00 P M P S T M F 7 30 A M to 5 00 P M C S T M F E mail techsupport orientalmotor com www orientalmotor com Headquarters and Düsseldorf Office Tel 0211 52067 00 Fax 0211 52067 099 Munich Office Tel 089 3181225 00 Fax 089 31...

Reviews: