background image


- 2 - 

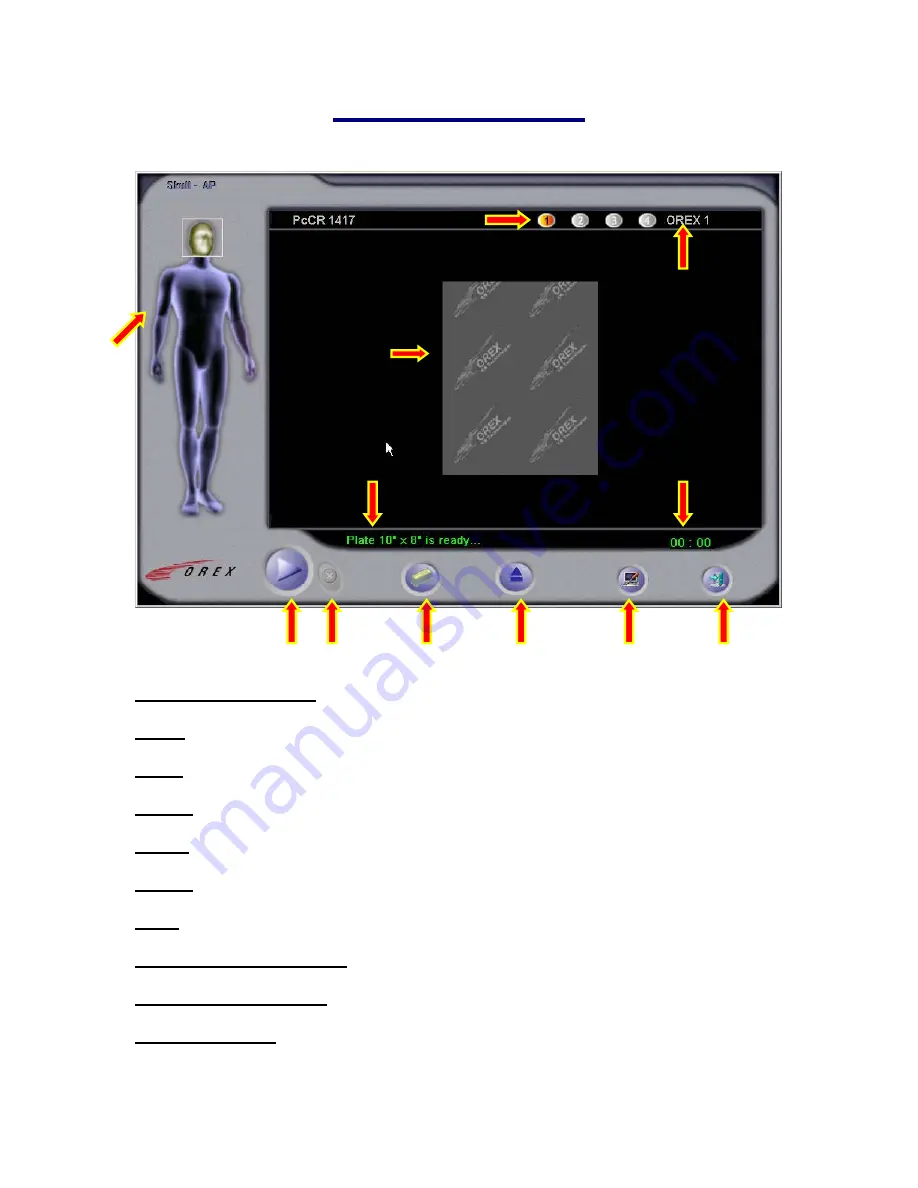
User Interface 


8.


9.


1.


10.


11.


12.


2.   3.          4.            5.             6.           7. 

1. Anatomical Selector:

  Selects the region of the body to be imaged 


2. Scan:

  Starts the scanning cycle. 


3. Stop:

  Aborts the current operation in progress. 


4. Erase:

  Allows user to manually perform an erase cycle on a plate/cassette. 


5. Eject:

  Ejects the plate/cassette from the machine. 


6. Setup:

  Enters the setup function of the software. 


7. Exit:

  Exits the Scanner Interface Program. 


8. Configuration Selector:

  Selects one of four (4) configurations. 


9. Configuration Name:

  Shows the name of the currently selected configuration. 


10. Preview  screen:

  A preview of the image, as it is being scanned, is displayed here. 


Summary of Contents for PcCR 1417

Page 1: ...PcCR 1417 Scanner Interface Guide Version 2 5 1 09 January 2003 ...

Page 2: ...nostics 16 17 Automatic Tests 18 Advance 19 20 About 21 Contact Information Orex Computed Radiography Inc USA 2000 Commonwealth Ave Suite 200 Auburndale MA 02466 Main Line 1 617 244 9000 Toll Free 1 888 844 7775 Fax 1 617 244 9020 Technical Services Dial 3 from main menu Note Before returning any materials you will need to call for an RA before shipping ...

Page 3: ...o manually perform an erase cycle on a plate cassette 5 Eject Ejects the plate cassette from the machine 6 Setup Enters the setup function of the software 7 Exit Exits the Scanner Interface Program 8 Configuration Selector Selects one of four 4 configurations 9 Configuration Name Shows the name of the currently selected configuration 10 Preview screen A preview of the image as it is being scanned ...

Page 4: ... 3 User Interface 11 Scanner status indicator Provides feedback to the user on the state of the scanner 12 Timer Shows the time left for current operation ...

Page 5: ...ot turned on off using unit sets 3 Organ List Selects the major organ category for the current setup 4 Sub Organ List Selects Sub Organ category for the current setup 5 Set New Sub Organ Name This feature allows for a new Sub Organ category to be added to any Major Organ Category 6 Sub Organ Acquisition Setup This section is used to define the setup of each Sub Organ PM Gain and Offset can be free...

Page 6: ... set anywhere from 0 80 Noise This is a noise reduction filter Noise can be set to either 0 or 1 Kernel One of three Unsharp Mask Parameters Smooth Kernel and Enhancement are used together to define how Unsharp Mask will function Kernel can be set to 3 5 or 7 8 Context Vision Filters Setup Check the On box to use these filters Filters also know as GOP are used for image enhancement Grayed out Wind...

Page 7: ...10 Scanner Cleaning This function is used during the roller cleaning procedure PREPARE This button is pressed prior to removing power from the scanner during the cleaning procedure Please see user manual for complete instructions 11 Calibration Settings The Orex PcCR 1417 comes from the factory pre calibrated Only minor adjustments need to be made when the System is installed Only Certified Orex t...

Page 8: ...s also where the viewer will retrieve the information The Browse button can be used to easily find this location Image Format Allows the selection of three formats for storing the Data ο Raw Data Only 16bit This is the default format and should be used in all applications ο Dent A View Image 16bit This is a format which can only be used by specific software sets Use this setting only when instruct...

Page 9: ...gh Resolution Selecting Always Ask will prompt the user to select Normal Resolution or High Resolution each time an 8 X 10 plate cassette is loaded into the scanner To set the unit for permanent high resolution check the box next to Normal Resolution you will notice that Normal Resolution will immediately change to High Resolution Note The Always Ask option will override the Normal High Resolution...

Page 10: ...of the Y Axis Steps for Plate Enter Defines travel of loader entering Cassette Factory Set do not adjust Steps for Plate Exit Defines travel of loader exiting cassette Factory Set do not adjust Erase Factor Defines the Erase time of the Unit Step Size Defines the step size of the carriage motor Currently this should always be 8 Screw Size Defines the size of the worm gear used for the carriage ass...

Page 11: ...e re positioned in millimeter increments into the viewable area Please note the image on this screen will not actually move The results will be seen on the next scan Fine Tuning Check this box to make smaller increments with each click of the left right up and down buttons 1 10th mm Find Origin After Scan This is an automated feature for finding the Origin values Check this box and return to the U...

Page 12: ...mage mode For complete details see the following section dedicated to this mode ACL4 Nominal This radio button should be selected under normal operating conditions NOTE Even if the system is NOT an ACL4 this radio button will be selected ACL4 Test This feature is used during the manufacturing process only It should never be used in normal operation 4 Save The save button must be pressed in order f...

Page 13: ...est to use without the need for multiple exposures Following is a brief description of each function 1 Image preview A preview of the image is shown here 2 Anatomical Settings These settings correspond to settings found on the Anatomical Screen Organ Selects moajor organ category Sub Organ Selects Sub Organ category Filters Selects the Context Vision filter GOP to be applied ...

Page 14: ...m This button will show the histogram for the currently showing image Slide bars These bars indicate the current levels of the window leveling Using the right mouse button while the cursor is over the image will allow the user to change the window levels Zoom This window shows the current level of zoom applied to the image Using the left mouse button while the cursor is over the image will allow t...

Page 15: ...L4 is always selected as a default and DOES NOT indicate currently loaded software version Check the About Screen to view currently loaded version 3 Firmware operation Boot password This window indicates the boot password for the software being updated This password MUST be correct for update to complete properly o APL ACL ACL2 120 o ACL4 180 Progress Bar and Hex File These windows show the progre...

Page 16: ...rrent operation version to be backed up simply by clicking this button Software Restore This button allows a previous operation version to be restored Click this button and then click the Software Update button to execute the update program This feature will only work if there was a previous version backed up The current version can be verified under the About Tab 3 Firmware operation 4 OK This Bu...

Page 17: ... can be safely viewed from the side of the machine CAUTION LASER energy can cause severe damage to your eyes DO NOT look directly into LASER light 2 Rotational Motor Pushing the ON button will start the rotational motor The speed of the motor will be displayed in the window below 3 Stepper Motor This section allows operation of the laser carriage assembly Left Right arrow buttons These buttons wil...

Page 18: ...nlabeled Sensor This sensor indicates the position of the loader mechanism Red indicates loader is in ready state Buttons The buttons in this section have various functions Below is a brief description of each ο IN OUT These buttons control the roller motor Click once to turn motor on once to turn off In Out indicates direction plate would be loaded The slide bar beneath can be used to control the...

Page 19: ...tic Scan Performs a complete scan cycle Can be used along with Test Image setting under the Configuration Tab or with an unexposed plate Automatic Erase Performs a complete Erase cycle Automatic Load Unload Performs a complete Load and Unload cycle Number of Tests Set number of tests cycles to be performed Note The cassette must be manually re inserted after each test cycle unless the Auto Load Un...

Page 20: ...ton to set counter to 0 RAIS 2 Configuration settings for a dual setup Consult with Orex service for settings Interface settings ο Anatomical Interface Check this box to show the Anatomical Interface on the User Screen Figure of a person VS Buttons ο Language There are currently two languages to choose from English and Chinese 2 Unit Configuration Backup This section allows each unit setup and the...

Page 21: ...ll Backup Restore operations interact with this Memory location Memory Backup This Backup Restore feature interacts with the Main Memory located inside the scanner The location of this backup is also inside the scanner ο Store Saves the current Main Memory to a chip inside the scanner ο Restore Loads the current memory backup to the main Memory Note After the scanner is setup and operating accordi...

Page 22: ...s of various system components This is an important tool remember to check this screen often 2 Scanner ID This section displays the Serial Number and DV Number which is programmed into the scanner under the Advance Tab The Scan Counter is also displayed here 3 OK This Button will exit setup ...

Reviews: