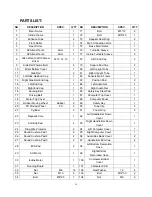
Orbit T977 Owner'S Manual Download Page 25


 25

35 

Bolt 

M10*45 

105

Tap Cushion Pad 


36 

Spring Washer 

10 

106

Hand Pulse 


37 

Flat Washer 

10 

107

Fan Set 


38 Bolt 

M8*65 


108

Sticker 


39 

Bolt 

M8*75(Option)

109

Safety Key Spring Ball 


40 Bolt 

M8*50 

110

Bolt  M10*25 

14 

41 Bolt 

M12*60 

111

Screw ST4.2*16 

30 

42 Nut   

M10*80 

112

Flat 

Washer 6 

43 

Bolt 

 M6*25  

113

Computer Up Wire 


44 

Bolt 

M4*8 

114

Computer Middle Wire 


45 Bolt 


M5*8 

115

Speaker   

46 Bolt 


M5*16 

116

Screw 

ST2.9*9.5 

47 Lock 

Washer 

5  2 

117

Screw 

ST4.2*13 

10 

48 Nut 

M3 

118

Screw ST2.9*8 

49 

Bolt 

M3*10 

119

Sensor Switch Board 


50 Screw  ST4.2*13 

24 

120

Screw 

(ST2.9*6.5) 


35 

51 Bolt 

M6*45 

121

Audio Insert Socket & 

Wire 

500 mm 

52 Lock 

Washer 

6  4 

122

Hand Pulse Connection 

Wire 1 

1300 mm 

53 Lock 

Washer 

8  7 

123

Hand Pulse Connection 

Wire 2 

340 mm 

54 

Lock Washer 

10 

16 

124

Single Wire 3 


55 

Bolt 

M6*16   

125

Single Wire 4 


56 

Flat Foot Pad 

Φ

38*

Φ

33*16

4 126

Ground 

Wire 


57 

Inverter / Control Board 


127

Fan Wire 


58 

Power Socket 


128

Chest Belt 

59 

Overload Protector 


129

HRC receiver 

Chest Belt 

Option 

60 

Square Switch 


130

Bolt (M5*8) 

61 Power 

Wire 

  1 

131

Filter 

62 

Bolt 

M8*40 

132

Single Wire 1 

63 

Computer Bottom Wire 


133

Single Wire 2 

64 

120 AC Single Wire   

(Brown) 

134

Ground Wire 

Filter Option

65 

AC Single Wire 1 

(Brown) 

135

Mp3 Amplifier Board 


66 

AC Single Wire 1 

(Blue) 

136

Mp3 Amplifier Board 

Power Wire 

 1 

67 Ground 

Wire 

  1 


68 Bolt 

M8*124 


69 

End Cap Adjustment 


70 Adjustment 

Cover 


2  


Summary of Contents for T977

Page 1: ......

Page 2: ...alking belt begins to move ALWAYS stand on the foot rails on the sides of the frame until the belt is moving 5 Wear appropriate clothing when exercising on the treadmill Do not wear long loose fitting clothing that could become caught in the treadmill Always wear running or aerobic shoes with rubber soles 6 Always unplug the power cord before removing the treadmill motor cover 7 Keep little childr...

Page 3: ...ge or wear on the mains plug or on any section of the mains lead please have these replaced immediately by a qualified electrician do not attempt to change or repair these yourself 13 If the supply cord is damaged it must be replaced by the manufacturer its service agent or similarly qualified persons in order to avoid a hazard 14 Put your feet on the side rail before using the treadmill and alway...

Page 4: ...B CONSOLE SET 1 92 LEFT HANDLE BOTTOM COVER 1 6 6 ALLEN WRENCH 6 mm 1 93 RIGHT HANDLE BOTTOM COVE 1 7 5 ALLEN WRENCH 5 mm 1 98 LEFT BOTTOM COVER 1 8 ALLEN WRENCH WITH DRIVER S 13 14 15 1 99 RIGHT BOTTOM COVER 1 54 LOCK WASER 10 14 110 BOLT M10 25 14 80 LEFT UPRIGHT 1 111 SCREW ST4 2 16 10 81 RIGHT UPRIGHT 1 ASSEMBLY TOOLS NO PART DESCRIPTION SPEC QUAN PC 6 6 ALLEN WRENCH 6mm 1 7 5 ALLEN WRENCH 5mm...

Page 5: ...pright 80 and the Right Upright 81 with the Main Frame A by the Bolt 110 and the Washer 54 2 Connection way Connect the Console Middle Wire 114 at the bottom of the Right Upright 81 with the Console Bottom Wire 63 on the Main Frame A carefully 1 Put the Left Handle Bottom Cover 92 onto the Left Upright 80 2 Put the Right Handle Bottom Cover 93 onto the Right Upright 81 ...

Page 6: ...sten the Left Protection Cover 98 onto the Base Main Frame by the Screw 111 ST4 2 16 1 Use 6 Allen Wrench Fasten the Console Set B with the Left Right Upright 80 81 by the Bolt 110 M10 25 and the Lock Washer 54 2 Connection Way Connect the Upper Wire 113 of the Console Set B with the Middle Wire 114 of the Right Upright 81 carefully Use Wrench W Screw Driver 8 Fasten the Left Handle Bottom Cover 9...

Page 7: ...p the main frame as shown by the arrow When the front moving wheel G touches the ground you can move the treadmill forward and backward 2 When the treadmill is moved to the place where you want pull down the main frame carefully then it will fall down as the arrow shows Do not put any part of your body under the treadmill in order to avoid danger 3 This treadmill should be operated by those who ar...

Page 8: ...conductor and a grounding plug The plug must be plugged into an appropriate outlet that is properly installed and grounded in accordance with all local codes and ordinances DANGER Improper connection of the equipment grounding conductor can result in a risk of electric shock Check with a qualified electrician or serviceman if you are in doubt as to whether the product is properly grounded Do not m...

Page 9: ...splay PUL if there is no operation of pressing the incline button for 5 seconds When the user grasps the handle bar sensors the pulse data will be shown in the window and the range is 50 200 times min This data is just for reference do not use it as medical data The window will change to INCL if the system can not detect the heart rate for 5 seconds 3 SPEED window Under setting and selecting state...

Page 10: ...the body fat testing function 2 MODE Button Press this button to choose the modes 0 00 15 00 1 0 and 50 0 00 is manual mode 15 00 is the time count down mode 1 0 is the distance count down mode and 50 is the calorie count down mode When you choose each mode you can press the speed button and incline button to set the target count down data after that press the START button to start the treadmill 3...

Page 11: ...incline up will increase the running level 5 Pressing STOP will reduce the speed until the treadmill stops 6 When the user holds the hand pulse about 5 seconds it will display pulse data MANUAL MODE 1 When the treadmill is under the standby state press START button the treadmill will start to run from the speed 1 0km h and the inline of 0 level The other windows will also start to count up from 0 ...

Page 12: ...ctions Each exercise time the setting time 10 When the system enters into the next section it will make 3 sound Bi Bi Bi then the speed and the incline will be changed according to the set speed and incline of the program then press INCLINE INCLINE SPEED SPEED to change the INCLINE and SPEED as you need When the program enters into the next section again the system will make 3 sound Bi Bi Bi then ...

Page 13: ... INCLINE 4 5 6 6 9 9 10 12 6 3 SPEED 2 4 6 8 7 8 6 2 3 2 P8 INCLINE 3 5 4 4 3 4 4 3 3 2 SPEED 2 4 5 5 6 5 6 3 3 2 P9 INCLINE 3 5 3 4 2 3 4 2 3 2 SPEED 2 3 5 3 3 5 3 6 3 3 P10 INCLINE 4 4 3 6 7 8 8 6 3 3 SPEED 2 5 8 10 6 9 5 3 2 2 P11 INCLINE 1 3 5 8 10 7 6 3 2 3 SPEED 2 5 5 4 4 6 4 2 3 4 P12 INCLINE 3 5 6 7 12 9 11 11 6 3 SPEED 2 7 4 7 8 9 4 5 3 2 P13 INCLINE 5 6 6 4 6 5 8 9 4 2 SPEED 2 6 5 4 8 6 ...

Page 14: ...1 2 2 4 3 7 4 9 4 3 4 9 3 7 1 2 1 8 1 2 P8 INCLINE 3 5 4 4 3 4 4 3 3 2 SPEED 1 2 2 4 3 1 3 1 3 7 3 1 3 7 1 8 1 8 1 2 P9 INCLINE 3 5 3 4 2 3 4 2 3 2 SPEED 1 2 1 8 3 1 1 8 1 8 3 1 1 8 3 7 1 8 1 8 P10 INCLINE 4 4 3 6 7 8 8 6 3 3 SPEED 1 2 3 1 4 9 6 2 3 7 5 5 3 1 1 8 1 2 2 P11 INCLINE 1 3 5 8 10 7 6 3 2 3 SPEED 1 2 3 1 3 1 2 4 2 4 3 7 2 4 1 2 1 8 2 4 P12 INCLINE 3 5 6 7 12 9 11 11 6 3 SPEED 1 2 4 3 2 ...

Page 15: ...incline is set well for the 10 sections and the running time can also be set well Heart Rate Control HRC program OPTION H1 program H2 program H3 program Age Target zone L H Age Target zone L H Age Target zone L H Lowest Default Highest Lowest Default Highest Lowest Default Highest 15 128 133 138 15 149 154 159 15 169 174 179 16 128 133 138 16 148 153 158 16 168 173 178 17 127 132 137 17 147 152 15...

Page 16: ...6 134 139 144 57 101 106 111 57 117 122 127 57 134 139 144 58 100 105 110 58 117 122 127 58 133 138 143 59 100 105 110 59 116 121 126 59 132 137 142 60 99 104 109 60 115 120 125 60 131 136 141 The above chart is for reference only And HRC 1 is recommended for moderate exercisers and HRC 2 HRC 3 is for weight loss users Please consult your physician if you have high blood pressure high cholesterol ...

Page 17: ... phase where the system won t change the speed and incline level automatically and the change can only be done manually After one minute the system will increase the speed automatically at 0 5KM ML every time according to your current pulse When the speed reaches the highest speed of the HRC program but it still cannot reach your target pulse the system will increase the incline level 1 section ea...

Page 18: ...ight 100 200 F 4 Weight 20 150 FAT 19 Underweight FAT 20 25 Normal weight FAT 25 29 Overweight F 5 FAT 30 Obesity SAFETY LOCK FUNCTION Pull out the safety pulling rope then the treadmill will stop immediately All the windows display the buzzer will make 3 sound Bi Bi Bi and the treadmill become stopped Attach the magnet end of the safety lock to the console the treadmill will be at the beginning o...

Page 19: ... To end your workout safely press the STOP button or pull out the safety pulling rope then the treadmill will stop immediately EXERCISE INSTRUCTIONS 1 The Warm Up Phase This stage helps to get the blood flowing around the body and the muscles working properly It will also reduce the risk of cramp and muscle injury It is advisable to do a few stretching exercises as shown below Each stretch should ...

Page 20: ... longer and harder It is advisable to train at least three times a week and if possible space your workouts evenly throughout the week To tone muscle while on your Treadmill you will need to have the resistance set quite high This will put more strain on our leg muscles and may mean you cannot train for as long as you would like If you are also trying to improve your fitness you need to alter your...

Page 21: ...LEFT Picture B If the belt has drifted to the RIGHT WARNING ALWAYS UNPLUG THE TREADMILL FROM THE ELECTRICAL OUTLET BEFORE CLEANING OR SERVICING THE UNIT CLEANING General cleaning or the unit will greatly prolong the treadmill Keep treadmill clean by dusting regularly Be sure to clean the exposed part of the deck on either side of the walking belt and also the side rails This reduces the build up o...

Page 22: ...major role in the function and life of your treadmill thus requiring periodic lubrication We recommend a periodic inspection of the deck We recommend lubrication of the deck according to the following timetable Light user less than 3 hours week annually Medium user 3 5 hours week every six months Heavy user more than 5 hours week every three months ...

Page 23: ...23 EXPLODED DIAGRAM ...

Page 24: ...udio Net 1 15 Right End Cap 1 85 Right Audio Net 1 16 Running Belt 1 86 Safety Key Steel Pad 1 17 Driving Belt 1 87 Computer Top Cover 1 18 Motor Top Cover 1 88 Computer Panel 1 19 Rubber Moving Wheel Rubber 2 89 Safety Key 1 20 PU Moving Wheel PU 2 90 Tube Clip 2 21 Cylinder 2 91 Foam Grip 2 22 Magnetic Core 1 92 Left Handle Bar Down Cover 1 23 Anti Slip Pad 4 93 Right Handle Bar Down Cover 1 24 ...

Page 25: ... 121 Audio Insert Socket Wire 500 mm 1 52 Lock Washer 6 4 122 Hand Pulse Connection Wire 1 1300 mm 2 53 Lock Washer 8 7 123 Hand Pulse Connection Wire 2 340 mm 1 54 Lock Washer 10 16 124 Single Wire 3 1 55 Bolt M6 16 8 125 Single Wire 4 1 56 Flat Foot Pad Φ38 Φ33 16 4 126 Ground Wire 1 57 Inverter Control Board 1 127 Fan Wire 2 58 Power Socket 1 128 Chest Belt 1 59 Overload Protector 1 129 HRC rec...

Page 26: ...age is in the normal range Data setting is wrong Change the Frequency Converter ER4 Overloading Protection User s weight is overloaded Reduce the loading The temperature sensor is short circuit Change the Frequency Converter Control Board Chip 358 or 324 is damaged Change the Frequency Converter ER5 Overheating Protection The Fan doesn t work Change the Frequency Converter Communication wire is da...

Page 27: ...27 ...

Reviews: