background image

25

5. DATA 

PROTOCOL

The instruments communicate via serial line RS232 or RS485. For communication they use the ASCII protocol. The 
communication is running in the following format:

ASCII:  


8 bit, no parity, one stop bit

Transmission rate is adjustable in the instrument menu and depends on the used control processor. The instrument 
address is set in the instrument menu in the range of 0…31. Manufacture setting always presets the ASCII protocol, 
rate of 9600 Baud, address 00. Type of line used - RS232 / RS485 - is determined by exchangeable card auto-
matically identified by the instrument.

COMMANDS FOR INSTRUMENT OPERATION

The commands are described in the description which can be found at 

www.orbit.merret.cz/rs

A command consists of a couple number-letter, where the letter size is of importance. 

COMMANDS NOT LISTED IN THE MENU

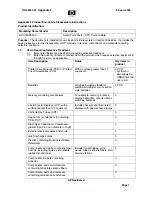
1M 


D


Send minimum value 

2M 


D


Send maximum value 

1X  


T


Send display value, data format „R <SP> DDDDDDDD“

1Z  


H


Send HW instrument configuration

1x  


D


Send output value from filter of Channel A

4. INSTRUMENT SETTING - CONFIGURATION MODE

Summary of Contents for 651UC

Page 1: ...OM 651UC 6 DIGIT PROGRAMMABLE IMPULSE COUNTER FREQUENCYMETER STOP WATCH WATCH GUARANTEE Y E R S ...

Page 2: ...ng instruments of the OM 651 series conform to European regulation 89 336 EWG and Ordinance 168 1997 Coll They are up to the following European and Czech standards CSN EN 55 022 class B CSN EN 61000 4 2 4 5 6 8 9 10 11 The instruments are applicable for unlimited use in agricultural and industrial areas CONNECTION Power supply from the main line has to be isolated from the measuring leads ORBIT ME...

Page 3: ...p H 16 4 3 1 3 Setting the auxiliary input 17 4 3 1 4 Permission to reset by the enter key 17 4 3 2 Configuration mode CHANNELS 18 4 3 2 1 Setting the calibration constant 18 4 3 2 2 Offset setting 18 4 3 2 3 Measured value rounding 19 4 3 2 4 Projection format 19 4 3 3 Configuration mode OUTPUT 20 4 3 3 1 1 Limits setting the relay mode 20 4 3 3 1 2 Limits setting the boundaries 20 4 3 3 2 1 Data...

Page 4: ...d DP for measuring modes STOPWATCH WATCH with option of setting in format 10 24 60 Time base 0 5 1 2 5 10 s Digital filters Input filter the instrument allows to filter the input signal and thus suppress undesirable interfering signals e g relay back swings The set parameter indicates maximum possible measured frequency that the instrument will process 5 40 100 200 Hz Radius of insensitiveness adj...

Page 5: ...tly into the control systems We offer isolated RS232 and RS485 with the ASCII protocol Analog outputs will find their place in applications where further evaluating or processing of measured data in external devices is required We offer universal analog output with the option of selection of the output type vol tage current The analog output value corresponds with the displayed data and its type a...

Page 6: ...de to ground terminal GND No 13 The instruments are tested in compliance with standards for use in industrial area yet we recommend to abide by the above mentioned principles CONNECTION Description wiring Input 1 input signal 60 V GND Input 1 Input 2 input signal 300 V GND Input 2 Resetting input signal 60 V GND Resetting Function Description Control Hold Instrument blocking display and outputs up...

Page 7: ...V 180 V 4 5 PNP 18 31 V 1 9 V 17 V 100 180 V 10 V 92 V 2 3 D O N O T C O N N E C T values guaranteed in full temperature range of the instrument operation Relay parameters specified in the technical data apply for resistance load Upon connection of the induction load we recommend to fit the leads to relay 1 A with a fuse for maximum load protection J1 Input 1 2 J2 Reset 1 5 J3 Battery J2 J3 J4 J4 ...

Page 8: ...r the setting in Configuration mode SYMBOLS USED IN THE INSTRUCTIONS DEF Items indicated this way are preset from manufacture C F H Indicates the setting for given type of instrument CONTROL KEYS FUNCTIONS MENU ENTER LEFT DOWN UP Measuring mode menu access Moving around in the menu exit menu without saving move to next level back to previous level move to next item Setting selecting items cancel s...

Page 9: ...preset values MINUS SIGN Setting the minus sign is performed on the highest valid degree by key The minus sign is in numeric row 0 1 2 3 9 Setting after transition beyond the highest decade the decimal point starts flashing by pressing you will place the DP and confirmit by ACCESS INTO THE CONFIGURATION MODE 000000 6x shift left positioning of flashing DP confirmation of the option and return to s...

Page 10: ...ting display projection INPUT SERVIC OUTPUT CHANEL SCALE CONST F Offset FORMAT NAST A Setting basic channel parameters SCALE Calibration constant calibration constant is for the conversion of input value to required display value by setting the minus value the direction of counting changes i e we count down range 0 00001 999999 DEF 1 OFFSET Additive constant PRESET shifting the beginning of measur...

Page 11: ...etting limit for relay switch on in full display range HYST Setting hysteresis only in values in 1 10 of the display range TIME Setting delayed swith on of the limit in range 0 99 9 s 4 2 2 SETTING THE DISPLAY BRIGHTNESS OUTPUT LIMIT BRIGHT 100 75 50 25 DEF BRIGHT Setting the display brightness 25 Brightness 25 50 Brightness 50 75 Brightness 75 100 Brightness 100 23 6 OUTPUT CLR C Setting the limi...

Page 12: ...etting Setting the Hold Lock function Calibration constant setting Setting the shift PRESET Setting the rounding Setting the limits hysteresis and delay Setting the data output Setting display brightness Setting the analog output Setting the access rights for User menu Restoration of manufacture calibration and instrument setting Instrument identification Change of the access password INPUT Settin...

Page 13: ...KEYS Here the basic instrument parameters are set CLR C Resetting the counter to zero CONFIG Basic instrument setting AUX INP Setting the Hold or Lock functions KEYS Povolení nulování tlačítkem Enter 4 3 1 1 RESETING THE COUNTER OUTPUT SERVIC OUTPUT CHANEL CLR C AUX INP CONFIG KEYS CLR C CLR C Resetting the counter ...

Page 14: ...easuring mode COUNT Frequency meter counter at the input 1 or 2 FREQV Frequency meter measures frequency on Input 1 or 2 4 3 1 2 2 SETTING THE MEASURING TIME TIME BASE M TIME M MOD BACKUP FILTER INPUT SERVIC OUTPUT CHANEL CLR C AUX INP CONFIG DEF 0 5 2 1 10 5 KEYS M TIME Setting the measuring time time base if you set the time of measurement for example to 1 s the measuring time is approximately f...

Page 15: ...G THE DISPLAY STATUS BACKUP M TIME MODE BACKUP FILTER DEF INPUT SERVIC OUTPUT CHANEL CLR C AUX INP CONFIG ENABLE DISABL KEYS BACKUP Setting the display status backup setting restoration of value on the display after power outage or instrument switchoff ENABLE After switch on instrument reads the display status from its memory DISABL After switch on instrument becomes reset to zero 4 3 1 2 5 TIME S...

Page 16: ...parator level and stopped and reset to zero by the next edge 4 3 1 2 7 SETTING THE STOP WATCH WATCH CONTROL RESETTING H BACKUP FILTER M START SET T M STOP INPUT SERVIC OUTPUT CHANEL CLR C AUX INP CONFIG KEYS DEF NULUJ St a N M STOP Setting the stop watch resetting to zero NULUJ Stop watch watch is reset to zero by input Zeroizing St a N Stop watch watch is stopped and reset to zero by input Zeroiz...

Page 17: ...play and outputs LOCK Auxiliary input controls the LOCK function the input controls the blocking of the keys on the front panel 4 3 1 4 PERMISSION TO RESET BY THE ENTER KEY INPUT SERVIC OUTPUT CHANEL CLR C AUX INP CONFIG ENABLE DISABL DEF KEYS KEYS Permission to reset by the ENTER key ENABLE Resetting to zero by the ENTER keyis permitted DISABL Resetting to zero by the ENTER key is prohibited 4 IN...

Page 18: ...CONSTANT INPUT SERVIC OUTPUT CHANEL SCALE ROUND OFFSET FORMAT SCALE Setting the calibration constant calibration constant is for the conversion of input value to required display value by setting a minus value the direction of counting is changed i e we count down range 0 00001 999999 DEF 1 4 3 2 2 OFFSET SETTING INPUT SERVIC OUTPUT CHANEL SCALE ROUND OFFSET FORMAT OFFSET Setting the additive cons...

Page 19: ...3 2 4 PROJECTION FORMAT INPUT SERVIC OUTPUT CHANEL SCALE ROUND OFFSET H DEF 000000 00000 0 0000 00 000 000 00 0000 0 00000 HH MM SS SSSSS c SSSSSS MMMM SS HHHHH H HH MM SSSS cc DEF FORMAT FORMAT Setting the projection format the instrument enables projection of a number with decimal positioning of the decimal point for projection of time there are also other forms of projection 4 INSTRUMENT SETTIN...

Page 20: ...HANEL LIMIT A OUT DATA BRIGHT LIM 1 LIM 2 TYPE TIME HYST LIMIT CLOSE OPEN DEF TYPE Setting the relay switching mode CLOSE The relay switches on when the condition is met OPEN The relay switches off when the condition is met 4 3 3 1 2 LIMITS SETTING THE BOUNDARIES INPUT SERVIC OUTPUT CHANEL LIMIT A OUT DATA BRIGHT LIM 1 LIM 2 HYST LIMIT TIME LIM Setting the values for limits evaluation LIMIT Settin...

Page 21: ...ENT ADDRESS INPUT SERVIC OUTPUT CHANEL LIMIT A OUT DATA BRIGHT BAUD ADDR ADDR Setting the instrument address setting in the range of 0 31 manufacture setting 00 DEF 4 3 3 3 1 ANALOG OUTPUT SETTING THE TYPE INPUT SERVIC OUTPUT CHANEL LIMIT A OUT DATA BRIGHT TYPE MAX MIN 0 20mA 4 20mA 0 2V 0 5mA 0 10V 0 5V DEF TYPE Setting the type of analog output current and voltage outputs are galvanically separa...

Page 22: ...mit points to two arbitrary points from the entire measuring range MIN Assigning the display value to the beginning of the range of the analog output range of the setting is 99 999 999 999 MAX Assigning the display value to the end of the range of the analog output range of the setting is 99 999 999 999 4 3 3 3 3 SETTING THE DISPLAY BRIGHTNESS INPUT SERVIC OUTPUT CHANEL LIMIT A OUT DATA BRIGHT 100...

Page 23: ...ACCESS N PASSW RESTOR IDENT LIM 2 LIM 1 CLR C SHOW DISABL DEF TIME LIMIT HYST EDIT LIM Nastavení přístupových práv do Limit v UM LIMIT Authorization for item LIMIT setting the limit HYST Authorization for item HYST setting hysteresis TIME Authorization for item TIME setting the switch on delay In all items the following parameters may be selected DISABL The item is not projected in the UM SHOW The...

Page 24: ...TTING NEW ACCESS PASSWORD INPUT SERVIC OUTPUT CHANEL ACCESS RESTOR N PASSW IDENT N PASSW Setting new access password for Configuration menu this selection allows to change the numeric code which blocks the access into the Configuration mode of the instrument Range of the numeric code is 0 9999 4 3 4 4 INSTRUMENT IDENTIFICATION INPUT SERVIC OUTPUT CHANEL ACCESS RESTOR N PASSW IDENT IDENT Projection...

Page 25: ...he ASCII protocol rate of 9600 Baud address 00 Type of line used RS232 RS485 is determined by exchangeable card auto matically identified by the instrument COMMANDS FOR INSTRUMENT OPERATION The commands are described in the description which can be found at www orbit merret cz rs A command consists of a couple number letter where the letter size is of importance COMMANDS NOT LISTED IN THE MENU 1M ...

Page 26: ...hange the input signal value or change display projection ERROR incorrect access password into Configuration mode repeat the command with correct password Er EMEM violation of data integrity in EEPROM error upon data storage in case of recurring report send the instrument for repai Er MEM EEPROM error the Def values will be used in emergency instrument needs to be sent for repair ...

Page 27: ...27 6 ERROR STATEMENTS ...

Page 28: ...28 INSTRUCTIONS FOR USE OM 651UC ...

Page 29: ...0 HP 125 V Pilot Duty D300 DATA OUTPUTS Protocols ASCII Data format 8 bit no paritx 1 stop bit Rate 1 200 38 400 Baud RS 232 isolated two way communication RS 485 isolated two way communication addressing max 31 instruments ANALOG OUTPUTS Type isolated programmable with resolution of max 10 000 points analog output corresponds with the displayed data type and range are adjustable Non linearity 0 2...

Page 30: ...mm 96 mm 48 mm 13 5 mm 119 mm 1 2 Instrument installation 1 insert the instrument into the panel cut out 2 fit both travellers on the box 3 press the travellers close to the panel Instrument disassembly 1 slide a screw driver under the traveller wing 2 turn the screw driver and remove the traveller 3 take the instrument out of the panel ...

Page 31: ...ignature 10 CERTIFICATE OF GUARANTEE r otherwi od of 24 months during this p ality fu plianc all not app mechanic damage n transport ntervention of unqualified person incl the u unavoidable event other unprofessional intervention perform instrument ts shall be e me ise Stam rio g ua mp sha m in in u o er eli ent m the date of sale to the user applies t od due to manufacture error or due to materia...

Page 32: ...avky příslušného nařízení vlády Product 6 digit measuring instruments Type OM 651 Version UC Conformity is assessed pursuant to the following standards Electr safety EN 61010 1 EMC EN 50131 1 chapt 14 and chapt 15 EN 50130 4 chapt 7 EN 61000 4 11 EN 50130 4 chapt 8 EN 61000 4 11 EN 50130 4 chapt 9 EN 61000 4 2 EN 50130 4 chapt 10 EN 61000 4 3 EN 50130 4 chapt 11 EN 61000 4 6 EN 50130 4 chapt 12 EN...

Reviews: