background image

Function

Touchless Electra faucets are turned on and shut off by a solenoid valve that is actuated by a photocell. 

When the hands are held under the faucet, the solenoid valve opens and water starts to flow. When the 

hands are removed, the faucet shuts automatically.

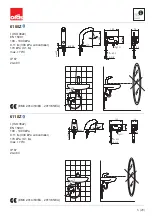
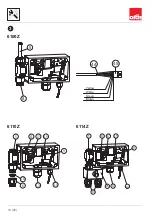
Handshower (see figure 1)

On models with  handshower (6105Z), water begins to flow from the spout when the showerhead (18) is 

removed from its wall bracket (20).

If the button on the showerhead is pressed in, water begins to flow from the showerhead and water flow 

from the spout stops.

Applications

Touchless Electra faucets are intended for use in areas that require a high standard of hygiene, e.g. 

hospitals, doctors’ offices, food processing plants etc. Electra faucets are also suitable for use where 

there is a possibility that a faucet can be left running, e.g. public toilets, restaurants, schools etc.

The wash-basin to which the Electra faucet is to be fixed may not be of the kind that can be plugged.

To clean the faucet

When cleaning the surface of the faucet, use neutral liquid detergents only. Do not use any scrubbing or 

corrosive cleaning agents! 

WARNING: Do not clean the appliance with a high pressure washer.

Risk of freezing

When installing the faucet in a place where the temperature may fall below freezing, the entire system 

must be drained of water to prevent bursting in freezing weather.

–  Shut off the water supply.

–  Disconnect all flexible hoses and make certain that all parts and hoses are drained of water.

Protection against vandalism

If the eye of the photocell is continuously covered for over 2 minutes, or if the   showerhead is used for 

over 2 minutes (i.e. no contact with the sensor in the wall bracket) the faucet shuts automatically. To 

regain normal operation, remove the blockage (e.g. chewing gum, tape) from the photocell, or replace 

the showerhead in the wall bracket.

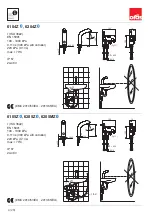
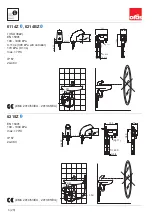
Installation (see Figure 1, 3)

–  Mount the no-touch faucet on the wash-basin (min. Ø 28–35 mm). Ensure that the seal between the faucet  

  and the wash-basin is correctly installed.

–  Slip the fixing washer (1) and stud nuts (2) into position and tighten with a screwdriver or 9 mm adjustable wrench. 

–  Remove the control-box cover.

–  Using the four screws supplied, mount the control box (3) on to  a suitable place in the cabinet or on  

  the wall below the basin, in a position that permits easy access for maintenance.

–  Cut the hose (4) to the proper length and attach it to the connector (5) on the controlbox.

–  Secure the hose with a hose clamp (6).

–  On models with handshower (6105Z), attach the handshowerhose (21) to the control-box nipple (22).

Connecting the water-supply hoses

6100Z, 6110Z (see Figure 1, 2)

–  Attach one end of the flexible water-supply hose (7) to the control-box attachment nipple (8) and    

  the other end to the pre-mixed waterpipe.

6104Z, 6105Z, 6114Z (see Figure 1, 2)

Connecting the water-supply hoses

–  Attach one end of each of the flexible water-supply hoses (7) to the control-box attachment 

  nipples (13). The nipples contain check valves (29).

–  Connect hot water to the left-hand water-supply hose and cold water to the right-hand hose.

Electrical Connections

–  Install the sensor wire (9) to the control box and tighten the cable gland with the nut (10)

–  On models with handshower (6105Z), install the sensor wire (23) that comes from the wall bracket    

  (20) to the control box and tighten the cable gland with the nut (24).

GB

13 (28)

GB

Summary of Contents for Electra 6100Z

Page 1: ...Installation and maintenance guide Oras Electra ...

Page 2: ......

Page 3: ...countries Google Play and the Google Play logo are trademarks of Google Inc The Bluetooth word mark and logos are registered trademarks owned by the Bluetooth SIG Inc and any use of such marks by Oras Group is under license Other trademarks and trade names are those of their respective owners 3 28 4 7 8 12 13 14 15 16 17 18 19 20 21 22 23 24 25 26 GB DK EE FI NO PL SE ...

Page 4: ...g 11 140 G 3 8 l 600 6105Z 6205Z 6205MZ I ISO 3822 EN 15091 100 1000 kPa 0 11 l s 300 kPa w Controller 220 kPa 0 1 l s max 70 C IP 67 24 48V EMC 2014 53 EU 2011 65 EU 6104Z 6204Z I ISO 3822 EN 15091 100 1000 kPa 0 11 l s 300 kPa w Controller 220 kPa 0 1 l s max 70 C IP 67 24 48V EMC 2014 53 EU 2011 65 EU 4 28 ...

Page 5: ... 11 l s 300 kPa w Controller 170 kPa 0 1 l s max 70 C IP 67 24 48V EMC 2014 53 EU 2011 65 EU l 800 ø 28 35 120 17 85 max 30 155 75 75 25 Pg 11 G 3 8 l 600 l 300 6110Z I ISO 3822 EN 15091 100 1000 kPa 0 11 l s 300 kPa w Controller 170 kPa 0 1 l s max 70 C IP 67 24 48V EMC 2014 53 EU 2011 65 EU 5 28 ...

Page 6: ...I ISO 3822 EN 15091 100 1000 kPa 0 11 l s 300 kPa w Controller 170 kPa 0 1 l s max 70 C IP 67 24 48V EMC 2014 53 EU 2011 65 EU 6215Z EN 15091 100 1000 kPa max 70 C IP 67 24 48V EMC 2014 53 EU 2011 65 EU ø 28 35 120 17 85 max 30 155 75 Pg 11 140 G 3 8 l 600 l 1 5 m l 800 6 28 ...

Page 7: ...ntroller 170 kPa 0 1 l s max 70 C IP 67 transformer IP 55 24 48V EMC 2014 53 EU 2011 65 EU 6251Z EN 15091 100 1000 kPa max 70 C IP 67 24 48V EMC 2014 53 EU 2011 65 EU 155 75 75 Pg 11 25 ø 10 x 600 20 160 ø 28 35 120 max 30 155 75 Pg 11 140 G 3 8 l 600 l 800 7 28 ...

Page 8: ...14 9 7 6 1 2 4 21 3 23 20 19 18 8 12 18 8 29 1 2 6104Z 6105Z 6114Z 6215Z 6100Z 6110Z 14 9 8 7 1 2 4 6 3 12 6104Z 6105Z 6100Z 6114Z 6215Z 8 28 ...

Page 9: ...5 11 17 15 9 12 10 25 6105Z 6104Z 5 11 17 15 9 12 10 24 23 22 25 44 45 Yellow White Green Brown Yellow Green Brown 3 9 28 ...

Page 10: ...6110Z 6114Z 6100Z 3 5 8 44 45 Yellow White Green Brown 5 11 17 15 9 12 10 8 18 5 11 17 15 9 25 12 10 13 10 28 ...

Page 11: ...2 5 mm off 1 2 3 2 5 mm 5 4 17 4 5 6104Z 6105Z 6114Z 6215Z 6251FZ 11 28 ...

Page 12: ...Factory default Factory settings Max Flow time sec Automatic flush h Automatic flush period sec Cleaning mode sec After Flow sec Recognition distance cm 12 28 ALCOHOL PH 6 9 cleaning oras com ...

Page 13: ... over 2 minutes or if the showerhead is used for over 2 minutes i e no contact with the sensor in the wall bracket the faucet shuts automatically To regain normal operation remove the blockage e g chewing gum tape from the photocell or replace the showerhead in the wall bracket Installation see Figure 1 3 Mount the no touch faucet on the wash basin min Ø 28 35 mm Ensure that the seal between the f...

Page 14: ...ove the control box cover Push the button 1 Position a piece of white paper e g the installation instructions vertically in front of the faucet at the distance at which the photocell is intended to react e g at the outer edge of the wash basin Hold the paper at this distance Water will start to flow after about 30 seconds Pull the paper away after the water flow has stopped The sensing range is no...

Page 15: ...exible slanger og kontroller at slangerne også tømmes for vand Beskyttelse mod vandalisme Hvis fotocellens synsfelt overdækkes mere end 2 min eller hvis bruseren fjernes fra vægholderen mere end 2 min lukker blanderen automatisk Ved at fjerne det som dækker fotocellen f eks tyggegummi tape etc eller ved at hænge bruseren på plads fungerer blanderen normalt igen Montering se billed 1 3 Monter fotoc...

Page 16: ...og hold det foran blanderen i den afstand hvor blanderen ikke skal reagere f eks ved vaskens forkant Hold papiret på denne afstand indtil vandet begynder at løbe og vent til blanderen automatisk lukker Nu er sensorfølsomheden indstillet og informationen er lagret i microprocessorens hukommelse Informationen forsvinder ikke selvom strømmen afbrydes Vil man senere ændre sensorens afstandsfølsomhed g...

Page 17: ...n või käsidušon hoidjast ära üle 2 min sulgub veevool segistis automaatselt Eemaldades takistuse näit näts teip jne või asetades käsiduši tagasi hoidjasse segisti töökord taastub Paigaldus vt skeemid 1 3 aseta segisti paigaldusavasse Ø 28 35 mm ja kontrolli et segisti põhjas olev O rõngas on soones paigalda kinnitusplaat 1 ja mutrid 2 käsitsi kohale ja pinguta need seejärel suure kruvikeeraja või ...

Page 18: ...ement ei tohi reageerida näit valamu välisserv hoia paberit kohal umbes 30 sekundit seejärel avaneb vesi Eemalda paber alles veevoolu lõppedes kui segisti on sulgunud on toimivuskaugus seatud ja selle suurus on mikroprotsessori mälus kinnistunud See säilib mälus elektrikatkestusest olenemata kui kaugus ei rahulda saab kaugust seada samal viisil uuesti muutes paberi asukohta aseta juhtimiskarbi kaa...

Page 19: ...in ajan hana sulkeutuu automaattisesti Poistamalla este esim purkka teippi jne valokennon edestä tai laittamalla käsisuihku takaisin ripustimeensa hanan toiminta palautuu Asennus kts kuvat 1 3 Työnnä hana paikoilleen asennusreikään min ø28 35 mm ja varmista että hanan pohjassa oleva O rengas on urassaan Aseta kiristyslevy 1 ja mutterit 2 paikoilleen käsin ja kiristä sen jälkeen suurehkolla ruuvita...

Page 20: ...idä paperia paikallaan noin 30 sekunttia jolloin vesi alkaa virrata POISTA PAPERI VASTA VEDENTULON LOPUTTUA Kun hana on sulkeutunut on tunnistusetäisyys säädetty ja arvo tallennettu mikroprosessorin muistiin Arvo säilyy muistissa sähkökatkoista huolimatta Jos etäisyys ei ole tyydyttävä voidaan säätö suorittaa samalla tavalla uudelleen mutta paperin paikkaa muutetaan Asenna ohjauslaatikon kansi pai...

Page 21: ... fotocellens øye overdekkes mer enn 2 min eller hvis hånddusjens brukstid er lengere enn 2 min signalgivaren i hånddusjens veggholder ikke er betjent stenger armaturet automatisk Ved å ta vekk hinderet f eks tyggegummi tape som dekker øyet eller sette hånddusjen tillbake i veggholderen fungerer armaturet som normalt igjen Montering se bilde 1 3 Monter det berøringsfrie armaturet på servanten min Ø...

Page 22: ...d det loddrett foran armaturet i den avstand den skal begynne å reagere f eks servantens forkant Hold papiret på denne avstand til vannet starter å renne tar ca 30sek og ta det først bort når vannet har stoppet Totalt tar tiden med papiret ca 1 min Avstandsfølsomheten er nå innstilt og lagret Denne informasjonen forsvinner ikke fra minnet selv ved strømbrudd Denne innjusteringen kan gjentas til de...

Page 23: ...z pozostałej wody Zakręć dopływ wody Odkręć elastyczne węże doprowadzające wodę do baterii i upewnij się że w żadnej częsci baterii nie pozostała woda Ochrona przed wandalizmem Jeśli sensor pozostaje zasłonięty przez ponad 2 minuty lub jeśli rączka natrysku jest w użyciu ponad 2 minuty tj nie ma kontaktu z sensorem w uchwycie bateria automatycznie wyłącza się Aby przywrócić działanie baterii należ...

Page 24: ...ielkości sa ustawione fabrycznie Zmiana zasięgu czujnika patrz rysunek 3 Zdjąć pokrywę skrzynki elektrycznej Wcisnąć przycisk 15 Ustawićkartkębiałegopapieru np instrukcjęmontażu pionowoprzedbaterią wodległościwktórejsensor ma reagować np zewnętrzna krawedź umywalki Przytrzymać kartkę w tej odległości Woda zacznie płynąć po około 30 sekundach Po ustaniu przepływu należy usunąć kartkę papieru Zasięg...

Page 25: ... till upphängaren fungerar blandaren normalt igen Montering se bilder 1 3 Montera fotocellarmaturen i monteringshålet min ø 28 35 mm och se till att den mot tvättställ tätande o ringen sitter i sitt spår på blandarens undersida Trä upp hästskon 1 och skruva på muttrarna 2 först för hand och dra sedan fast med en bred skruvmejsel eller med en 9 mm hylsnyckel Demontera styrenhetens lock Skruva fast ...

Page 26: ...stånd där blandaren skall starta t ex vid tvättställskanten Papperet skall hållas framför blandaren tills den börjar att rinna Håll kvar papperet tills blandaren stänger av sig själv När blandaren slutat att rinna kan papperet tas ned Sensorkänsligheten är nu inställd Sensorkänsligheten är lagrad i blandarens programvara och raderas inte vid strömavbrott Sätt tillbaka elektronikboxens täcklock Ren...

Page 27: ......

Page 28: ...pany s mission is to make the use of water easy and sustainable and its vision is to become the European leader of advanced sanitary fittings Oras Group has two strong brands Oras and Hansa The Group s head office is located in Rauma Finland and the Group has three manufacturing sites Kralovice Czech Republic Olesno Poland and Rauma Finland Oras Group employs approximately 1 200 people in twenty c...

Reviews: