background image

14

brushing in back and forth motions, just like you 
would do with a manual toothbrush. 
With any brush head start brushing the outsides, 
then the insides and finally the chewing surfaces. 
Brush all four quadrants of your mouth equally. You 
may also consult your dentist or dental hygienist 
about the right technique for you.

In the first days of using any electric toothbrush, 
your gums may bleed slightly. In general, bleeding 
should stop after a few days. Should it persist after 
2 weeks, please consult your dentist or dental 
hygienist. If you have sensitive teeth and/or gums, 
Oral-B recommends using the «Sensitive» mode in 
combination with an Oral-B Sensitive brush head.

Timer

You can choose between «2-Minute» or 
«Professional» timer and «Count up» or «Count 
down» timer.

The «2-Minute» timer signals with four beeps and a 
Smiley on the SmartGuide that the dentist recom-
mended 2-minute brushing time has been reached.

The «Professional» timer signals with short beep 
sounds at 30-seconds intervals to move to the next 
quadrant of your mouth (45 seconds intervals within 
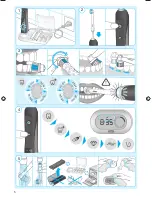
«Deep Clean» mode) (picture 3, page 5). A single 
beep indicates completion of the first quadrant, two 
beeps the second one, three beeps the third one 
and four beeps sound when you reach the recom-
mended 2-minute brushing time.

The timer memorises the elapsed brushing time, 
even when the handle is briefly switched off during 
brushing. The timer resets if pausing longer than 
30 seconds or briefly pressing the mode button (d) 
during pause.

The «Count up» timer displays your actual brushing 
time. The «Count down» timer indicates the remain-
ing brushing time.
 
Personalizing the timer
Your toothbrush comes with the «Professional» and 
«Count up» timer activated. To change this, press 
and hold the brushing mode button for 3 seconds 
until the SmartGuide shows «:30» and «timer». 
Briefly press the on/off button to switch to the 
«2-Minute» timer. Push the mode button to confirm. 
The SmartGuide now shows «up» and «timer». Press 
the on/off button to switch to the «Count down» 
timer and confirm with the mode button. Leave the 
setup menu by pressing the mode button.

Pressure sensor

If you put excessive pressure on your teeth, the red 
pressure sensor light (b) will light up (picture 3, 

page 5). Additionally, when brushing in «Daily 
Clean» or «Deep Clean» mode, the brushing mode 
will change to the «Sensitive» mode.  Periodically 
check the operation of the pressure sensor by 
pressing moderately on the brush head during use.
Note: In «Tongue Cleaning» mode the pressure 
sensor is turned off.  

Brushing modes 

Your toothbrush offers different brushing modes:

«Daily Clean» 

– 

Standard mode for daily 
mouth cleaning 

«Deep Clean» 

– 

Mouth cleaning with 
extended brushing time of 
45 seconds per quadrant 
(3 minute total brushing time)

«Sensitive» – 

Gentle, yet thorough 
cleaning for sensitive areas

«Whitening» – 

Polishing for occasional or 
everyday use

«Massage» – 

Gentle massage of gums

«Tongue Cleaning»  – 

Tongue cleaning for 
occasional or everyday use

When operating the «Tongue Cleaning» mode, we 
recommend using the «Sensitive» brush head. 
You can brush your tongue either with or without 
toothpaste. Brush the whole area of your tongue 
systematically in gentle movements. The recom-
mended brushing time is 20 seconds; the SmartGuide 
will indicate completion with a smiley face.

Your toothbrush automatically starts in the «Daily 
Clean» mode. To switch to the other modes, 
successively press the mode button (picture 4, 
page 5). To return from any mode back to the «Daily 
Clean» mode, press and hold the mode button. 
The brushing mode is memorised even when the 
handle is briefly switched off during brushing. When 
pausing longer than 30 seconds or briefly pressing 
the mode button (d) during pause the brushing 
mode resets to the «Daily Clean» mode.

Brush heads 

Oral-B offers you a variety of different Oral-B brush 
heads that fit your Oral-B toothbrush handle. Our 
rotating brush heads can be used for tooth-by-
tooth precision cleaning.

Oral-B FlossAction brush head

features micropulse bristles that allow 
for an outstanding plaque removal in 
the interdental areas.

92036479_D34_WE_7000_S6-68.indd   14

19.12.12   13:49

CSS  APPROVED Effective Date  27Dec2012 GMT  - Printed 05Mar2013 Page 13 of 67

Summary of Contents for Professional Black 7000

Page 1: ...with wireless SmartGuide O r a l B O r a l B B 6 modes Oral B...

Page 2: ...6 Kronberg Germany Charger Type 3757 Handle Type 3762 Display Type 3742 92036479 XII 12 D GB F E P I NL DK N S FIN GR DE AT 00 800 27 28 64 63 CH 08 44 88 40 10 GB 0 800 731 1792 IE 1 800 509 448 FR 0...

Page 3: ...b e f g h Oral B a Oral B 6 modes m n i j k l A C 24 h set h min AAA AAA set AAA AAA B set h min h min set c d 4...

Page 4: ...4 3 2 Oral B 30 s e c 3 0 s e c 3 0 s ec 3 0 s e c 45 s e c 4 5 s e c 4 5 s ec 4 5 s e c 5 6 modes 6 modes 1 5...

Page 5: ...entsorgen ACHTUNG Falls das Ger t fallen gelassen wurde sollten Sie die Aufsteckb rste vor dem n chsten Gebrauch wechseln auch wenn kein sichtbarer Schaden zu erkennen ist Halten Sie das Ladeteil von...

Page 6: ...gang n tig bevor Sie Ihre Zahnb rste f r einen weiteren Putzvorgang von 2 Minuten nutzen k nnen Zur t glichen Anwendung kann das Handst ck auf der Ladestation verbleiben damit es jederzeit volle Leis...

Page 7: ...ztechnik ist In den ersten Tagen der Verwendung Ihrer Zahn b rste kann es zu leichtem Zahnfleischbluten kommen In der Regel h rt dies nach einigen Tagen auf Falls es l nger als 2 Wochen andauert sollt...

Page 8: ...ta reinigen Reinigen Sie die gesamte Fl che der Zunge systematisch mit sanften Bewegungen Die empfohlene Reinigungsdauer ist 20 Sekunden Der SmartGuide zeigt das Erreichen durch einen Smiley an Ihre Z...

Page 9: ...odus endet automatisch nach 30 Sekunden Reinigung Sp len Sie die Aufsteckb rste nach jedem Gebrauch bei eingeschaltetem Handst ck unter flie endem Wasser ab Schalten Sie das Handst ck aus und entferne...

Page 10: ...ptimal auf das Handst ck abgestimmt sind Oral B kann keine Aussagen zu Langzeitaus wirkungen der Aufsteckb rsten auf die Haltbar keit des Handst cks treffen Alle Oral B Aufsteckb rsten tragen das Oral...

Page 11: ...ven if no damage is visible Do not place the charger in water or liquid or store where it can fall or be pulled into a tub or sink Do not reach for it when fallen into water Unplug immediately Do not...

Page 12: ...ock feature the flashing 12 00 will disappear automatically after 24h Note If the SmartGuide display is blank before first use no active demonstration mode the batteries will need to be replaced befor...

Page 13: ...martGuide now shows up and timer Press the on off button to switch to the Count down timer and confirm with the mode button Leave the setup menu by pressing the mode button Pressure sensor If you put...

Page 14: ...le to start the synchronization process It is finished when L 1 is displayed Turn off the handle To assign a second handle to the same SmartGuide turn on the other handle until L 2 is displayed After...

Page 15: ...o be attributed to the use of non Oral B replacement brush heads Oral B does not recommend the use of non Oral B replacement brush heads Oral B has no control over the quality of non Oral B replacemen...

Page 16: ...endant un certain temps Evitez tout contact entre votre peau et les piles usag es Conserver hors de port e des enfants Ne pas avaler En cas d ingestion consulter imm diatement un m decin Enlevez sans...

Page 17: ...iatement laissez le corps de brosse en charge Il devrait s clairer dans les 10 ou 15 minutes Lorsque la charge de la batterie devient faible le voyant lumineux de charge clignote en rouge pendant quel...

Page 18: ...et enfin les surfaces de mastication Brossez les quatre quadrants de votre bouche de mani re gale Vous pouvez galement consulter votre dentiste au sujet de la technique qui vous conviendrait Lors des...

Page 19: ...nnel ou quotidien Massage Stimulation des gencives en douceur Nettoyage de Nettoyage de la langue pour la langue un usage occasionnel ou quotidien Lors du mode Nettoyage de la langue nous recommandons...

Page 20: ...s de brosse la m me unit d affichage SmartGuide r p tez les deux derni res op rations ci dessus avec le deuxi me corps de brosse jusqu l affichage de L 2 Apr s avoir synchro nis le deuxi me corps de b...

Page 21: ...quent nous ne pouvons pas garantir la performance de nettoyage de brossettes qui ne sont pas de marque Oral B tel que annonc au moment de l achat initial Oral B ne peut pas assurer le bon montage de...

Page 22: ...vous con cernent Pour exercer ce droit adressez vous au responsable du traitement Procter Gamble France SAS Service du Consommateur 92665 Asni res Cedex Procter Gamble France SAS 391 543 576 RCS Nant...

Page 23: ...o debe ser reemplazado antes del siguiente uso incluso si no se aprecian da os visibles No colocar o almacenar la base de carga donde se pueda caer o sumergirse en una ba era o lavabo No cogerlo si se...

Page 24: ...a 6 meses Ajustes de la pantalla SmartGuide La pantalla SmartGuide i viene con el modo de demostraci n activado Desactive este modo quitando la tapa del compartimento de las pilas en la parte trasera...

Page 25: ...moriza el tiempo entre cepilla dos incluso cuando el mango se apaga breve mente durante el cepillado El tiempo comienza de nuevo si la pausa es m s larga de 30 segundos o se presiona brevemente el bot...

Page 26: ...ntes Los cabezales de cepillo Oral B llevan filamentos INDICATOR que ayudan a indicar cuando es necesario cambiar el cabezal Con un profundo cepillado dos veces al d a durante dos minutos los filament...

Page 27: ...llo as como uso negligente del mismo La garant a se invalida si la reparaci n es llevada a cabo por personas no autorizadas o por el uso de elementos que no sean Braun Para acceder al servicio durante...

Page 28: ...ubstitua simultaneamente todas as pilhas N o misture pilhas alcalinas com pilhas recarreg veis ou de zinco carbono PRECAU ES No caso de o aparelho cair substitua a cabe a da escova mesmo que esta n o...

Page 29: ...cova Quando a bateria est completamente descarregada o motor p ra necessitar de 40 minutos para uma recarga que permita uma utiliza o da escova de dentes durante de 2 minutos Para uma utiliza o di ria...

Page 30: ...m para si Durante os primeiros dias de utiliza o de qualquer escova el ctrica as suas gengivas podem sangrar ligeiramente Geralmente este sintoma deve parar ap s alguns dias Se persistir ap s 2 semana...

Page 31: ...Escove sistematicamente toda a l ngua com movi mentos suaves O tempo de escovagem recomen dado de 20 segundos O SmartGuide vai indicar que o tempo terminou com um risonho A sua escova de dentes arran...

Page 32: ...ntes de voltar a colocar a cabe a no cabo Desmonte a unidade de carregamento antes de a limpar A base de suporte das cabe as de escovagem e a tampa de protec o podem ser colocadas na m quina de lavar...

Page 33: ...m pe as originais Oral B tal como declaramos na altura da compra do cabo el ctrico recarreg vel A Oral B n o pode garantir um bom encaixe e adapta o das cabe as de escova que n o sejam pe as originais...

Page 34: ...he Non smontare ricaricare o gettare nel fuoco AVVERTENZA Se il prodotto dovesse cadere si dovr sostituire la testina prima dell utilizzo anche se non ci sono danni visibili Non immergete il caricator...

Page 35: ...ssimo staccarla dalla presa elettrica e togliere il manico dalla carica almeno una volta ogni 6 mesi Regolazioni SmartGuide La SmartGuide i regolata in fabbrica sulla modalit di dimostrazione Disattiv...

Page 36: ...zolatura Il timer si resetta se resta in pausa oltre 30 secondi o brevemente premendo il pulsante modalit d durante la pausa Il timer Count up indica l effettivo tempo di spaz zolatura Il timer Count...

Page 37: ...troppa pressione su denti e gengive Non consigliamo di usare la testina Oral B FlossAction o Oral B 3D White se portate un apparecchio ortodontico Potete usare la testina Oral B Ortho appositamente di...

Page 38: ...aun Per ricevere assistenza durante il periodo di garanzia consegnare o inviare l apparecchio completo insieme allo scontrino di acquisto a un Centro di Assistenza Clienti Oral B Braun autorizzato Sol...

Page 39: ...rschillende merken en of types Herlaad batterijen niet en gooi ze niet in het vuur De batterijen niet openmaken WAARSCHUWING Als het product gevallen is dient u de opzet borstel te vervangen voor uw v...

Page 40: ...laad bare batterij leeg is zal de elektrische tanden borstel stoppen het duurt 40 minuten voordat u de borstel voor 2 minuten opnieuw kunt gebruiken Bij dagelijks gebruik kan de tandenborstel elke dag...

Page 41: ...naar de juiste poetstechniek voor u Bij het eerste gebruik van een elektrische tanden borstel zou het kunnen dat uw tandvleesvlees lichtjes gaat bloeden de eerste dagen Over het algemeen stopt het blo...

Page 42: ...ematisch in zachte bewegingen De aanbevolen poetstijd is 20 seconden de SmartGuide zal bij afronding een lachend gezichtje tonen Uw tandenborstel staat automatisch in de Dagelijks Reiniging poetsstand...

Page 43: ...gereinigd mogen worden met een vochtige doek Bij het reinigen van het reisetui m haal het binnenste gedeelte eruit Het binnenste deel is vaatwasmachinebestendig de behuizing moet worden schoongemaakt...

Page 44: ...Alle Oral B opzetborstels hebben het Oral B logo envoldoen aan Oral B s hoogste kwaliteitsnormen Oral B verkoopt geen opzetborstels of andere stukken onder aan andere merknaam 30 Dagen Niet Tevreden...

Page 45: ...stat alle batterier p samme tid Bland ikke nye og brugte batterier forskellige m rker merker eller typer M ikke skilles ad genop lades eller afskaffes i ild M ikke demonteres lades opp p nytt eller ka...

Page 46: ...ekunder n r du slukker t nder for sl r av og p tandb rsten Hvis det genopladelige oppladbare batteri er afladet utladet stopper motoren tandb rsten skal oplades i 40 minutter f r den kan anvendes til...

Page 47: ...til r ds om den rigtige teknik for dine t nder tenner De f rste dage el tandb rsten den elektriske tannb rsten anvendes kan dit tandk d bl de lidt kan tannkj ttet bl litt Det holder normalt op efter...

Page 48: ...rsten starter automatisk i indstillingen Daglig reng ring For at skifte til de andre indstillinger skal du trykke p b rsteindstillings knappen fig 4 side 5 Tryk p og hold b rste indstillingsknappen n...

Page 49: ...kil Ta fra hverandre opladeren heden ladeenheten for reng ring Kammeret til b rstehoveder b rstehoder med beskyttelses kappe t ler opvaskemaskine Reng r kun basis opladeren basisladeren og SmartGuide...

Page 50: ...ndtag Oral B kan ikke forudsige den langsigtede effekt af ikke Oral B b rstehoveders slid slitasje p h ndtaget Alle Oral B b rstehoveder b rstehoder har Oral Bs logo og m der Oral Bs h je kvalitetskra...

Page 51: ...m det inte finns n gra synliga skador Placera inte laddaren i vatten eller v tska och f rvara den inte s att den kan ramla i eller dras ned i ett badkar eller ett handfat F rs k inte f tag p en laddar...

Page 52: ...e genom att lossa batteriluckan baktill bild A sid 4 och trycka p n gon av knapparna set eller h min N r 12 00 blinkar p displayen indikerar detta att du nu kan st lla in tiden Om du inte vill anv nda...

Page 53: ...den St lla in timern Din tandborste har timerfunktionerna Professional Timer och R kna upp aktiverade vid leverans Du kan ndra detta genom att trycka p och h lla ned knappen f r borstningsl ge i 3 sek...

Page 54: ...nden n r mer n en Oral B Black 7000 tandborste med SmartGuide anv nds i samma hush ll m ste du tilldela tandborstarna till sina respektive SmartGuide Du kan synkronisera max 2 handtag med en SmartGuid...

Page 55: ...ra handtaget kan h nf ras till anv ndning av borsthuvuden som inte r fr n Oral B Oral B rekommenderar inte anv ndning av borst huvuden som inte r fr n Oral B Oral B har ingen kontroll ver kvaliteten h...

Page 56: ...toaa harjasp tulee vaihtaa ennen seuraavaa k ytt vaikkei siin olisikaan n kyv vikaa l laita latausyksikk veteen tai muuhun nesteeseen tai pid latausyksikk sellaisessa paikassa mist se voi pudota ammee...

Page 57: ...u t st tilasta irrotta malla laitteen takana oleva paristotilan kansi kuva A sivu 4 ja paina set asetus tai h min paini ketta Vilkkuva 12 00 merkint tarkoittaa sit ett voit asettaa kelloajan Jos et ha...

Page 58: ...s t minen Toimitushetkell hammasharjaan on ohjelmoitu Professional Timer ja Count Up Timer Muuta asetusta painamalla harjaustilan valitsinta kolmen sekunnin ajan kunnes SmartGuide n yt ss lukee 30 ja...

Page 59: ...tt n voidaan synkronoida enint n kaksi runkoa Tee se painamalla paristotilan h min painiketta v hint n kolmen sekunnin ajan SmartGuide n ytt n tulee L merkint Aloita synkronointi k ynnist m ll runko o...

Page 60: ...k densijan vauriot johtuvat siit ett sen kanssa on k ytetty muita kuin Oral B harjasp it Oral B suosittelee ettet k yt muita kuin Oral B n vaihdettavia harjasp it Oral B ei voi taata muiden kuin Oral...

Page 61: ...62 Oral B Oral B 3 14 SmartGuide Oral B Black 7000 3...

Page 62: ...on off f 15 6 a b c d e f g h i SmartGuide j SmartGuide k l m n 1 5 24 10 2 2 10 15 40 2 6 SmartGuide SmartGuide i 4 set h min 12 00 SmartGuide 12 00 24 SmartGuide set 12h h min 12h 24h set h min set...

Page 63: ...64 SmartGuide 2 3 SmartGuide SmartGuide 2 5 3 5 TriZone 4 Oral B Oral B Sensitive 2 Minute 2 Professional Count Up Count Down 2 Minute 2 SmartGuide 2 Professional 30 45 3 5 2 3 4 2 30 d...

Page 64: ...nt Up Count Down Professional Count Up 3 SmartGuide 30 timer 2 Minute 2 up timer Count Down c b 3 5 45 3 Sensitive 20 SmartGuide 4 5 30 d Oral B Oral B Oral B Oral B FlossAction Micropulse Oral B Sens...

Page 65: ...rspace Oral B TriZone Oral B TriZone 3 Oral B INDICATOR 3 Oral B Floss Action 3DWhite Oral B Ortho Oral B Black 7000 SmartGuide SmartGuide 2 SmartGuide h min 3 SmartGuide L L 1 SmartGuide L 2 Full h m...

Page 66: ...Oral B Braun Braun Braun Service Oral B Braun Oral B Oral B H Oral B Oral B H Oral B Oral B Oral B Oral B Oral B Oral B Oral B Oral B Oral B Oral B H Oral B 30 Oral B Black 7000 SmartGuide 30 Berson 4...

Reviews: