background image

Install the Rack Rails for the Pilot

Install the rack rails on the rack prior to installing the Pilot.

Prerequisite:

Ensure that you have adequate room to work around the rack while installing the

rails and the Pilot.

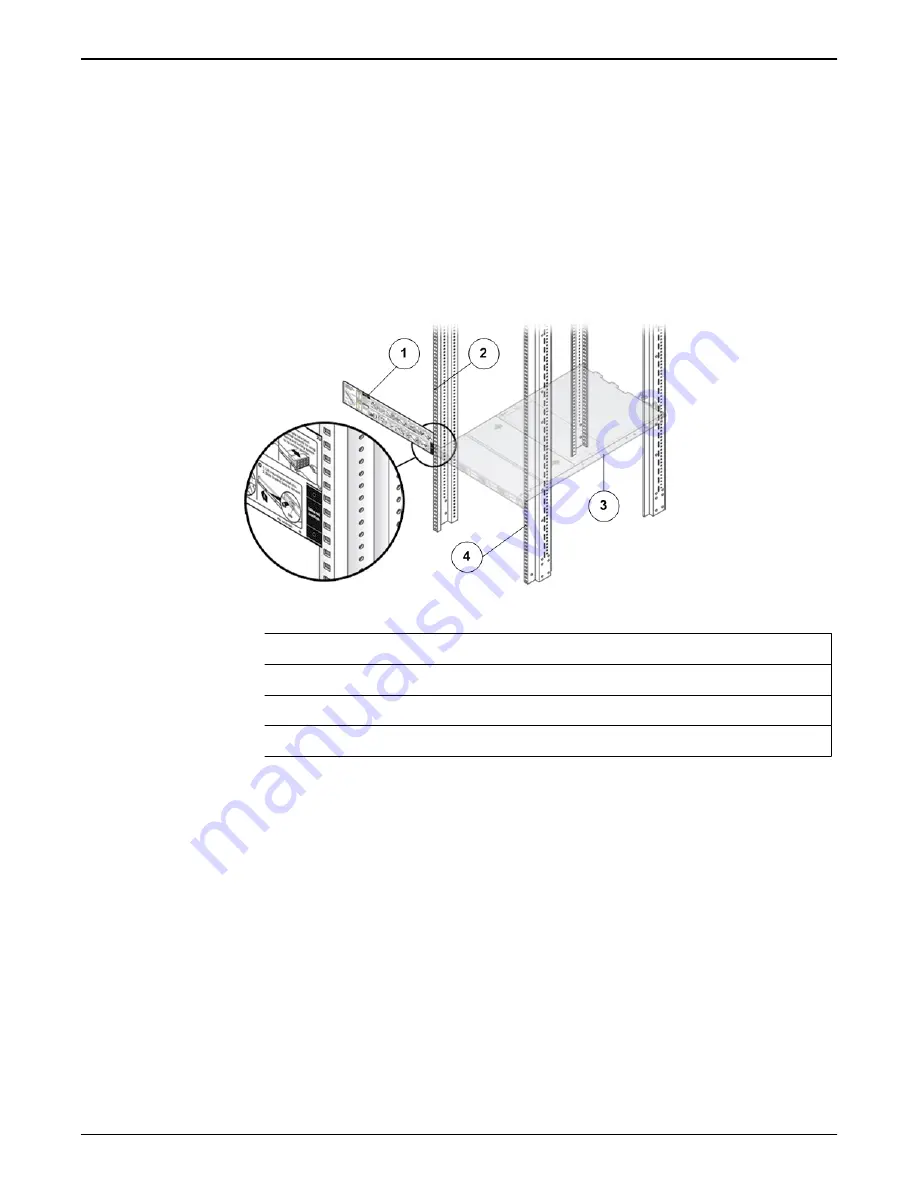
1 Place the rack-mount installation card against the front rails to identify the

correct mounting holes for the slide rails.

Figure 51: Rack-mount installation card template

Legend

1 Installation card
2 Rack mount hole
3 Pilot chassis
4 Front rack post

Note: 

The Pilot requires one standard rack units (1U) of vertical space.

Tip: 

The bottom edge of the installation card must correspond to the

bottom edge of the 

Pilot

. Measure up from the bottom of the installation

card.

2 Mark the mounting holes for the front slide rails.
3 Mark the mounting holes for the back slide rails.
4 Remove the rails from the packaging.
5 Orient the slide-rail assembly so that the ball bearing track is forward and

locked in place.

Oracle FS1–2 Global Procedures

82

Summary of Contents for FS1-2

Page 1: ...Oracle FS1 2 Flash Storage System Customer Service Guide Part Number E63119 02 Oracle FS1 2 Flash Storage System release 6 2 0 2016 September...

Page 2: ...applications that may create a risk of personal injury If you use this software or hardware in dangerous applications then you shall be responsible to take all appropriate fail safe backup redundancy...

Page 3: ...e a Controller Component 1 36 Access to Replace a Controller Component 2 37 Access to Replace a Drive Enclosure Component 37 Access to Replace a Pilot Component 38 Chapter 2 Oracle FS1 2 Global Proced...

Page 4: ...oller Power Supply Cords 97 Open the Controller Top Cover 98 Remove a Fan Module 99 Insert a Fan Module 100 Close the Controller Top Cover 100 Complete the Component Replacement 101 Verify Controller...

Page 5: ...r Duct 145 Remove a DIMM 147 Insert a DIMM 148 Lower the Drive Compartment 149 Insert an Air Duct 150 Insert an Air Filter 150 Close the Controller Top Cover 150 Complete the Component Replacement 151...

Page 6: ...Service Position 188 Power Off the Pilot 189 Open Pilot Fan Door 189 Open Pilot Top Cover 190 Remove a SAS HBA 191 Insert a SAS HBA 193 Close Pilot Top Cover 195 Close Pilot Fan Door 196 Connect Powe...

Page 7: ...sert a Pilot DIMM 228 Close Pilot Top Cover 228 Close Pilot Fan Door 229 Connect Power Cords On the Pilot 229 Slide Pilot to Rack Position 229 Verify Component Replacement on the Standby Pilot 230 Ver...

Page 8: ...Pilot Drive LED Indicators 261 Pilot Fan LED Indicators 261 Pilot Port LED Indicators 262 Pilot Motherboard LED Indicators 263 Pilot Power Supply LED Indicators 264 Index 265 Contents 8...

Page 9: ...3 Component placement with four Replication Engines 41 Table 14 Controller rail kit mounting screws 45 Table 15 Drive Enclosure rail kits 64 Table 16 Basic components of an Oracle Flash Storage System...

Page 10: ...ntroller ESM LED status and description 250 Table 36 Drive Enclosure LED status and description operator panel 252 Table 37 Drive Enclosure LED status and description power cooling module 253 Table 38...

Page 11: ...roller rack mount location 46 Figure 13 Left rail secured to the front of the rack 47 Figure 14 Left rail adjusted at the back of the rack 48 Figure 15 Slide rail assembly unlocked 49 Figure 16 Mounti...

Page 12: ...40 Rail location pegs from inside of the rail flange and the clip nut 73 Figure 41 Rail location pegs and a square hole rack 74 Figure 42 Rail extended to holes in the back of the rack 74 Figure 43 Th...

Page 13: ...6 Slide the Controller to service position 97 Figure 67 Remove power supply cords 98 Figure 68 Captive thumb screws to remove the top cover 98 Figure 69 Remove fan module 99 Figure 70 Insert fan modul...

Page 14: ...ease HBA 129 Figure 95 Remove HBA from riser slots 130 Figure 96 Insert HBA into riser slot 131 Figure 97 HBA retainer latch 131 Figure 98 Insert riser 132 Figure 99 Captive screws to secure risers to...

Page 15: ...24C Drive Enclosure drives 156 Figure 126 A DE2 24P Drive Enclosure drive and drive carrier latch 158 Figure 127 A DE2 24C Drive Enclosure drive and drive carrier latch 159 Figure 128 A drive removed...

Page 16: ...ith fan door open 180 Figure 150 Pilot top cover removal 181 Figure 151 Battery removal 182 Figure 152 Battery insertion 182 Figure 153 Pilot top cover installed 183 Figure 154 Location of the Pilot r...

Page 17: ...n during component replacement 215 Figure 180 Pilot slide lockout release tabs 216 Figure 181 Pilot with fan door open 217 Figure 182 Fan module status indicator 218 Figure 183 Pilot fan module remova...

Page 18: ...re 198 Operator panel LEDs DE2 24C Drive Enclosure 251 Figure 199 Power cooling module LEDs 252 Figure 200 I O module LEDs 254 Figure 201 Drive LEDs DE2 24P Drive Enclosure 255 Figure 202 Drive LEDs D...

Page 19: ...com goto fssystems docs Table 1 Oracle resources For help with Contact Support http www oracle com support www oracle com support Training https education oracle com https education oracle com Documen...

Page 20: ...roller components are customer replaceable CRUs while others are field replaceable units FRUs that require Oracle Customer Support to perform the replacement Also some components are hot serviceable m...

Page 21: ...assembly FRU No Motherboard cable kit FRU No Power distribution board PDB FRU No Power supply CRU Yes Rail kit assembly FRU No Riser board assembly CRU No SAS HBA PCIe 3 6 Gb s 4x4 port CRU No Some FR...

Page 22: ...to opposite Controller The following figure shows the front of the Controller with the air filter Figure 2 Controller front view with the air filter Legend 1 LED alarm board assembly 3 Controller ide...

Page 23: ...ls 3 Controller Unit Identification Display CUID The following figure shows all the replaceable components of the Controller Figure 4 Exploded view of Controller replaceable components Introduction to...

Page 24: ...know its part number and whether it is hot serviceable Having that information helps you to order the correct replacement component and to determine whether you can replace the component yourself To...

Page 25: ...ure CRUs Legend 1 Drives 4 I O module 0 2 Power cooling module 0 5 I O module 1 3 Power cooling module 1 The following figure shows the CRUs in the DE2 24C Drive Enclosure Introduction to Oracle FS1 2...

Page 26: ...2 The following table provides a summary of the Drive Enclosure components Table 3 Drive Enclosure component descriptions Drive Enclosure component Component Type Hot serviceable Chassis for the DE2...

Page 27: ...re DE2 24P Drive Enclosure 2 5 inch 6 35 cm SAS 2 SFF HDDs 900 GB 24 drives in a DE2 24P Drive Enclosure DE2 24P Drive Enclosure SSDs 400 GB Seven or 13 drives in a DE2 24P Drive Enclosure DE2 24P Dri...

Page 28: ...t is powered on The following table provides a summary of the Pilot FRUs and CRUs Table 5 Pilot components and descriptions Pilot component Type Hot serviceable Battery CRU No USB Oracle System Assist...

Page 29: ...t 10 Ethernet port ETH 3 labeled as NET 0 5 ILOM SP network management port labeled as NET MGT port 11 USB connectors 6 Serial management port labeled as SRMGT port 12 Video connector The following fi...

Page 30: ...tery 11 DIMMs 4 Heat sink 12 Power supplies 5 Fan modules 13 CPU 6 Front Indicator Module FIM 14 USB OSA flash drive 7 Energy Storage Module ESM for Oracle 12 Gb s SAS PCIe RAID HBA that goes into PCI...

Page 31: ...problems in the outcome of the in process task Electrostatic Discharge Precautions Caution Before you handle a component make sure that you have taken electrostatic discharge ESD precautions The minim...

Page 32: ...nes are carefully followed Caution Always load components into a rack from the bottom to the top so that the rack does not become top heavy and tip over Caution Avoid elevated operating ambient temper...

Page 33: ...Controller or Drive Enclosure During the identify process Guided Maintenance issues a command to light the LEDs on the affected chassis If you are replacing a component on a Drive Enclosure the follow...

Page 34: ...o verify that a FRU or CRU is accessible and functioning properly The diagnostics are primarily used to verify FRUs and CRUs that have been added or replaced The system also tracks parts that have fai...

Page 35: ...IMMs Energy storage module ESM ESM backplane Fan modules HBAs Heat sink LED alarm assembly Motherboard assembly Motherboard cables NVDIMMs Power distribution board Riser Pilot Components Replacing Pil...

Page 36: ...n into the GUI with an administrator account set up with Support role privileges Access to Replace a Controller Component 1 For the following Controller components access Guided Maintenance through Sy...

Page 37: ...upport System Trouble 2 Select the Controller that contains the component that is to be replaced 3 Select Actions Replace Component Guided Maintenance displays the list of replaceable components for t...

Page 38: ...ays the Introduction page and guides you through the steps to replace the Drive Enclosure component Access to Replace a Pilot Component 1 From Oracle FS System Manager GUI navigate to System Hardware...

Page 39: ...roller 1 RU 23 RU 24 RU 21 RU 22 Controller 2 RU 25 RU 26 RU 23 RU 24 Remaining Drive Enclosures RU 27 to RU 42 RU 25 to RU 28 next DE2 24C DE RU 29 to RU 42 If the Oracle FS System includes one Repli...

Page 40: ...15 RU 16 Replication Engine 1 RU 19 RU 20 RU 17 RU18 Pilot 0 RU 21 RU 19 Pilot 1 RU 22 RU 20 Controller 1 RU 23 RU 24 RU 21 RU 22 Controller 2 RU 25 RU 26 RU 23 RU 24 Remaining Drive Enclosures RU 27...

Page 41: ...16 Replication Engine 1 RU 19 RU 20 RU 17 RU 18 Pilot 0 RU 21 RU 19 Pilot 1 RU 22 RU 20 Controller 1 RU 23 RU 24 RU 21 RU 22 Controller 2 RU 25 RU 26 RU 23 RU 24 Remaining Drive Enclosures RU 27 to RU...

Page 42: ...ed in might differ from the cabling order recommended in this document If the Drive Enclosures appear out of order not 1 through 30 in sequence bottom up then the customer can change it through the GU...

Page 43: ...You need not always perform a complete data backup to remove Drive Enclosures from an Oracle FS System However prior to removal make sure that all necessary resources have been migrated from the Drive...

Page 44: ...all each Controller after you install the rail kit before installing the next combination of rail kit and Controller Installing all of the rail kits and then inserting the Controllers is not always po...

Page 45: ...t rails are shipped pre assembled 8 32 pan head screw 4 Mount left and right rails to front of cabinet rails Metric M6 pan head screw 8 Mount left and right rails to back of cabinet rails Secure front...

Page 46: ...mat while replacing components Ensure that you have a Phillips Number 2 screwdriver with at least a 4 inch shaft If you are installing the rails in a rack with threaded holes make sure you have a Tor...

Page 47: ...it U has three mounting holes in the left and right rack rails Note Insert the screws into the lowest holes in the top two mounting units of the 2U slot in which the chassis is to be mounted These scr...

Page 48: ...s two on each side at the back of the rail 9 Repeat the above three steps for the right rail 10 Using a Phillips Number 2 screwdriver tighten the eight 10 32 panhead adjustment screws four on each sid...

Page 49: ...ked Legend 1 Slide rail assembly 2 Slide rail lock button 2 Slide the mounting bracket release button and then slide the mounting bracket out of the slide rail Figure 16 Mounting bracket release butto...

Page 50: ...section unlocked Legend 1 Slide rail 2 Metal lever Tip Press the metal lever on the middle section of the slide rail to unlock the slide rail and then push the middle section back into the rack 3 Att...

Page 51: ...ing the slide rails to the rack posts Note The Controller is two rack units tall 2U The slide rails will occupy the lower half of the 2U space 6 Determine which screws you will use to mount the slide...

Page 52: ...he length of the slide rail by sliding the back mounting flange to reach the outside edge of the back rack post Loosely attach the back of the slide rail to the back rack post with two screws 8 Attach...

Page 53: ...he ends of the tool to enter the ends of both rails The distance between the rails is now equal to the width of the Controller with mounting brackets 10 Tighten the screws to lock the front ends of th...

Page 54: ...slide rails are locked to the mounting brackets before continuing Install the Controller CMA The cable management arm CMA clips into the ends of the left and right Controller slide rail assemblies No...

Page 55: ...e back of the left slide rail Legend 1 CMA rail extension 2 Slide rail Caution Support the CMA during this installation Do not allow the assembly to hang by its own weight until it is secured by all t...

Page 56: ...CMA connector mounted Legend 1 Slide rail 2 Inner CMA connector 3 Clip 3 Insert the outer CMA connector into the end of the right sliding rail Figure 24 Outer CMA connector attached Oracle FS1 2 Globa...

Page 57: ...a four inch shank Caution Do not power on the Controller until all components have been installed and all internal private management interface PMI and private interconnect PI cables have been connect...

Page 58: ...se a Phillips screwdriver to install and tighten the four M6 panhead screws two on each side to secure the chassis to the front of the rack 4 Install and tighten two 6 32 screws one on each side at th...

Page 59: ...n 2 Inspect the attached cables for any binding or kinks 3 Verify that the CMA extends fully and does not bind in the slide rails 4 When the Controller is fully extended out release the mounting brack...

Page 60: ...buttons and push the Controller completely into the rack Figure 28 Slide rail release button Legend 1 Slide rail release button 2 Slide rail Note The Controller should stop after approximately 15 inch...

Page 61: ...inch wide four post EIA compatible rack with a front to back depth between vertical cabinet rails of 24 inches to 36 inches 61 cm to 91 cm Drive Enclosures rail kits can be installed in racks with the...

Page 62: ...Figure 30 Rails for the DE2 24P Drive Enclosure Legend 1 Left side rail for square hole and round hole racks 2 Adaptor pins for threaded hole racks Oracle FS1 2 Global Procedures 62...

Page 63: ...for square hole racks 3 Round hole racks 2 Threaded hole racks Related Links Install Drive Enclosure Rails Drive Enclosure Rail Kits Drive Enclosure Rail Kits The following table summarizes the conte...

Page 64: ...ft hand rail assembly 2 Phillips hex flange head screws 11mm 1 Right hand rail assembly 2 Cage nuts 4 Orange service screw labels 2 Clip nuts 8 Special screws for round hole rack 1 Rail kit user label...

Page 65: ...e Enclosure Rail Kits Install Rails for DE2 24P Drive Enclosures The rails for the DE2 24P Drive Enclosure are preassembled with rail location pegs on the front and back for installation in a square h...

Page 66: ...rench 2 Adaptor pins 3 Position the front of the rails inside of the rack with the rail flange inside of the rack flange The rail label faces the inside of the rack The pins should be fully located wi...

Page 67: ...oosely tighten one screw through the front of the rack and into the top hole in the rails 5 Adjust the rail lengths and locate the back pins inside the corresponding back rack holes 6 Insert and loose...

Page 68: ...l space in the rack 2 Remove the rails from the Drive Enclosure packaging 3 Position the front rail location pegs fully inside the holes in the front rack posts where you plan to add a Drive Enclosure...

Page 69: ...and rail location pegs Legend 1 Rail location pegs 2 Front rack post 4 Insert and tighten one Phillips 13mm head hex flange screw through the front rack hole and into the top hole of the rail Oracle...

Page 70: ...Rail location pegs 5 From the back of the rack position the pegs fully into the corresponding rack holes To position the pegs extend the length of the rail to the back of the rack and position the peg...

Page 71: ...es 1 Locate the appropriate rack unit RU height The DE2 24C Drive Enclosure requires four standard rack units 4U of vertical space 2 Remove the rails from the Drive Enclosure packaging 3 If you are in...

Page 72: ...Remove the two rail location pegs from each rail end and replace them with the special screws from the rail kit The special screws are part number 0093340 02 Threaded hole rack Remove the two rail loc...

Page 73: ...aligns with the inside of the rack flange and the rail label faces the inside of the rack Square hole racks The rail location pegs fit inside of the rack holes Round hole rack The special screws fit i...

Page 74: ...hole rack Legend 1 Rail location pegs 2 Cage nut 6 Extend the rail length towards the back of the rack and into the rail holes at the back of the rack Figure 42 Rail extended to holes in the back of t...

Page 75: ...ately 53 lbs 24 kg Use a mechanical lift when handling fully populated Drive Enclosures If you are working alone or you do not have access to a mechanical lift you can reduce the weight of a Drive Enc...

Page 76: ...Drive Enclosure must be fully seated in the rack To verify that the Drive Enclosure is fully seated check for the following Using a flashlight visually check to see that the sliders on both sides of t...

Page 77: ...Back of the Drive Enclosure Important If you insert the screw through the hole at the back of the Drive Enclosure and the screw does not align with the screw hole on the rail then the Drive Enclosure...

Page 78: ...e DE2 24P Drive Enclosure weighs approximately 53 lbs 24 kg Use a mechanical lift when handling fully populated Drive Enclosures If you are working alone or you do not have access to a mechanical lift...

Page 79: ...the rail to allow you to slide the Drive Enclosure into the rack To verify that the Drive Enclosure is seated correctly in the rails ensure that the bottom edges on both sides of the Drive Enclosure s...

Page 80: ...he Drive Enclosure 5 Insert the I O modules the power cooling modules and all of the drives into their corresponding slots in the chassis Pilot Rails Adding Pilots in the rack requires you to install...

Page 81: ...have all of the parts in the Pilot rail kit before you begin the installation of the Pilot rails on the rack and the Pilot chassis Note To locate part numbers for the rail kits open Oracle System Hand...

Page 82: ...rd template Legend 1 Installation card 2 Rack mount hole 3 Pilot chassis 4 Front rack post Note The Pilot requires one standard rack units 1U of vertical space Tip The bottom edge of the installation...

Page 83: ...ting with either the left or right side of the rack align the rear of the slide rail assembly against the inside of the rear rack rail and push until the assembly locks into place with an audible clic...

Page 84: ...gainst the Pilot chassis so that the slide rail lock is at the Pilot front and the five keyhole openings on the mounting bracket are aligned with the five locating pins on the side of the Pilot chassi...

Page 85: ...might vary slightly from the CMA shipped with your product 1 Unpack the CMA parts 2 Take the CMA to the back of the rack and ensure that you have adequate room to work around the back of the Pilot 3 R...

Page 86: ...your Pilot might be slightly different 7 Install and route cables to the Pilot as required Insert the Pilot into a Rack Prerequisites Before handling a component touch a grounded surface to discharge...

Page 87: ...l not become top heavy and tip over Caution Slide rail mounted components are not to be used as a shelf or a work space 1 Push the slide rails as far as possible into the slide rail assemblies in the...

Page 88: ...nd 1 Slide rail button 2 Mounting bracket Caution Verify that the Pilot is securely mounted in the rack and that the slide rail locks are engaged with the mounting brackets before you install the cabl...

Page 89: ...stops are levers located on the inside of each slide rail just behind the back panel of the Pilot These levers are labeled PUSH Push in both levers simultaneously and slide the Pilot toward the rack...

Page 90: ...er Figure 59 Oracle FS System Controller Replace Controller Air Filter Air filters are designed to maintain proper airflow within the Controller by keeping the air circulating inside the chassis clear...

Page 91: ...r filter release tabs 2 Press the release tabs inwards at the same time to unlock the tabs and disengage the air filter Figure 61 Air filter release tabs Legend 1 Release tabs 2 Air filter 3 Carefully...

Page 92: ...to the mounting tabs Figure 63 Insert air filter Important Ensure that nothing interferes with the edges of the air filter and that the air filter seats properly 2 Press the top corners of the air fil...

Page 93: ...g the release buttons and extending the Controller chassis Fail over the Controller before replacing the component using Guided Maintenance Note The Controller must be failed over to prevent data loss...

Page 94: ...e replacing the fan module Disconnect the power cables before performing the fan module replacement procedure Note For fan replacement the Replaceable Unit list displays the names of each fan Each pow...

Page 95: ...repare the Component for Replacement 1 From Oracle FS System Manager GUI navigate to System Hardware Controllers and then select the Controller that contains the component that is to be replaced 2 Sel...

Page 96: ...an HTML link that you use to access the instructions for component replacement For hot serviceable components Guided Maintenance completes the process of preparing the system for component replacemen...

Page 97: ...bles do not interfere with the movement of the Controller chassis Although the cable management arm CMA is hinged so that you can extend the Controller chassis all cables and cords must be out of the...

Page 98: ...affected users that the Controller will be powered off Open the Controller Top Cover 1 Fully loosen the two captive thumb screws at the back of the top cover using the Phillips number 2 screwdriver i...

Page 99: ...Remove a Fan Module 1 Using your thumb and forefinger grasp the removal tab and gently lift the fan module from the fan compartment Figure 69 Remove fan module Legend 1 Controller chassis 2 Fan compar...

Page 100: ...Insert the replacement fan module into the Controller Figure 70 Insert fan module Legend 1 Controller chassis 2 Fan compartment 3 Fan module Note Press down on the fan module and apply firm pressure...

Page 101: ...oller back into rack position 2 Re connect the cables that were removed from the Controller Note The Controller automatically powers up when the power cords are plugged in Verify Controller Component...

Page 102: ...erequisites Deploy any rack anti tilt mechanism before releasing the release buttons and extending the Controller Before handling a component touch a grounded surface to discharge any static electrici...

Page 103: ...learance and the power supplies can be re inserted into the power supply compartment without interference Note Ensure that the power cable is routed correctly and there is no interference with the Con...

Page 104: ...racle FS System Manager GUI navigate to System Hardware Controllers and then select the Controller that contains the component that is to be replaced 2 Select Actions View The View dialog displays the...

Page 105: ...at are not hot serviceable Guided Maintenance sends a request to bring the Controller offline and automatically initiate failover Guided Maintenance also displays an HTML link that you use to access t...

Page 106: ...1 Remove the power supply by grasping the power supply handle and pushing the power supply latch to the left Figure 74 Controller power supply latch Legend 1 Power supply handle 3 Power supply 2 Powe...

Page 107: ...ediate powering off of the Controller Do not pull both power supplies from an active and running Controller Note The power supplies must be reinstalled into the same slots from which they were removed...

Page 108: ...ided Maintenance verify that the status is Normal You can also verify the status by navigating to System Hardware and then selecting a chassis The Overview page for the selected chassis lists the stat...

Page 109: ...must be replaced Each Controller contains three PCI express PCIe risers that are located side by side at the back of the Controller The three risers though similar are not interchangeable Each riser...

Page 110: ...8 Close the Controller Top Cover 9 Reconnect Controller Cabling 10 Complete the Component Replacement 11 Verify Controller Component Status Related Links Controller Components Prepare the Component fo...

Page 111: ...o shut down the software running on the Controller and automatically initiates failover Guided Maintenance also displays an HTML link that you use to access the instructions for component replacement...

Page 112: ...les do not interfere with the movement of the Controller chassis Although the cable management arm CMA is hinged so that you can extend the Controller chassis all cables and cords must be out of the w...

Page 113: ...cement procedure is complete Reconnecting cables to the incorrect position might impact the performance of the Controller or result in a complete loss of functionality Note Service the Controller comp...

Page 114: ...ting cable connections before removing any cables Replacing HBAs or their cables into the incorrect position in the riser may result in a loss of performance or functionality 2 Note the position of th...

Page 115: ...secure the risers Legend 1 Riser 3 with latch 3 Riser 1 2 Riser 2 4 Captive screws that secure riser To remove riser 3 unlock the latch to release the riser from the Controller motherboard Controller...

Page 116: ...Figure 82 Unlock Riser 3 latch Legend 1 Riser 3 latch 3 HBA 2 Riser 3 4 Carefully pull the riser straight up and place it aside Figure 83 Remove riser Controller Replacement Procedures 116...

Page 117: ...ser edge connector securely into the socket Important Ensure that any HBAs that must be removed from the failed riser and placed onto the replacement rise are inserted into the same slots on the repla...

Page 118: ...to secure risers to the motherboard Legend 1 Riser 3 with latch 3 Riser 1 2 Riser 2 4 Captive screws To install riser 3 lock the latch to secure the riser to the Controller motherboard Controller Rep...

Page 119: ...ternal cables to any HBAs installed in the riser 4 Repeat the above steps for any additional risers that you are installing Close the Controller Top Cover Place the top cover of the Controller and tig...

Page 120: ...the cables can be reconnected accurately to the Controller after the replacement procedure is complete 2 Reconnect the CMA to the Controller by attaching the release tab on the left and right side of...

Page 121: ...l HBAs can also be added to existing configurations Prerequisites Ensure that you have a Phillips Number 2 screwdriver with at least a 4 inch shaft Before handling a component touch a grounded surface...

Page 122: ...Gb s SAS PCIe 3 4x4 port ALL 3 6 2 16 Gb s Fibre Channel FC or 10GbE iSCSI universal HBA QLogic SAN 1 4 5 Note Replacement of the HBA will result in a change to the world wide port name WWPN of the HB...

Page 123: ...es the LEDs on the chassis that contains the failed component Reverse Identify Flashes the LEDs on all of the chassis in the system except for the chassis that contains the failed component 6 Click Ne...

Page 124: ...e buttons and extending the Controller chassis Figure 88 Slide the Controller to service position Legend 1 Rack 2 Controller chassis 3 Release buttons Important Before you slide the Controller chassis...

Page 125: ...Controller after the replacement procedure is complete Reconnecting cables to the incorrect position might impact the performance of the Controller or result in a complete loss of functionality Note S...

Page 126: ...ting cable connections before removing any cables Replacing HBAs or their cables into the incorrect position in the riser may result in a loss of performance or functionality 2 Note the position of th...

Page 127: ...secure the risers Legend 1 Riser 3 with latch 3 Riser 1 2 Riser 2 4 Captive screws that secure riser To remove riser 3 unlock the latch to release the riser from the Controller motherboard Controller...

Page 128: ...Figure 92 Unlock Riser 3 latch Legend 1 Riser 3 latch 3 HBA 2 Riser 3 4 Carefully pull the riser straight up and place it aside Figure 93 Remove riser Controller Replacement Procedures 128...

Page 129: ...inside the riser If you have not done so already note the ports from which the cables are disconnected in the HBA so that the cables can be reconnected to their original ports when the HBA is replaced...

Page 130: ...A from the riser with the retainer latch swing the retainer latch to its fully open 180 degrees position 2 Orient the HBA so that the brackets of the HBA align with the alignment pin in the PCIe slot...

Page 131: ...t Caution Support the HBA and the riser as necessary to prevent excessive flexure Otherwise the HBA or the riser card might be damaged 5 When all HBAs have been installed in this riser swing the retai...

Page 132: ...isconnected cables from the HBAs are connected to their original ports Insert a Riser 1 Lower the riser onto the Controller motherboard and press the riser edge connector securely into the socket Impo...

Page 133: ...screws on both sides of the riser to secure the riser on the Controller motherboard Figure 99 Captive screws to secure risers to the motherboard Legend 1 Riser 3 with latch 3 Riser 1 2 Riser 2 4 Capti...

Page 134: ...ternal cables to any HBAs installed in the riser 4 Repeat the above steps for any additional risers that you are installing Close the Controller Top Cover Place the top cover of the Controller and tig...

Page 135: ...the cables can be reconnected accurately to the Controller after the replacement procedure is complete 2 Reconnect the CMA to the Controller by attaching the release tab on the left and right side of...

Page 136: ...he Controller motherboard A failed DIMM might cause the Controller to be brought offline and must be replaced as soon as possible Prerequisites Ensure that you have a Phillips Number 2 screwdriver wit...

Page 137: ...e Controller chassis Note To replace a DIMM you do not need to remove the Controller from the rack but extend it along the Controller rails using the cable management arm CMA Note All DIMM fault LEDs...

Page 138: ...tem Hardware Controllers and then select the Controller that contains the component that is to be replaced 2 Select Actions View The View dialog displays the components in the Replaceable Unit list Th...

Page 139: ...e components Guided Maintenance completes the process of preparing the system for component replacement and displays the Replace Hardware dialog The Replace Hardware dialog instructs you to replace th...

Page 140: ...bles do not interfere with the movement of the Controller chassis Although the cable management arm CMA is hinged so that you can extend the Controller chassis all cables and cords must be out of the...

Page 141: ...affected users that the Controller will be powered off Open the Controller Top Cover 1 Fully loosen the two captive thumb screws at the back of the top cover using the Phillips number 2 screwdriver if...

Page 142: ...t the front of the Controller chassis locate the air filter release tabs 2 Press the release tabs inwards at the same time to unlock the tabs and disengage the air filter Figure 107 Air filter release...

Page 143: ...nt to Service Position 1 Disconnect the cables attached to the backplane Cables that must be disconnected include SATA or drive cable NV DIMM cable Motherboard to HDD backplane cable USB board cable F...

Page 144: ...to unnecessary flexure or pull Note Note the location of all the cable connections to the backplane for later re connection of the cables after the replacement procedure is completed Tip Refer to the...

Page 145: ...ntroller 3 Raise the backplane and drive compartment to the vertical position Figure 111 Drive compartment raised Legend 1 Backplane 2 Drive compartment 3 Controller motherboard Remove an Air Duct 1 R...

Page 146: ...e labeled L left and R right The left bracket slides forward and the right bracket slides back when facing the Controller in the service position 2 Lift up the air duct from the Controller chassis and...

Page 147: ...owering up the fault remind button can be sustained only for 60 seconds Note While inserting or removing DIMMs ensure that there is no interference with the cables Pulling or pressing down on the cabl...

Page 148: ...rference with the cables Pulling or pressing down on the cables might cause damage to the cables during the replacement procedure Figure 116 DIMM alignment over DIMM slots Important Ensure that the no...

Page 149: ...e Controller 2 Secure the backplane inside the Controller by inserting the four Phillips Number 2 thumb screws on the four sides of the backplane and tightening them using a Phillips Number 2 screwdri...

Page 150: ...towards you and insert the bottom two hooks into the mounting tabs Figure 118 Insert air filter Important Ensure that nothing interferes with the edges of the air filter and that the air filter seats...

Page 151: ...p when the power cords are plugged in Verify Controller Component Status 1 From Guided Maintenance verify that the status is Normal You can also verify the status by navigating to System Hardware and...

Page 152: ...validate the status of the Controller and the hardware before it will allow the Controller to rejoin the system and return to Normal status 2 Review the status of the LEDs to confirm a status of Norma...

Page 153: ...e are high availability serial attached SCSI SAS 2 storage enclosures The DE2 24P Drive Enclosure has a 2U chassis that supports the following types of drives Twenty four small form factor SFF 2 5 inc...

Page 154: ...able 580W power cooling modules with dual load sharing power supplies and integrated fans 19 inch rack compatible enclosure Front access to all drives Back access to the I O modules and the power cool...

Page 155: ...es are customer replaceable units CRUs Replacing a drive is a hot serviceable process The DE2 24P Drive Enclosure supports the following drive configuration options 300GB hard disk drives HDDs fully p...

Page 156: ...n the DE2 24P Drive Enclosure Figure 124 DE2 24P Drive Enclosure drives The DE2 24C Drive Enclosure can only be configured with 24 4TB HDDs The 24 drive locations are numbered 0 to 23 from the lower l...

Page 157: ...drive to be replaced Procedure Overview 1 Prepare a Drive Enclosure for Component Replacement 2 Remove a Drive 3 Insert a Drive 4 Verify the Status of a Drive Enclosure Component Prepare a Drive Enclo...

Page 158: ...e chassis in the data center 9 Click Next Guided Maintenance completes the process of preparing a Drive Enclosure for component replacement After Guided Maintenance prepares the Drive Enclosure for re...

Page 159: ...y open to unlock and partially eject the drive from the Drive Enclosure chassis Caution Do not force open the drive carrier handle You can damage the drive carrier handle if you apply too much force F...

Page 160: ...drive body and pull the drive completely out of the Drive Enclosurechassis Place the drive into an antistatic bag or on an ESD qualified surface Insert a Drive 1 Make sure that the drive carrier hand...

Page 161: ...inserted drive Figure 132 DE2 24P Drive Enclosure and inserted drive 3 Press the drive carrier handle closed until it locks into place Verify the Status of a Drive Enclosure Component 1 From Guided Ma...

Page 162: ...ed I O module as soon as possible Prerequisites Before handling a component touch a grounded surface to discharge any static electricity Attach an electrostatic discharge ESD wrist strap to your wrist...

Page 163: ...not remove a FRU or CRU if you cannot replace it within 10 minutes with a FRU or CRU or with a filler panel If a FRU or CRU slot is left empty the system can overheat due to improper airflow Note Prio...

Page 164: ...t in the data center You can select one of the following methods to identify the chassis Identify Flashes the LEDs on the chassis that contains the failed component Reverse Identify Flashes the LEDs o...

Page 165: ...lease button toward the lever hole to release the lever Figure 135 Remove the I O module Legend 1 Release button 2 Lever 3 Pull the lever and remove the I O module from the Drive Enclosure Note Be car...

Page 166: ...chassis midplane Figure 136 Insert the I O module Legend 1 Lever 2 Release button 3 Reconnect the SAS cables to the SAS ports on the I O module Make sure to connect the SAS cables in the exact same c...

Page 167: ...rical overload inadequate internal and external airflow dirt and dust incorrect input voltage or a short circuit can damage a power cooling module Replace a failed power cooling module immediately oth...

Page 168: ...Do not remove a FRU or CRU if you cannot replace it within 10 minutes with a FRU or CRU or with a filler panel If a FRU or CRU slot is left empty the system can overheat due to improper airflow Proced...

Page 169: ...chassis that contains the failed component Reverse Identify Flashes the LEDs on all of the chassis in the system except for the chassis that contains the failed component 8 Click Next Based on the me...

Page 170: ...r cooling module out of the Drive Enclosure chassis Note Be careful not to damage the connector pins Insert a Power Cooling Module Before sliding a power cooling into the Drive Enclosure ensure that t...

Page 171: ...ooling module 1 With the attachment lever fully open orient the power cooling module so that the latch aligns with the inner area of the Drive Enclosure and slide the power cooling module into the cha...

Page 172: ...Make sure that the power switch is off for the power cooling module 4 Plug the power cord into the power cooling module 5 Attach the power cord tie strap to the power cord 6 Power on the replacement p...

Page 173: ...You can also verify component status by navigating to System Hardware Drive Enclosures The Drive Enclosure overview page lists the status of each component Drive Enclosure Replacement Procedures 173...

Page 174: ...g Controller and Drive Enclosure resources The two models available for the Pilot are X4 2 and X5 2 The following figure is an isometric illustration of the Pilot Note The X4 2 and X5 2 Pilot models c...

Page 175: ...nk panel at the top right corner of the front panel and two drive bays directly below The right ear nameplate indicates the model name X4 2 or X5 2 Figure 144 Identifying X4 2 and X5 2 Pilot front pan...

Page 176: ...Before handling a component touch a grounded surface to discharge any static electricity Attach an electrostatic discharge ESD wrist strap to your wrist and stand on an ESD mat while replacing compone...

Page 177: ...Pilot to Rack Position 11 Connect Power Cords On the Pilot 12 Verify Component Replacement on the Standby Pilot 13 Verify Component Replacement on the Active Pilot Related Links Pilot Components Prepa...

Page 178: ...the active Pilot is offline the GUI closes When the failover is complete you can log back into the GUI If you are replacing a component located on the standby Pilot Guided Maintenance brings the stan...

Page 179: ...ponent replacement Legend 1 Rack 2 Pilot chassis 3 Pilot rails 2 Slide the Pilot chassis fully forward until the slide lockout release tabs lock into position Figure 148 Pilot slide lockout release ta...

Page 180: ...lacement procedure must be performed is powered off 3 Disconnect the power cords from the back of the Pilot Open Pilot Fan Door Press the two fan door release tabs simultaneously forward and swing the...

Page 181: ...the Pilot top cover before powering off the Pilot might cause damage to the operating system on the Pilot Tip Slide out the Pilot top cover by pressing down on the grooves located on both sides of the...

Page 182: ...an antistatic mat if it must be set aside for any reason 2 Press the replacement battery into the battery retainer with the positive side facing upwards Figure 152 Battery insertion Legend 1 Pilot ba...

Page 183: ...es of the Pilot top cover two on the right side and one on the left side when viewing the Pilot from the front There is also a latch on the underside of the top cover in the front left corner near the...

Page 184: ...oes not comes on until the SP is solid green Note If you need to stop the Pilot from booting in order to check the BIOS you must wait until the SP LED is solid green and then press the power button wh...

Page 185: ...al requires no action Verify Component Replacement on the Active Pilot If you replaced a component on the active Pilot complete the following steps to verify the status of the Pilot 1 Restart Oracle F...

Page 186: ...is not hot serviceable However replacing a SAS HBA will require failing over all operations to the other Pilot The following figure shows the location of the SAS HBA inside a riser board assembly Fig...

Page 187: ...Pilot components 4 Based on the information from your Oracle Customer Support representative select the correct component from the list 5 Click Next Guided Maintenance sends a request to flash the wh...

Page 188: ...ithout bringing the Pilot offline as long as the second power supply remains online and operational Slide Pilot to Service Position 1 Extend the rack s anti tilt legs Figure 156 Pilot position during...

Page 189: ...at the Pilot will be powered off 2 Ensure that the Pilot on which the replacement procedure must be performed is powered off 3 Disconnect the power cords from the back of the Pilot Open Pilot Fan Door...

Page 190: ...he top cover and use the recessed areas to slide the top cover toward the back of the Pilot about 0 5 inches 12 7 mm Caution Before removing the top cover of the Pilot power off the Pilot using Guided...

Page 191: ...the Pilot motherboard Note There are three riser board assemblies inside the Pilot chassis The SAS HBA is located on the third riser and the other risers are empty Caution Do not disconnect the SAS c...

Page 192: ...er from the Pilot Tip You might need to remove fan module FM 0 which is the left most fan when viewing the Pilot from the front 4 Using the PCIe riser lever pull the riser straight up 5 Disconnect the...

Page 193: ...ver remove the two screws to disconnect the rear bracket attached to the SAS HBA from the rear of the PCIe riser Figure 162 Disconnect the bracket from the SAS HBA Legend 1 Phillips Number 2 screwdriv...

Page 194: ...the connectors on the edge of the SAS HBA into the PCIe slot by pushing firmly to seat the card and apply firm pressure on each end of the SAS HBA alternately until it clicks into place in the riser s...

Page 195: ...or Close Pilot Top Cover 1 Place the top cover of the Pilot onto the chassis Tip Place the top cover down so that it hangs over the back of the Pilot by about 13 mm 0 5 inches and the side latches ali...

Page 196: ...es of the fan door until it locks into place Connect Power Cords On the Pilot Reconnect the power cords to the Pilot Note After the power cords are connected the SP ILOM LED blinks first The OK LED do...

Page 197: ...ack position with an audible click Verify Component Replacement on the Standby Pilot If you replaced a component on the standby Pilot complete the following steps to verify the status of the Pilot 1 R...

Page 198: ...your wrist and stand on an ESD mat while replacing components Ensure that you have a Phillips Number 2 screwdriver with at least a 4 inch shaft Fail over the Pilot before replacing the component using...

Page 199: ...to Service Position 3 Power Off the Pilot 4 Open Pilot Fan Door 5 Open Pilot Top Cover 6 Remove a Riser 7 Insert a Riser 8 Close Pilot Top Cover 9 Close Pilot Fan Door 10 Slide Pilot to Rack Position...

Page 200: ...tive Pilot Guided Maintenance brings the active Pilot offline and fails over to the standby Pilot After the active Pilot is offline the GUI closes When the failover is complete you can log back into t...

Page 201: ...ponent replacement Legend 1 Rack 2 Pilot chassis 3 Pilot rails 2 Slide the Pilot chassis fully forward until the slide lockout release tabs lock into position Figure 168 Pilot slide lockout release ta...

Page 202: ...lacement procedure must be performed is powered off 3 Disconnect the power cords from the back of the Pilot Open Pilot Fan Door Press the two fan door release tabs simultaneously forward and swing the...

Page 203: ...er by pressing down on the grooves located on both sides of the cover Figure 170 Pilot top cover removal Legend 1 Push button to release top cover 2 Grooves to slide out top cover 2 Lift the cover off...

Page 204: ...an module FM 0 which is the left most fan when viewing the Pilot from the front 4 Using the PCIe riser lever pull the riser straight up Insert a Riser 1 Unpack the component from its shipping carton N...

Page 205: ...the SAS cable bundle must be disconnected 4 Insert the riser into the PCIe slot on the Pilot motherboard and secure the riser in position using the three locking mechanisms Figure 172 Pilot riser inse...

Page 206: ...slots in the sides of the Pilot chassis Note There are three latching tabs on the sides of the Pilot top cover two on the right side and one on the left side when viewing the Pilot from the front Ther...

Page 207: ...the SP ILOM LED blinks first The OK LED does not comes on until the SP is solid green Note If you need to stop the Pilot from booting in order to check the BIOS you must wait until the SP LED is solid...

Page 208: ...dby Pilot If you replaced a component on the standby Pilot complete the following steps to verify the status of the Pilot 1 Return to Guided Maintenance and click Finish Guided Maintenance closes and...

Page 209: ...able units CRUs Replacing a failed power supply does not require you to bring the Pilot offline provided that the other power supply is online and working The following figure shows the location of th...

Page 210: ...he Pilot to help you identify the Pilot in the data center 6 Click Next Guided Maintenance displays a link that you use to access the instructions for component replacement 7 Click the link to open an...

Page 211: ...of a failed power supply may still be spinning when the system is powered on You can remove a power supply while the fans are still spinning 2 Disconnect the power cord from the failed power supply 3...

Page 212: ...engage to confirm that the power supply is properly seated 4 Re connect the power cord into the replacement power supply 5 Attach the power cord velcro to the power supply Note If you pulled the Pilot...

Page 213: ...replacing components If you need to replace multiple fan module replace only one fan module at a time and within five minutes Initiate Guided Maintenance only when you are able to replace the fan mod...

Page 214: ...le Customer Support identifies the failed component on the Pilot for you 2 From Oracle FS System Manager GUI navigate to System Hardware Pilots and select the Pilot that contains the component that yo...

Page 215: ...dule you are not required to bring the Pilot offline The power supplies and fan modules are hot serviceable Note You can replace one power supply without bringing the Pilot offline as long as the seco...

Page 216: ...tabs must be released to push the Pilot chassis back into the rack Open Pilot Fan Door Press the two fan door release tabs simultaneously forward and swing the Pilot fan door to the open position Note...

Page 217: ...Module 1 Identify the faulted fan module and then using your thumb and forefinger on both sides of the fan module tab gently lift the fan module from the fan compartment Each fan module has a status...

Page 218: ...Figure 182 Fan module status indicator Legend 1 Fan module 2 Fan module tab 3 Fan module status indicator 4 Fan door Figure 183 Pilot fan module removal Pilot Replacement Procedures 218...

Page 219: ...le do not service any other components unless the system is shut down and the power cords are removed Insert a Fan Module 1 Unpack the component from its shipping carton Note Place the component on an...

Page 220: ...u push the Pilot into the rack Figure 185 Location of the Pilot release tabs Note As you push the Pilot into the rack verify that the cable management arm CMA retracts without binding Note To pull the...

Page 221: ...n the Pilot A failed DIMM would cause the Pilot to fail and must be replaced as soon as possible Prerequisites Before handling a component touch a grounded surface to discharge any static electricity...

Page 222: ...MMs Note The DIMMs can be accessed only after removing the cover over the Pilot chassis Note To replace a DIMM you do not need to remove the Pilot from the rack but extend it along the Pilot rails usi...

Page 223: ...the Pilot to help you identify the Pilot in the data center 6 Click Next Guided Maintenance displays a link that you use to access the instructions for component replacement 7 Click the link to open...

Page 224: ...ck s anti tilt legs Figure 187 Pilot position during component replacement Legend 1 Rack 2 Pilot chassis 3 Pilot rails 2 Slide the Pilot chassis fully forward until the slide lockout release tabs lock...

Page 225: ...at the Pilot will be powered off 2 Ensure that the Pilot on which the replacement procedure must be performed is powered off 3 Disconnect the power cords from the back of the Pilot Open Pilot Fan Door...

Page 226: ...he top cover and use the recessed areas to slide the top cover toward the back of the Pilot about 0 5 inches 12 7 mm Caution Before removing the top cover of the Pilot power off the Pilot using Guided...

Page 227: ...le inserting or removing DIMMs ensure that there is no interference with the cables Pulling or pressing down on the cables might cause damage to the cables during the replacement procedure 2 Lift out...

Page 228: ...out 13 mm 0 5 inches and the side latches align with the slots in the sides of the Pilot chassis Note There are three latching tabs on the sides of the Pilot top cover two on the right side and one on...

Page 229: ...the SP ILOM LED blinks first The OK LED does not comes on until the SP is solid green Note If you need to stop the Pilot from booting in order to check the BIOS you must wait until the SP LED is solid...

Page 230: ...dby Pilot If you replaced a component on the standby Pilot complete the following steps to verify the status of the Pilot 1 Return to Guided Maintenance and click Finish Guided Maintenance closes and...

Page 231: ...to the Controllers Controller Two Controllers for failover and failback Provide network I O access to customer facilities and provides a storage fabric interface between all Drive Enclosures and other...

Page 232: ...r any Replication Engines are included as well as the Pilots and Controllers Related Links Component Chassis Hardware Specifications PDU Hardware Specifications System Power Requirements System Packag...

Page 233: ...ive Enclosure depends on the drive type and the number of drives in each Drive Enclosure Width Width across mounting flange 19 in 48 26 cm Width across body of enclosure 17 44 in 44 29 cm Depth 24 8 i...

Page 234: ...able 23 Controller power characteristics Power characteristic Value Frequency nominal 50 60 Hz 47 63 Hz range Voltage nominal 100 to 127 200 to 240 Volts AC Input current maximum for both nodes 13 6 A...

Page 235: ...s for the Oracle FS System components Oracle PDUs might be purchased for use with non Oracle racks The Oracle FS System component power cords have been designed to work with vertical style Oracle or t...

Page 236: ...Number of data center receptacles and type 2x NEMA L6 30R Maximum input current for each cord 24A Outlet receptacles number type 42 C13 seven for each outlet group 6 C19 one for each outlet group Out...

Page 237: ...group 6 C19 one for each outlet group Outlet groups for each PDU 6 PDU power cord length 2 meters 6 6 feet PDU power cords are 4 meters 13 feet long but sections are connected for internal routing in...

Page 238: ...oltage three phase PDU for Oracle Flash Storage Systems High Voltage 3Ph 5W ground kVA size 15 kVA Marketing part number 7104980 Phase 3 Voltage input 3Ph 4W ground 230 400Vac 50 60 Hz maximum 25A per...

Page 239: ...rmation provided for Oracle Flash Storage Systems Oracle Flash Storage Systems require redundant input power feeds for proper fault tolerant operation Note Ensure that you have the exact power load an...

Page 240: ...b temperature Gradient Operational Up to 7000 feet elevation 41 to 104 F 5 to 40 C Up to 10 000 feet elevation 41 to 95 F 5 to 35 C 10 85 10 hr gradient 86 F 30 C 36 F hr 20 C hr Non operational 45 4...

Page 241: ...identify component status Note LED interpretations in this appendix apply to a system after it has been powered on Related Links Controller LED Indicators Drive Enclosure LED Indicators Pilot LED Ind...

Page 242: ...larm assembly on the Controller Table 31 Controller LED status and description front panel No LED LED color Status 1 Chassis identification LED or Locator LED button White The Locator LED can be turne...

Page 243: ...n standby mode and can be quickly returned to full function 200ms On 2800ms Off Slow blink Indicates that a normal but transitory activity is taking place Slow blinking might indicate that system diag...

Page 244: ...e FS System 8 User Alarm LED Amber Indicates a user alarm condition Note The alarm indicators appear on the front panel of the Controller but are not applicable for the Oracle FS System The following...

Page 245: ...s LEDs Left Locator LED and button White Center Service Action Required LED Amber Right Main Power OK LED Green Locator LED and button The Locator LED can be turned on to identify a particular system...

Page 246: ...Status Fast blink System is running in standby mode and can be quickly returned to full function Slow blink A normal but transitory activity is taking place Slow blinking might indicate that system d...

Page 247: ...a 100 Mbps connection Off The link is operating as a 10 Mbps connection 4 Net0 to Net3 status LEDs Left Link and Activity LED Green Right Speed LED Amber Indicates the state of the service processor L...

Page 248: ...C Green On Input power present and good Off Input power not present Flashing No function Controller Fan LED Indicators A single bi color LED represents the status of each fan module The LEDs are on th...

Page 249: ...orage module ESM The LEDs are above the release button of each drive Figure 196 Controller drive LEDs Legend 1 Ready to Remove LED 3 OK Activity LED 2 Attention Service Required LED This following tab...

Page 250: ...ed Off No faults are detected Flashing No function Bottom OK Activity Green On ESM is functional without fault Off ESM is off or initializing Flashing ESM read and write activity Drive Enclosure LED I...

Page 251: ...ndicator 2 Module fault indicator 4 Chassis ID Figure 198 Operator panel LEDs DE2 24C Drive Enclosure Legend 1 System power indicator 3 Locate indicator and logical fault indicator 2 Module fault indi...

Page 252: ...ed Related Links Oracle FS System LEDs Power Cooling Module LED Indicators The LED indicators on the power cooling modules provide power activity status fan and temperature fault conditions and firmwa...

Page 253: ...oling module Off Off On On AC power is present and the status of the power cooling module is normal On Off Off Off The power cooling module fan is outside of acceptable limits Off On Off Off The power...

Page 254: ...able provides status information on the I O module LEDs Table 38 Drive Enclosure LED status and description I O module Status Fault and locate indicator amber Power and OK indicator green Host port ac...

Page 255: ...mal Not applicable Not applicable Flashing Drive LED Indicators The LED indicators on the Drive Enclosure drives provide power activity status locate indicators and fault conditions of each drive The...

Page 256: ...n the operator panel is also a continuous amber light A failure occurred in the power control circuit Off On In addition to the continuous amber light on the Drive Fault LED the Module Fault LED on th...

Page 257: ...Pilot Figure 204 LEDs at the back of the Pilot Legend 1 Poser supply 0 PS0 5 Locator LED white 2 Power supply LEDs Service Required LED amber and AC OK LED green 6 Service Required LED amber 3 Power s...

Page 258: ...Pressing the Locate button toggles the LED fast blink on or off Service Action Required LED Amber OFF Normal operation STEADY ON Fault present on the Pilot This LED lights whenever a fault indicator...

Page 259: ...wer on the Pilot This status indicates either 1 POST code checkpoint tests are running on the Pilot host system or 2 the host is transitioning from the powered on state to the standby state on shutdow...

Page 260: ...Power Supply Failure LED Amber Indicates that one of the Pilot power supplies has failed OFF Indicates steady state no service is required STEADY ON Indicates service required service the power suppl...

Page 261: ...ed drive STEADY ON The drive is engaged and is receiving power STEADY BLINK There is disk activity Indicator blinks on and off to indicate activity Related Links Oracle FS System LEDs Pilot Fan LED In...

Page 262: ...100BASE T link Off No link or link down Flashing No function Activity Top right Green On No function Off No activity Flashing Packet activity Ethernet Port Status LEDs The Pilot has four Ethernet port...

Page 263: ...the Fault Remind button on the motherboard signals the service processor to light the fault LED associated with the faulted processor Fault Remind Power LED This LED is located next to the Fault Remin...

Page 264: ...SLOW BLINK Normal operation Input power is within specification DC output voltage is not enabled STEADY ON Normal operation Input AC power and DC output voltage are within specification Service Requi...

Page 265: ...d materials 31 customer support 19 D Danger signal words 31 DE2 24C Drive Enclosure part numbers 24 DE2 24C Drive Enclosures physical configuration 153 type of Drive Enclosure 153 DE2 24P Drive Enclos...

Page 266: ...ce a FRU 36 overview 33 34 H hardware components CRUs Drive Enclosures 24 Drive Enclosure parts list 24 FRUs Drive Enclosures 24 how to replace a drive 157 replace a power cooling module 167 replace a...

Page 267: ...DE2 24P Drive Enclosure chassis 24 drives 24 I O modules 24 Pilot components 27 power cooling modules 24 parts list Controller components 20 Pilot components 27 PDUs hardware specifications 235 Pilot...

Page 268: ...assembly how to replace 109 198 service procedures 109 198 S safety notice conventions 31 safety precautions 32 sales information 19 SAS HBA how to replace 185 service procedures 185 service procedur...

Reviews: