


7
WCU500
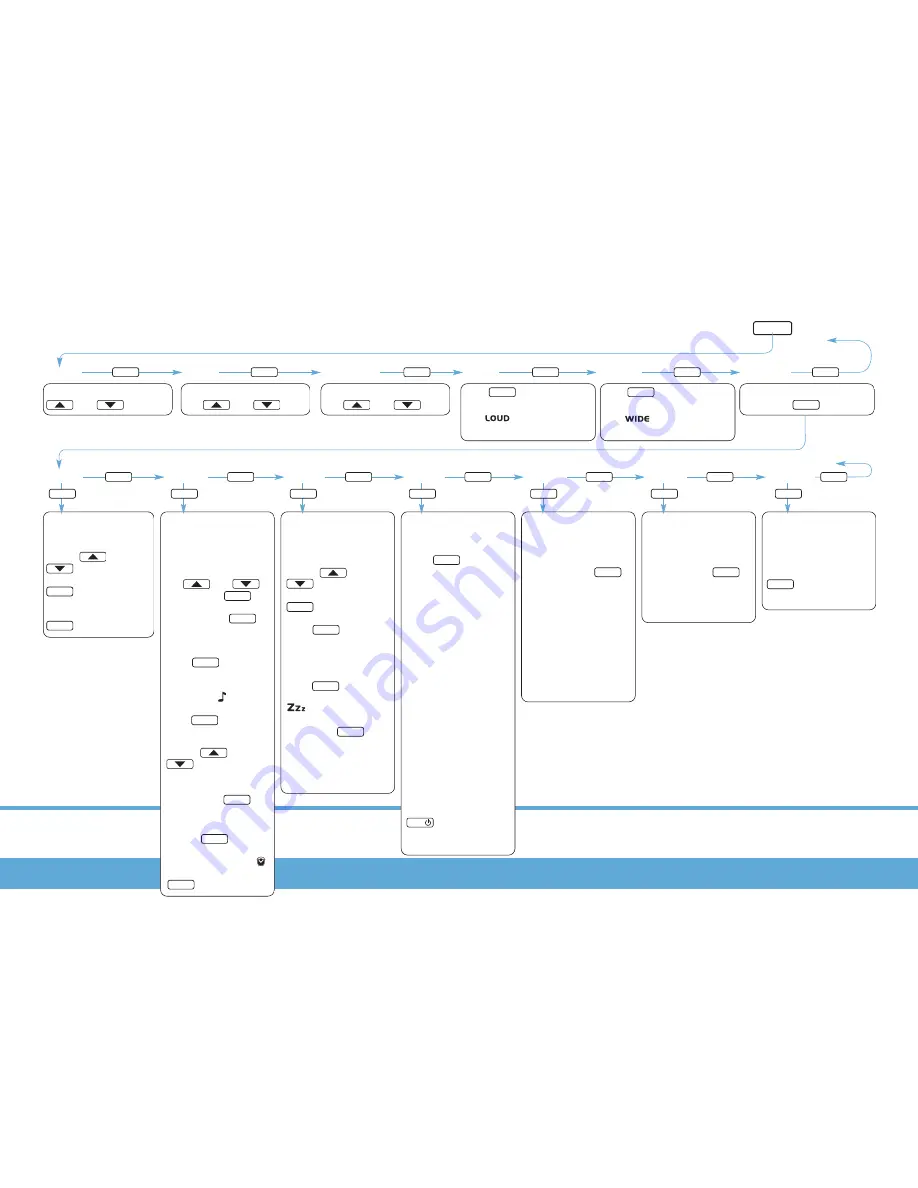
Menu Functions
STBY
To activate special Opus functions or adjust the sound in your zone press the key
Bass
Treb
Balance
Loud
Wide
Set-up
To adjust the Bass use the
and keys.
To adjust the Treble use
the and keys.
To adjust the Balance use
the and keys.
Use
to toggle the
Loud control on or off.
The
icon will be shown
when Loud is activated.
Use
to toggle the
Wide control on or off.
The
icon will be shown
when Wide is activated.
To access the set-up menu
press the
key.
Clock
Alarm
Sleep
Party
All On
All off
B-Light
MENU
MENU
MENU
MENU
MENU
MENU
MENU
MENU
MENU
MENU
MENU
MENU
MENU
Press the MENU key to skip to the next option
Press the MENU key to skip to the next option
Press the SELECT button to
modify a function
Pressing the menu button
returns to the Tuner etc.
SELECT
SELECT
SELECT
MENU
SELECT
SELECT
SELECT
SELECT
SELECT
SELECT
SELECT
MENU
MENU
MENU
MENU
MENU
MENU
SELECT
SELECT
SELECT
SELECT
SELECT
SELECT
SELECT
SELECT
MENU
SELECT
SELECT
Setting the time
To set the correct time
use the
and
keys to adjust the
flashing digits. Use the
key to move to
the next set of digits.
When you’re done press
to exit.
Setting the Alarm
Setting the alarm wake
up time
Set the alarm time using
the and
keys. Use the
key
to move to the next set
of digits. Press to
confirm the wake up time.
Select a source
Press to
toggle
between Beeper and
Tuner. When Beeper is
selected the
icon is
shown on the display.
Press to
continue.
Set the wake up volume
Use the
and
keys to set the
volume. The volume scale
is shown on the keypad
display. Press to
continue.
Activating the alarm
Use the
to toggle
the alarm on or off. When
the alarm is active the
icon is shown. Press
to exit.
Setting sleep time
Setting the sleep timer
To set the sleep timer
use the
and
keys to adjust the
flashing digits. Use the
key to move to
the next set of digits.
Press to
confirm
the sleep time.
Activating the sleep
function
Press to
toggle
between on and off. The
icon is shown on the
display when sleep is set
to on. Press
to
confirm and exit.
When sleep mode is
active Opus will shutdown
the zone at a pre-set time.
Using Party Mode
Activating Party mode
Press to
toggle
the Party mode on and
off. When Party mode is
active all zones and sub
zone keypads will display
Party. During Party mode
each keypad will only
have access to the vol-
ume, on and off controls
for that zone. When you
activate party mode the
keypad you use will
become the Party
Master Keypad. The
Party Master is the only
keypad that can control
the source for the other
zones. When Party Off is
selected each zone has
its volume set to zero.
To exit Party mode
Press and hold the
key for three sec-
onds to exit Party mode.
Using All On
Activating All On mode
To activate the All On
mode press the
key to toggle between on
and off.
The All On mode allows
all the zones to play a
source selected from a
single keypad. Unlike
Party mode each keypad
retains full control over
its volume and source
controls.
Using All Off
Activating All Off mode
To activate the All Off
mode press the
to
toggle between on and off.
Activating All Off shuts
down all active zones.
Setting Backlight
Activating Backlight
To activate the keypad
display backlight use the
key to toggle
between the two options.
Note:
If the clock has
problems check the dip
switch on the rear of
your MCU. Even where
RDS station naming data
is available it is often rec-
ommended that the
‘RDS CLK’ is switched to
‘off’ due to the unreliabili-
ty of these transmis-
sions. See page 11 for
instructions.
Summary of Contents for LRC500
Page 11: ...11 Notes...


