background image


Introduction 


13

Note:


The remote control can only interface with a computer when connected to the computer through a 
USB cable connection. The computer cable connects a computer to the projector for display pur-
poses only. 

Remote Control Operating Range 

The remote control uses infrared transmission to control the projector. It is not necessary to point the 
remote directly at the projector. Provided you are not holding the remote perpendicular to the sides or 
the rear of the projector, the remote will function well within a radius of about 10 meters (33 feet) and 
30 degrees above or below the projector level. 

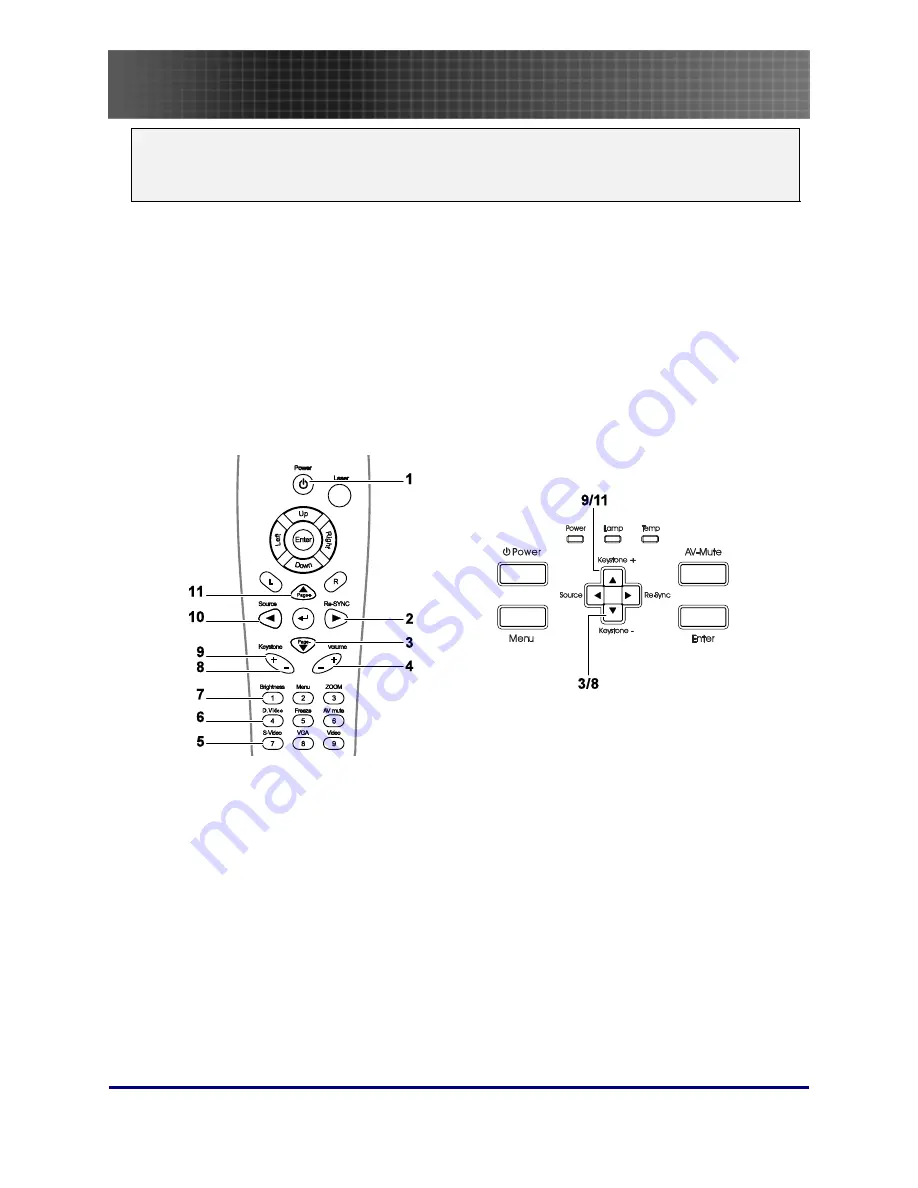
Projector and Remote Control Buttons 

The projector can be operated using the remote control or the buttons on the top of the projector. All 
operations can be carried out with the remote control; however the buttons on the projector are lim-
ited in use. The following illustration shows the corresponding buttons on the remote control and on 
the projector. 


Some buttons on the projector have two functions. For example, item 9/11 on the projector functions 
both as the keystone button and as the up arrow key in OSD menus. 

Summary of Contents for Optoma EP7155

Page 1: ...ing down the Projector 16 Setting an Access Password Security Lock 17 Adjusting the Projector Level 20 Adjusting the Zoom Focus and Keystone 21 Adjusting the Volume 21 OSD Menu Controls 22 Setting the...

Page 2: ...ms 49 Audio Problems 49 Having the Projector Serviced 50 Specifications 52 Projection Distance V S Projection Size 52 Timing Mode Table 53 Projector Dimensions 57 Regulatory Compliance 58 FCC Warning...

Page 3: ...l injury Throughout this manual component parts and items in the OSD menus are denoted in bold font as in this example Push the Menu button on the remote control to open the Main menu Remote Control S...

Page 4: ...the Electronic Industries Alliance at WWW EIAE ORG For lamp specific disposal information check WWW LAMPRECYCLE ORG This symbol found on your product or on its packaging indicates that this product sh...

Page 5: ...nt and rear projections Line of vision projections remain square with advanced keystone correction for angled projections Input source automatically detected About this manual This manual is intended...

Page 6: ...d DLP PROJECTOR REMOTE CONTROL WITH TWO AAA BATTERIES POWER CORD USB CABLE USB TYPE A TO B USB VIDEO CABLE RCA X 1 TO RCA X 1 COMPUTER CABLE VGA TO VGA CARRYING CASE Contact your dealer immediately if...

Page 7: ...ctor 20 4 Lens cap Attach to protect lens when not in use 5 IR receiver Receiver for IR signal from remote control 11 6 Lens Adjust focus zoom on top opening 7 Focus Focuses the projected image 8 Zoom...

Page 8: ...not press the power button 4 Lamp LED Off Lamp is in normal state On System over temperature 5 Temp LED Off Normal state 6 AV Mute Display blank and audio mute 7 Enter Enter key for the OSD menu 8 Ke...

Page 9: ...evice 5 VIDEO Connect a composite video cable from a video device 6 VGA SCART Connect a VGA cable from a computer 7 Ventilation opening Do not obstruct to keep the projector cool 8 DIGITAL VIDEO Conne...

Page 10: ...over screws Remove when changing the lamp 41 2 Height adjuster button Push to release height adjuster 3 Height adjuster Adjuster drops down when adjuster button is pushed 20 4 Strap mount Fasten the l...

Page 11: ...projector is obstructed you can bounce the signal off certain reflective surfaces such as projector screens 3 The buttons and keys on the projector have the same functions as the corresponding buttons...

Page 12: ...Zoom in and out 13 6 AV mute Display blank Audio mute 14 9 Video Input source select Video 15 8 VGA Input source select VGA 16 5 Freeze Freeze unfreezes the on screen picture 17 7 S Video Input sourc...

Page 13: ...rear of the projector the remote will function well within a radius of about 10 meters 33 feet and 30 degrees above or below the projector level Projector and Remote Control Buttons The projector can...

Page 14: ...irec tion of the arrow 2 Insert the supplied batteries taking note of the polarity as shown here 3 Replace the cover Caution 1 Only use AAA batteries Alkaline battery is preferred 2 Dispose of used ba...

Page 15: ...output connector ITEM LABEL DESCRIPTION A USB Connect the USB cable from a computer for USB mouse function and firmware upgrades B AUDIO Connect an audio cable from the computer s audio out connector...

Page 16: ...ut to the projector Check the user manual of the PC to de termine the appropriate Fn key combination to change display output See Setting an Access Password Security Lock on page 17 if security lock i...

Page 17: ...r you power on the projector See Navigating the OSD on page 22 and Setting the OSD Language on page 23 for help on using OSD menus Important Keep the password in a safe place Without the password you...

Page 18: ...hen press to select En able Disable 5 When the security setting is Enabled you are prompted to enter a password soon after the projector is powered on Note If the incorrect password is en tered three...

Page 19: ...Setup and Operation 19 6 To change a password enter the previ ous password when prompted 7 Use the following keys 1 2 3 4 5 6 7 8 9 to define a new password...

Page 20: ...screen Ensure the cables are in a safe location You could trip over them 1 To raise the level of the projector lift the projector A and press the height adjuster button B The height adjuster drops do...

Page 21: ...the projector only to sharpen the pro jected image A 6 Press the Keystone but ton on the remote control The correspond ing buttons are seen on the panel 7 Use the Keystone but ton to correct image dis...

Page 22: ...ote control and on the projector 1 To open the OSD press the Menu button 2 There are four main menus Press to navigate through the menus 3 Press to move up and down in a menu 4 Press to change values...

Page 23: ...rojector while reading this section Set the OSD lan guage to your preference before continuing The default language is English 1 Press the Menu button Press to navigate to the SETUP menu as seen in th...

Page 24: ...Setup and Operation 24 3 Select the language from the Language menu Press until your language is displayed 4 Press Enter to select your language and then click Exit 5 Press Menu to close the OSD...

Page 25: ...Menu Setting 25 Menu Setting OSD Menu Overview Use the following illustration to quickly find a setting or determine the range for a setting...

Page 26: ...Menu Setting 26 OSD Sub Menu Overview Use the following illustration to quickly find a setting or determine the range for a setting...

Page 27: ...mage Press to darken image Press to lighten image Based on different input sources or user selected display mode Contrast The contrast controls the degree of difference between the light est and darke...

Page 28: ...Color Space Converter coefficients The gain brightness can be adjusted independently for each color R G B Red Bias Press to adjust the contrast Bias The gain can be adjusted independently for each co...

Page 29: ...Adjusts video image from black and white to fully saturated color Press to decrease the amount of saturation in the image Press to increase the amount of saturation in the image Hue Adjusts the color...

Page 30: ...selection The projector will not search for deselected inputs If the user con nects multiple sources at the same time use the Source button on the keypad or the remote control Available sources VGA S...

Page 31: ...ss to enable or disable video overscan Note The Overscan function only accessible when Zoom function is not active Based on different input sources Zoom Press to Zoom In and Zoom Out 0 V Image Shift 1...

Page 32: ...II Scale to 1280x768 Native Depends on the resolution of the display XGA Source 480i p 576i p 1080i p 720p PC 4x3 Scale to 1024x768 16x9 1 Scale to 1024x576 16x 9 II Scale to meet 1 67 1 0 6 DMD displ...

Page 33: ...nfirm the new setting ITEM DESCRIPTION DEFAULT Frequency Press to adjust the A D sampling clock Auto Phase Press to adjust the A D phase Auto Display Menu Functions Available for Connected Source Func...

Page 34: ...Projection Press to choose from four projection methods Desktop mount front of screen Desktop mount rear of screen Ceiling mount front of screen Ceiling mount rear of screen Front Desktop Menu Locati...

Page 35: ...to move up and down and select Language Press to change values for settings and then press Enter to confirm the new setting ITEM DESCRIPTION DEFAULT English Italiano Polski Norsk Dansk e tina Deutsch...

Page 36: ...nu Press to move up and down and select Advanced Press to change values for settings and then press Enter to confirm the new setting ITEM DESCRIPTION DEFAULT Logo Press to select the desired startup s...

Page 37: ...nd down and select Security Timer Press Enter to open the Security Timer submenu Press to change values for settings and then press Enter to confirm the new setting ITEM DESCRIPTION DEFAULT Month Set...

Page 38: ...Off High Altitude Press to change fan speed high speed in high temperature high hu midity or high altitude area Off Keypad Lock Press to enable or disable keypad function The following warning messag...

Page 39: ...On If the user selects On the projector will automatically power on when AC power is supplied Off Auto Power Off min Set the projector to automatically switch off the lamp when there is no signal in m...

Page 40: ...tting ITEM DESCRIPTION DEFAULT Lamp Hour Set the number of hours for the lamp to be active Standard and bright counter are separated Lamp Reminder Show or hide the warning message Note The lamp remind...

Page 41: ...ontains a certain amount of mercury and should be disposed of according to local or dinance regulations 2 Avoid touching the glass surface of the new lamp doing so may shorten its operation life Warni...

Page 42: ...Appendices 42 2 Remove the two screws from the lamp module A 3 Lift the module handle up B...

Page 43: ...Appendices 43 4 Pull firmly on the module handle to re move the lamp module 5 Reverse steps 1 to 5 to replace the new lamp module...

Page 44: ...ero Refer to the following 1 Press the Menu button to open the Image menu 2 Press to navigate to the OPTIONS menu 3 Press to navigate to Lamp Setting and then press Enter 4 Navigate down to Lamp Reset...

Page 45: ...ra stores Refer to the following to clean the pro jector lens 1 Apply a little optic lens cleaner to a clean soft cloth Do not apply the cleaner directly to the lens 2 Lightly wipe the lens in a circu...

Page 46: ...tached Ensure the attached device is turned on Ensure a connected PC is not in suspended mode Ensure a connected notebook computer is configured for an external display This is usu ally done by pressi...

Page 47: ...s ERROR CODE MESSAGE POWER LED FLASHES LAMP LED FLASHES Thermal break status error 4 0 Fan1 error Power Fan 6 1 Fan2 error Lamp Fan 6 2 Fan3 error Blower Fan 6 3 Lamp door sensor detect high 7 0 DMD e...

Page 48: ...de fault settings 2 To ensure the problem is not caused by a connected PC s video card connect to another computer Problem The image is flat with no contrast Adjust the Contrast setting on the Main m...

Page 49: ...5 Replace the batteries 6 Turn off other Infrared enabled devices in the vicinity 7 Have the remote control serviced Audio Problems Problem There is no sound 1 Adjust the volume on the remote control...

Page 50: ...691 888 www optoma eu Service Tel 44 0 1923 691 865 Service service tsc europe com France B timent E 81 83 avenue Edouard Vaillant 92100 Boulogne Billancourt France Tel 33 1 41 46 12 20 Fax 33 1 41 46...

Page 51: ...erftstrasse 25 D40549 D sseldorf Germany Tel 49 0 211 506 6670 Fax 49 0 211 506 66799 Service info optoma de Latin America 715 Sycamore Drive Milpitas CA 95035 USA Tel 408 383 3700 Fax 408 383 3702 ww...

Page 52: ...2 29m 2 67m 1 37m 1 83m 2 29m 11 4 90 105 54 72 90 13 2 90 105 54 72 90 4 63m 3 05m 3 55m 1 83m 2 44m 3 05m 5 36m 3 05m 3 55m 1 83m 2 44m 3 05m 15 2 120 140 72 96 120 17 6 120 140 72 96 120 5 79m 3 8...

Page 53: ...40 x 350 31 5 70 1 640 x 350 37 9 85 1 720 x 350 31 5 70 640 x 400 31 5 70 1 640 x 400 37 9 85 1 720 x 400 31 5 70 720 x 400 37 9 85 640 x 480 31 5 60 640 x 480 37 9 72 8 640 x 480 37 5 75 640 x 480 4...

Page 54: ...4x768 75 1024x768 85 1280x720 60 1280x720 75 1280x720 85 1280x768 60 1280x768 75 1280x768 85 1280x800 60 1280x1024 60 Macbook compatibility 1280x1024 75 800x600 60 800x600 72 800x600 75 800x600 85 102...

Page 55: ...4x768 70 1024x768 75 1024x768 85 1280x720 60 1280x720 75 1280x720 85 1280x768 60 1280x800 60 1280x1024 60 1280x1024 75 Power Mac G5 compatibility 1280x1024 85 800x600 56 800x600 60 800x600 72 800x600...

Page 56: ...ALOG 1920 x 1080 33 8 30 0 1920 x 1080 28 1 25 0 HDTV 1280 x 720 45 0 60 0 720 x 576 31 3 50 0 SDTV 720 x 480 31 5 60 0 Frequency supported Frequency not supported The native resolution is 1024 x 768...

Page 57: ...Specifications 57 Projector Dimensions 220 mm 8 6 inches 178 mm 7 inches 71 mm 2 7 inches...

Page 58: ...peration of this equipment in a residential area is likely to cause harmful interference in which case the user will be required to correct the interference at his her own expense Changes or modificat...

Page 59: ...Disclaimer The information in this document is subject to change without notice The manufacturer makes no repre sentations or warranties with respect to the contents hereof and specifically disclaims...

Reviews: