Optima Digital 400 User Manual Download Page 13

Quick Set Operations

After connecting to a battery:

With your OPTIMA

®

 Digital 400


set up as outlined in pages 18-20, you can now make quick and easy

selections. With the charger plugged into a GFCI protected 110 VAC outlet, and properly connected to a
battery, the OPTIMA

®

 Digital 400 will automatically perform a quick self-test of the display and all LEDs.

Following the self-test you will be prompted by the display and the battery type LEDs will flash indicating
the Digital 400 is ready to charge or maintain. The LCD screens you will see:

Note: Self test takes less than 2 minutes. If after 10 minutes no selection is made,
the OPTIMA

®

 Digital 400 will automatically default to a safe charging/maintaining mode.

Note: It is recommended to make a selection and allow the charger to finish that selection
before making a different selection.

Below is an overview of each function that can be selected.

1. Pre-Charge Battery Status.

Note: Vehicle engine and all charging systems must be off.

This quick and easy feature allows you to understand your battery’s state of charge before
charging it. To use this feature, use the battery pre-charge status function. The LCD display will
provide the current state of battery in % of charge and DC volts in the numeric display. Below
is a typical sequence of the display during this selection.

Note: If the charger identifies a fault during this process or any quick set process it will
illuminate the  

 “Check Battery” icon on the charger. Read the fault message and attend

to the battery or charger. See pages 23 and 24 for Fault Screens and Troubleshooting steps.

Make a Quick Set Selection Prompt

Display Check

Deeply Discharged Status;

From here you can make a

Quick Set Charge Selection

for your battery type.

Processing

Normal Charge Status

21

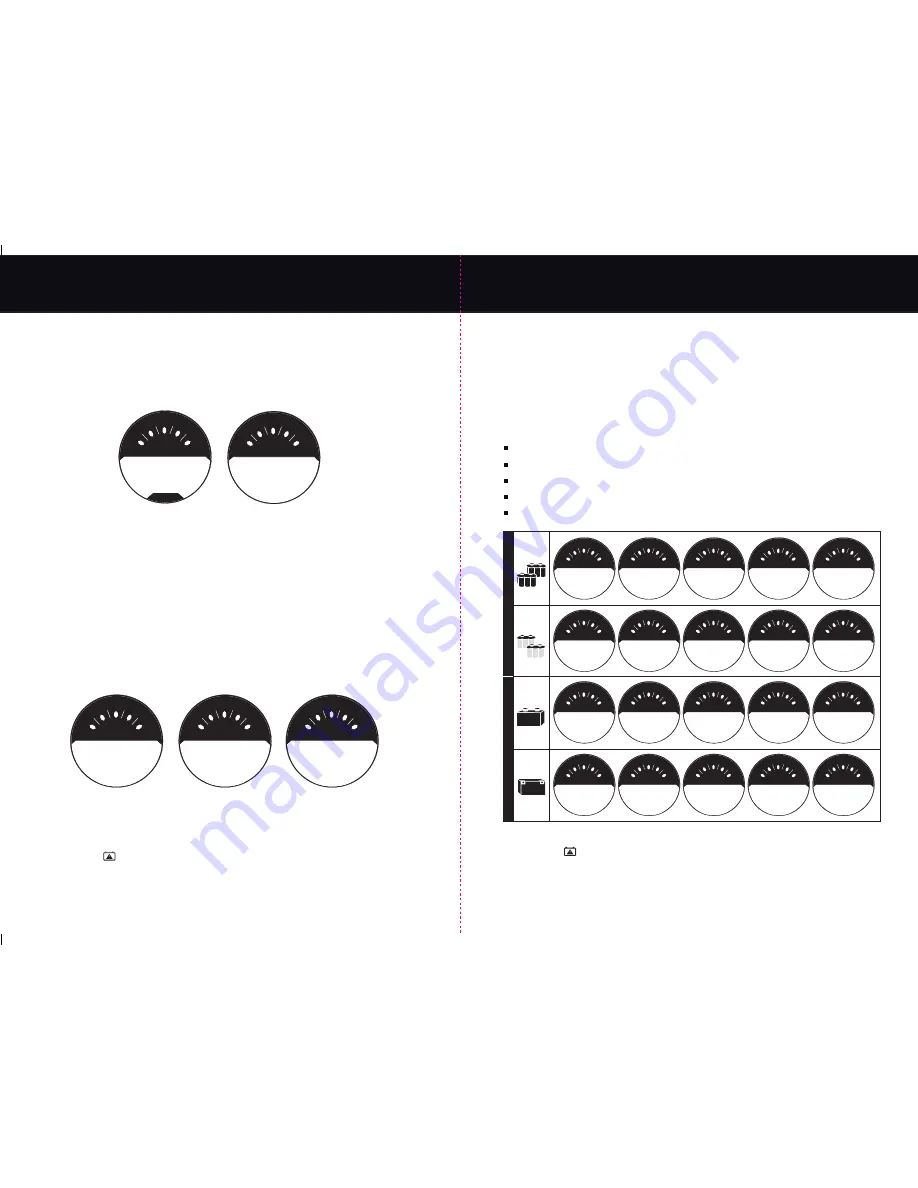
2. Quick Set Charging by Battery Type.

From the battery type selector choose the BATTERY TYPE that matches the battery type descriptions
as outlined on page 17 titled: “Charging Battery Types & Approximate Charge Times.”

After selecting 1 of the 4 battery types the charger will begin its stage 1 “Analyzing Battery” mode. This
mode can take up to 2 minutes to complete while it determines the state of your battery and check that
all connections made are correct. The charger is charging and testing the battery at this time.

Upon completing the Stage 1 “Analyzing Battery” mode, the charger will start its multi-stage
charging process checks and will sequence through the illustrated LCD screens highlighted below:

Analyzing Battery Mode (screen not shown)

Charging Battery Mode

Conditioning Battery Mode

Maintaining Battery

30 Day Recondition Mode

Note: If the charger identifies a fault during this process or any quick set process it will
illuminate the  

 “Check Battery” icon on the charger. Read the fault message and attend

to the battery or charger. See pages 23 and 24 for Fault Screens and Troubleshooting steps.

Quick Set Operations

Profile 1
Engine
Starting

Profile 2
Deep Cycle

Profile 3
Auto/Marine

Profile 4
Motorcycle

PERFORMANCE AGMS

ST

ANDARD FLOODED & 

AGMS

22

 Digital 400

 Digital 400

see manual

Volts DC Amps DC

F

E

50

25

0

75

100

% Charge

OPTIMA

DISPLAY CHECK

00.0 0.0

F

E

50

25

0

75

100

% Charge

MAKE A QUICK SET

SELECTION NOW

see manual

Volts DC Amps DC

F

E

50

25

0

75

100

% Charge

PRE-CHARGE

BATTERY STATUS

00.0 0.0

see manual

Volts DC

Amps DC

F

E

50

25

0

75

100

% Charge

BATTERY

NORMAL

13.4

0.0

see manual

Volts DC

Amps DC

F

E

50

25

0

75

100

% Charge

DEEP DISCHARGE

SELECT CHARGE

7.0

0.0

see manual

Volts DC Amps DC

F

E

50

25

0

75

100

% Charge

CHARGING 12V

OPTIMA BATTERY

10.5 3.5

see manual

Volts DC Amps DC

F

E

50

25

0

75

100

% Charge

CONDITIONING 12V

OPTIMA BATTERY

14.6 1.5

see manual

Volts DC Amps DC

F

E

50

25

0

75

100

% Charge

MAINTAINING 12V

OPTIMA BATTERY

13.4 1.0

see manual

Volts DC Amps DC

F

E

50

25

0

75

100

% Charge

OPTIMA 30 DAY

3 HR RECONDITION

13.4 1.0

see manual

Volts DC Amps DC

F

E

50

25

0

75

100

% Charge

MAINTAINING 12V

OPTIMA BATTERY

13.4 1.0

see manual

Volts DC Amps DC

F

E

50

25

0

75

100

% Charge

CHARGING 12V

LARGE BATTERY

10.5 3.5

see manual

Volts DC Amps DC

F

E

50

25

0

75

100

% Charge

CONDITIONING 12V

LARGE BATTERY

14.6 1.5

see manual

Volts DC Amps DC

F

E

50

25

0

75

100

% Charge

MAINTAINING 12V

LARGE BATTERY

13.4 1.0

see manual

Volts DC Amps DC

F

E

50

25

0

75

100

% Charge

30 DAY 3 HR

12V RECONDITION

13.4 1.0

see manual

Volts DC Amps DC

F

E

50

25

0

75

100

% Charge

MAINTAINING 12V

LARGE BATTERY

13.4 1.0

see manual

Volts DC Amps DC

F

E

50

25

0

75

100

% Charge

CHARGING 12V

SMALL BATTERY

10.5 3.5

see manual

Volts DC Amps DC

F

E

50

25

0

75

100

% Charge

CONDITIONING 12V

SMALL BATTERY

14.6 1.5

see manual

Volts DC Amps DC

F

E

50

25

0

75

100

% Charge

MAINTAINING 12V

SMALL BATTERY

13.4 1.0

see manual

Volts DC Amps DC

F

E

50

25

0

75

100

% Charge

30 DAY 3 HR

12V RECONDITION

13.4 1.0

see manual

Volts DC Amps DC

F

E

50

25

0

75

100

% Charge

MAINTAINING 12V

SMALL BATTERY

13.4 1.0

Summary of Contents for Digital 400

Page 1: ...zaderas hasta 3 amperios Motorcycle Powersports Tipos de bater as Bater as AGM e inundadas plomo cido 12 V para autom viles uso mar timo 12 V para motocicletas equipo deportivo Bater as OPTIMA y AGM d...

Page 2: ...6 Charging Battery Types and Approximate Charge Times 17 Easy Set Up 18 20 a Charging with DC Charging Clamps out of a Vehicle 18 b Charging with DC Charging Clamps in a Vehicle 19 c Charging with Rin...

Page 3: ...a battery installed in a vehicle first connect charger output lead to ungrounded battery post not connected to automobile chassis in accordance with polarity identification and then opposite polarity...

Page 4: ...16 AWG extension cord iii 100 to 150 feet in length use a 14 AWG extension cord 11 Do not operate charger if any protectiveAC and DC cable insulation charging clamps DC fuse holders and or maintainer...

Page 5: ...ine compartment or near moving parts Place away from the battery using the length of the DC cables l Consult vehicle owner s manual 18 PREPARING TO CHARGE A BATTERY CAUTION a When it is necessary to r...

Page 6: ...ttery posts POSITIVE POS P battery post usually has a larger diameter than the NEGATIVE NEG N post d Identify if you have a negative or positive grounded vehicle This can be done by identifying which...

Page 7: ...batteries Always wear proper eye face and hand protection Never try to charge a visibly damaged battery Do not attempt to charge a frozen battery Have plenty of soap water and baking soda nearby in ca...

Page 8: ...the rest Product Overview Digital 400 Performance Multi Stage Charging Enhance the performance of your battery and extend battery life The OPTIMA Digital 400 employs the latest in digital multi stage...

Page 9: ...gableDCringterminalsforpermanentinstallation Additional sets available as an option 7 Hood Latch Hook and Kickstand This convenient hook allows the unit to hang from a hood latch or other vehicle hard...

Page 10: ...etting to Know your Charger Feature Function 16 OPTIMA Starting Charge Profile ForquicksetautomaticselectionofOPTIMA REDTOPandBLUETOP AGMSTARTINGbatteriesorotherHighPerformancestartingAGM s 17 OPTIMA...

Page 11: ...without caps AGM small motorcycle tractor power sport batteries Approximate Amp Hour Rating 40 100 Ah 35 100 Ah 40 to 130 Ah up to 40 Ah Battery Type High Performance AGM Absorbed Glass Mat starting b...

Page 12: ...nal Cables WARNING FAILURE TO FOLLOW INSTRUCTIONS MAY CAUSE SERIOUS INJURY DAMAGE OR EXPLOSION ALWAYS SHIELD EYES WITH SAFETY GLASSES Follow all General and Personal Safety Precautions in this manual...

Page 13: ...e charger identifies a fault during this process or any quick set process it will illuminate the Check Battery icon on the charger Read the fault message and attend to the battery or charger See pages...

Page 14: ...protected outlet has not tripped due to a ground fault 2 Confirm there is 110 VAC present by plugging in a table lamp or meter 3 Reset and apply power to resume using the OPTIMA Digital 400 4 If powe...

Page 15: ...of merchantability or implied warranty of fitness for a particular purpose Further manufacturer shall not be liable for any incidental special or consequential damage claims incurred by purchasers use...

Page 16: ...tre port es lors de travaux avec ou proximit d une batterie INSTRUCTIONSS CURITAIRESIMPORTANTES VEUILLEZLIREETSAUVEGARDERCESINSTRUCTIONS Le guide de l utilisateur du Digital 400 contient d importante...

Page 17: ...rgement multiphase un conditionnement des modes de maintien et de reconditionnement automatiques de la batterie associ s des commandes de r glage rapide et un cran d informations ACL la pointe de l in...

Page 18: ...endommag Renvoyer le chargeur OPTIMA pour le faire r parer v rifier imm diatement Instructions importantes concernant la s curit Digital400 Digital400 Instructions importantes concernant la s curit CO...

Page 19: ...ge de moteur Ne pas utiliser le chargeur de batterie pour charger des batteries de piles s ches qui sont couramment utilis es dans les appareils lectrom nagers Ces batteries risquent d clater et de pr...

Page 20: ...pas trop remplir Pour une batterie sans entretien qui n est pas dot e de capuchons amovibles notamment les batteries soupape respecter toutes les instructions du fabricant sur la recharge f D terminer...

Page 21: ...urent ledeforte paisseur g Brancher le cordon d alimentation C A du chargeur h Pour interrompre l alimentation du chargeur mettre les interrupteurs hors circuit retirer le cordon C A delaprise enlever...

Page 22: ...es anti claboussures lorsqu on travaille sur des batteries ou leur proximit Prot ger toujours ad quatement les yeux le visage et les mains Ne jamais essayer de charger une batterie qui est visiblement...

Page 23: ...ou votre batterie sont entrepos s et sont entretenus Conseil d utilisation Une batterie quel que soit son tat charg e ou d charg e peut commencer sulfater et donc influencer la performance de la batte...

Page 24: ...e support mural doit tre mont solidement soit sur un montant situ dans le mur soit en utilisant des attaches adapt es au mur sur lequel il va tre install Les dommages dus une installation incorrecte n...

Page 25: ...toris Capacit nominale approximative en amp re heure 40 100 Ah 35 100 Ah 40 130 Ah jusqu 40 Ah Type de batterie Batteries de d marrage AGM Absorbed Glass Mat fibres de verre impr gn es haute performan...

Page 26: ...tion avec POSITIVE POS P la masse suivez les instructions s curitaires de la page 37 pour le chargement d une batterie dans un v hicule masse positive Installation facile Chargement avec les pinces c...

Page 27: ...nt votre type de batterie En cours tat de charge normal AVERTISSEMENT LE NON RESPECT DES INSTRUCTIONS PEUT PROVOQUER DES BLESSURES GRAVES DES DOMMAGES OU UNE EXPLOSION TOUJOURS SE PROT GER LES YEUX AV...

Page 28: ...malie HiTemp temp rature lev e danslebutdeprot gerlechargeuretlabatterie Le chargeurrecommencera chargerautomatiquementapr s3 15minutes enfonctiondelatemp ratureambianteetl tatdelabatterie Nepas couvr...

Page 29: ...emarque 1 Pour r initialiser le chargeur tout moment le d branchez et attendez que l indicateur d alimentation BLUEAC soit compl tement teint Pour les applications typiques o le n gatif est reli au ch...

Page 30: ...uit qui n est pas fabriqu par OPTIMA Batteries ni approuv pour son utilisation avec ce produit La pr sente garantie limit e est annul e si le produit est utilis incorrectement manipul inad quatement o...

Reviews: