background image

32521AD 

59 

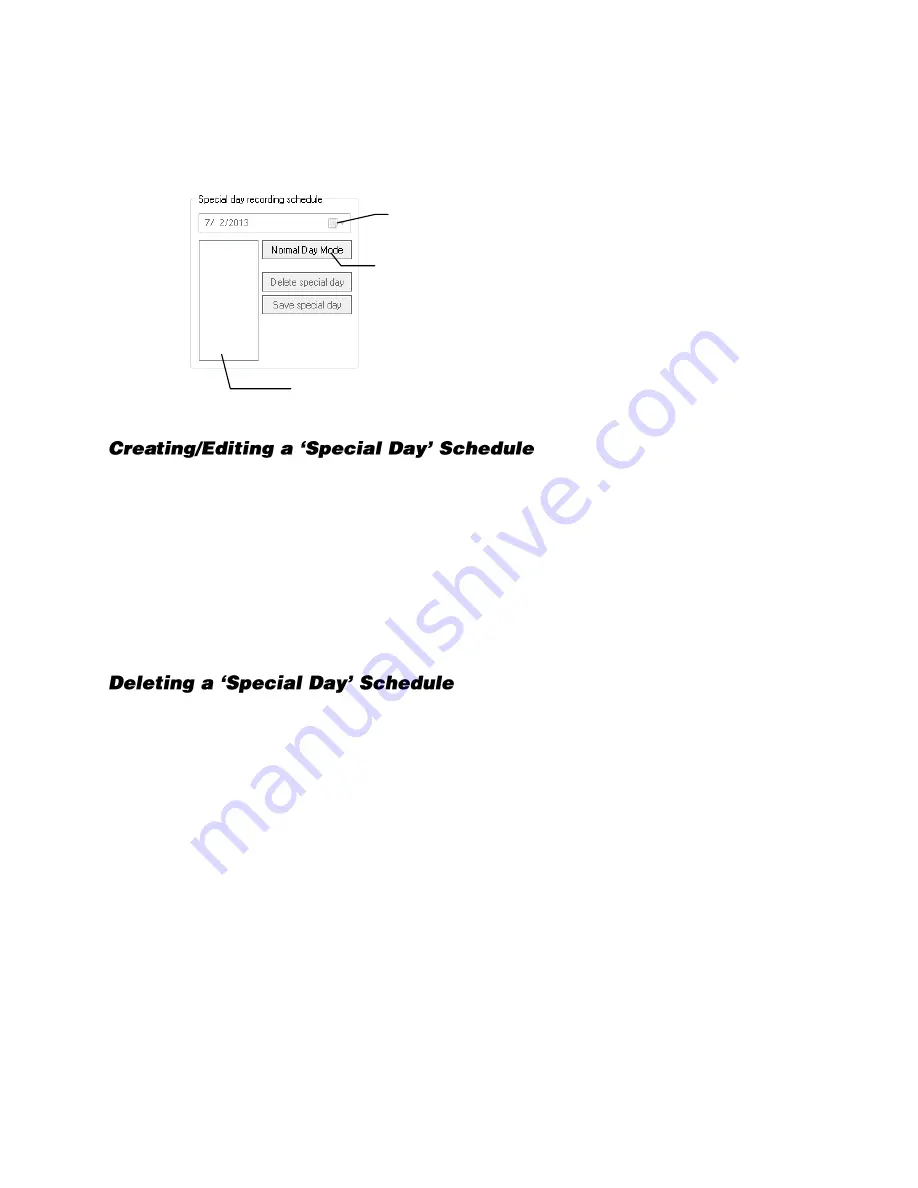
Special Day Schedule 

You can create unique recording schedules for specific days such as holidays or special events. 


1.


Click 

Normal Day Mode

 to enable the 

Special Day Mode

2.


Set a recording schedule as desired. For instructions, see the 

Creating a Recording Schedule 

(Example)

 and 

Creating a Sensor Schedule (Example) 

sections in this chapter. 

3.


Select a day by typing the date or clicking the down arrow to select the date from a calendar. 

4.


Click 

Save Special Day

5.


The special day will appear as a date in the Special Day Schedule. To edit this schedule, select it, 
and then and repeat steps 1 and 2. 

6.


Click save 

Special Day

. When a confirmation message appears, click 

OK

7.


Click 

Apply

 to save your settings. 


1.


Select a date from the Special Days list. 

2.


Click 

Delete Special Day


Configured Special Days List 

Special Day Mode / 
Normal Day Mode 

Date Selector (Calendar) 

Summary of Contents for OE-N2U08

Page 1: ...Network Video Recorder User Manual N2 OE N2U08 OE N2U16 OE N2U32 OE N2U64 NM OE NM04 OE NM08 OE NM16 N3 OE N3U08 OE N3U16 OE N3U32 N Series www openeye net N4 OE N4U16 OE N4U32 OE N4U64...

Page 2: ...loss of business information even if OPENEYE has been advised of the possibility of such damages or whether in an action contract or tort including negligence This software and documentation are copy...

Page 3: ...rt out parts that could result in a fire or electrical shock Never spill liquid of any kind on the product 11 Accessories Do not place this product on an unstable cart stand tripod bracket or table Th...

Page 4: ...Use a dry cloth to wipe it dry Do not use any type of solvent such as thinner and benzene as they may damage the surface of the recorder If using a chemical saturated cloth to clean the unit follow t...

Page 5: ...operation of the equipment is not compromised Mechanical Loading Mounting of the equipment in the rack should be such that a hazardous condition is not achieved due to uneven mechanical loading Circu...

Page 6: ...ntenna Increase the separation between the equipment and receiver Connect the equipment into an outlet on a circuit different from that to which the receiver is connected Consult the dealer or an expe...

Page 7: ...el 20 GETTING STARTED 21 Identifying Included Components 21 Keyboard Setup 22 Mouse Setup 22 Monitor Setup 23 Power Setup 23 Hard Drive Array N2 and N4 Only 24 Inserting a Hard Drive 24 N2 Drive Order...

Page 8: ...Manually 36 Connecting with Find Cameras 37 Naming Camera Channels 37 Import Export Camera Configuration Settings 37 Assigning Dual Streams 38 Assigning Audio Channels to a Network Device 38 Camera St...

Page 9: ...Setting Weekend Motion Recording 57 Creating a Sensor Schedule Example 58 Special Day Schedule 59 Creating Editing a Special Day Schedule 59 Deleting a Special Day Schedule 59 Alarm Options 60 Setting...

Page 10: ...Portion of an Image 77 Open Video from a Saved Location 77 Sync 77 Clean Image 77 Instant Recording 78 Activate Instant Recording 78 Searching Instant Recorded Video 78 Performing a Basic Search 78 P...

Page 11: ...verview 95 Performing a Clip Backup 95 Scheduled Backup Overview 96 Activating Scheduled Backup 96 Specifying Scheduled Backup Drives 96 Performing a Scheduled Backup 97 LAN ISDN PSTN CONNECTIONS 98 L...

Page 12: ...Software Overview 107 Remote Software Setup 108 Installing Remote Software 108 Create a New Remote Connection 108 Configuring the Recorder 109 Digital Verifier Overview 110 Installing the Digital Veri...

Page 13: ...oubleshooting and repair procedures that may be shown are for reference and minor repair only Because of the complexity of the individual components and subassemblies no one should attempt to make rep...

Page 14: ...s unparalleled stability security and ease of use Accordingly your security investment has never been easier to maintain Multiple users can simultaneously connect through any network connection for in...

Page 15: ...s video search playback and backup Video indexes for easy searching Multiple levels of security access Optional POS and ATM support High performance durable rackmount case Output the video to a NTSC P...

Page 16: ...moval retrieval and backup replacement The most common components and buttons are shown below N2 Front Panel N3 Front Panel 1 2 Drive bays USB port Mute DVD RW drive Power switch Reset LEDs Power HDD...

Page 17: ...g fan intake DVD RW drive USB ports Power switch LEDs HDD Power Speaker out Microphone in Cooling Fan Intake Power Switch USB 2 0 ports Power Failure NIC 1 and 2 Reset Button Alarm Mute System HDD HDD...

Page 18: ...and relays to the recorder Below are diagrams that outline the location and description of each connector N2 Rear Panel N3 Rear Panel AC power Cooling fan Optical output 5 1 Surround sound HDMI VGA N...

Page 19: ...rround sound HDMI VGA Network Line in line level Speaker out Microphone in not used USB 2 0 USB 3 0 DVI D Display port AC power Cooling fans Optical output 5 1 Surround sound HDMI VGA Network Line in...

Page 20: ...thing has been properly included with the new recorder If any of the following items are missing contact the dealer to arrange a replacement Case key varies by model Mouse Keyboard Repair disc Softwar...

Page 21: ...ly In this manual Click means to position the mouse cursor over an item and to single click the left button Right click means to position the mouse cursor over an item and to single click the right bu...

Page 22: ...able a minimum screen resolution of 1024 x 768 and support 32 Bit color WARNING To reduce the risk of electrical shock or damage to the equipment Do not disable the power grounding plug The grounding...

Page 23: ...ves follow these instructions The drives must be inserted in order 1 16 depending on how many drives you purchased The drive trays are marked with the number of their port See the diagram for the orde...

Page 24: ...into the rack Please read this section in its entirety before you begin the installation procedure outlined in the sections that follow These rails are designed to fit a rack between 26 and 33 5 inche...

Page 25: ...models 4 Repeat steps for the other inner rail extension Installing the Outer Rack Rails Outer rails attach to the rack and hold the chassis in place The outer rails will extend between 30 inches and...

Page 26: ...he recorder 2 Turn on the Secondary Power Switch located in the rear of the recorder 3 Press the Power Switch located on the front of the recorder 4 The recorder will run a series of self tests If ask...

Page 27: ...ers quickly or reconfigure a unit that has been reset to factory defaults Some things must be kept in mind when using this feature You cannot use this function on Recorders that are different models W...

Page 28: ...xit on the Display screen and then clicking Restart in Windows Mode 2 Click Start All Programs OpenEye vFormat 3 Click Import in the System Setting Tool section 4 Select the location of the settings f...

Page 29: ...em resources of your recorder GREEN System configuration OK YELLOW Caution evaluate system configuration and consider decreasing system load RED System configuration has been exceeded which may affect...

Page 30: ...tal PTZ function on a 360 camera View type Select the view for a 360 camera Mount Type Select the type of mount that matches the location of your 360 camera Projection type Dewarp your 360 camera imag...

Page 31: ...ecial Recording Text is displayed on the camera display area indicating what type of Special Recording is activated SENSOR Sensor is displayed when a sensor associated with the camera is activated INS...

Page 32: ...in the Video Display Area To return to a different Multi Camera View select a different Screen Division option from the Screen Division menu 3rd Four Cameras View Displays cameras 9 12 in the Video Di...

Page 33: ...want to be displayed during AutoSequence viewing Create custom live view divisions 1 On the Display screen click Setup and then click General Setup 2 Click theSequencing tab 3 Drag and drop cameras fr...

Page 34: ...edule Optimize the type of recording by adding motion detection to this as well again increasing the amount of useful video Camera Naming Name each camera so the location can be easily identified and...

Page 35: ...hannels section Connecting a Network Device 1 On the Display screen click Setup 2 Click Camera Setup and then click IP Cameras 3 Click Manually Add Camera 4 Select the Vendor and Model of your network...

Page 36: ...nd then click IP Cameras 3 Click the Camera Setup tab 4 Double click the Device Name column for the camera you want to name 5 Type a name for your camera 6 Click Apply to save the name Server software...

Page 37: ...isplay screen click Setup 2 Click Camera Setup and then click IP Cameras 3 Click the Camera Setup tab 4 Choose which camera you want to configure and double click the Record Stream column 5 Select whi...

Page 38: ...tus and Information The Camera Status and Information tab displays information for all cameras connected to the OpenEye recorder 1 In the Display screen click Setup 2 Click IP Cameras 3 Click the Came...

Page 39: ...enerated using the MAC address of the recorder 1 On the Display screen click Setup 2 Click IP Cameras 3 Click the License tab Note Multiple video streams can be recorded from a single device while onl...

Page 40: ...Code generated by the OpenEye Registration Site into the License Key box 3 Click Register 4 Click OK 5 Click Apply 6 Click Exit Setup Unlocking Additional Network Devices Follow the instructions abov...

Page 41: ...r to the camera manual Enabling an IP PTZ Camera 1 Ensure that you have properly connected your IP PTZ camera to the network 2 On the Display screen click Setup 3 Click IP Cameras and then click the A...

Page 42: ...Eight directions are available only for select cameras Only four of the PTZ Control buttons work for all protocols UP DOWN LEFT RIGHT Note The Advanced menu panel on the graphical PTZ controller can...

Page 43: ...double click to close the shape 9 Click OK 10 Move the sliders to adjust motion sensitivity and the noise filter 11 Define the pre alarm and post alarm recording time for a motion event Pre Alarm Reco...

Page 44: ...appropriate relay number 5 Select the Beep on Detect check box to enablethe recorder to emit an audible beep on Sabotage Detection 6 Click Apply to save your settings Etc Additional motion detection c...

Page 45: ...stem 2 Use the slider enter a value or click Mute to disable audio playback 3 Click OK Audio Channels 1 Select an Audio Chanel 2 Select Record and Use Live Audio as desired 3 Adjust the gain and Live...

Page 46: ...gs Display The Display tab allows you to control the on screen appearance of your recorder including the resolution and configuration of multiple monitors Motion Bounding Box Select Display Motion Det...

Page 47: ...and Size Select Bold if desired 5 When you have selected your font click OK 6 Select Hide Network Connectivity Status from Live View if desired 7 Click Apply to save your settings General Use the Gen...

Page 48: ...idually customized but a camera can only be displayed once in each group view All selected screen divisions will be shown when AutoSequence is enabled on the Live View Be sure to clear any screen divi...

Page 49: ...rmation about setting up your POS system please refer to the manuals for your POS system and your Vidoe Analytics software 1 Select you desired camera channel in the Select Channel list 2 Select your...

Page 50: ...ific POS terminal select Select POS ID and then select the POS ID from the Unselected List 7 Click to add the selected POS IDs to the Selected List 8 Click OK Creating a POS Alarm Schedule 1 Click Sin...

Page 51: ...annel loses video The recorder can beep the loss can be added to the System Log or you can activate an external alarm Login Failure Enable this function for the recorder to beep continuously in respon...

Page 52: ...iate Sensor 4 Select the appropriate Preset position for the camera to move to when the selected Sensor is activated Note The preset positions must be configured on your camera Refer to the camera man...

Page 53: ...Network Device List 3 In the Sensor Relay list double click DVR Sensor No and then select a sensor to assign to this camera 4 Double click DVR Relay No and then select a relay to assign to this camera...

Page 54: ...oftware Power Off Options Use this function to specify time frames for turning off and restarting your recorder automatically Default Schedules These are pre set schedules Click Default Schedule 1 or...

Page 55: ...chedule When you understand the process of creating a schedule create one to suit your specific needs This example schedule will be configured as follows MON FRI 9AM 5 59PM all 4 cameras will record u...

Page 56: ...1 in the Camera section repeatedly until a red C continuous appears 5 Repeat for 2 4 in the Camera section 6 Click Apply to save 1 In the Schedule Number list select Sch03 2 Clear Mon Fri and then sel...

Page 57: ...his schedule example will be configured as follows SUN SAT 12AM 11 59 PM cameras 1 and 2 will be activated by Sensor 3 and Sensor 4 1 Select Sch01 in the Schedule Number list 2 Click the Single Select...

Page 58: ...in this chapter 3 Select a day by typing the date or clicking the down arrow to select the date from a calendar 4 Click Save Special Day 5 The special day will appear as a date in the Special Day Sche...

Page 59: ...n the Display screen click Setup 2 Click Recording Schedule 3 In the Alarm Options section select Sensor Event Motion Event or both 4 Once you have selected an Event option you can select alarm option...

Page 60: ...In the Display screen click Setup 2 Click Recording Schedule 3 Click Power Off Options 4 Select Enable for each day of the week that a restart is desired 5 Specify the time of day to schedule the sys...

Page 61: ...002 Search Port Transfers search information to the OpenEye remote software default port 2003 Note If connecting to the recorder through a firewall the above ports must be open to incoming and outgoin...

Page 62: ...elete User button immediately deletes the user use cautiously 1 In the Display screen click Setup 2 Click User Management 3 Click Add User 4 Type a User Name and Password 5 Type the password again in...

Page 63: ...may NOT save when a higher ranked user kicks the lower ranked user out of the Setup menu PTZ Control The recorder software can only have one user using the PTZ controls at any given time A user with a...

Page 64: ...rmation for the email account that will be used to send emails from the recorder Contact your administrator for this information if necessary 8 If using a secondary email account select Use Secondary...

Page 65: ...dd a Comment that will be seen in the email message if desired 7 Click Apply to save your settings 1 Set up the General and Users tabs first 2 Click the Recording Data Check tab 3 Select Enable 4 Defi...

Page 66: ...r Email Alert 8 Add a Comment that will be seen in the email message if desired 9 Click Apply to save your settings 1 Set up the General and Users tabs first 2 Click the Alarm Event tab 3 Select Enabl...

Page 67: ...f you want the recorder to report alarm events to Report Star 7 Type a new MAC Address if necessary 8 To set a custom time to send updates to ReportStar select Custom Day Night and then select your de...

Page 68: ...ng the appropriate number of Days you want to retain saved data 3 Select Delete Data or Hide Data 4 Click Apply to delete the data Note Deleting data is permanent It cannot be retrieved 1 Click View F...

Page 69: ...tion and see the currently running server software version Site Code A user specified unique identification name used by other recorder software to identify the recorder Remote Emergency Agent RADIUS...

Page 70: ...inistration at the site Set the IP Address The IP address of the recorder is set in Windows to set the IP address follow the steps below 1 On the Display screen click Exit and choose Restart in Window...

Page 71: ...he type of log you want to see System Event Alarm or Drive Check 4 Use the Calendar to select the date you want to review 5 Scroll through the System Log Files list to view your files 1 Select a Start...

Page 72: ...enable 5 Select Overwrite or Do Not Overwrite 6 If Overwrite is selected d Enter a maximum Log File Size e Choose a number of days to keep logs Delete Log File Older Than Note Log files can also be ma...

Page 73: ...e Configuration 2 In the System Information menu click the Upgrade Information tab 3 If a new Upgrade Version is available it will display 4 Click the Release Notes button to view the release note for...

Page 74: ...the Display screen click Setup 3 Click System Information and then click Update Camera Information 4 Click the Upgrade File Browse button 5 Select the upgrade file on the connected USB and then click...

Page 75: ...w to use the Search features Note Audio Channel buttons are only viewable when one camera is selected Play Controls Back Frame Moves video back one frame Rewind Rewinds video Stop Stops video playback...

Page 76: ...e Open Video from a Saved Location Previously saved video clips or backup files can be searched for content Find file by date and time or by name 1 Click Open File to search for the saved file 2 Selec...

Page 77: ...the Instant Recording option See the Search chapter for more information There are several different types of searches that can be performed on the recorder The most basic involves selecting the date...

Page 78: ...rded over The OpenEye recorder actually records both hours and allows the user to select which hour to play if the need arises To access the lost hour 1 On the Search screen click Select Date 2 Select...

Page 79: ...export a video clip 1 Locate your desired video or frame using the Search screen Note To save a JPG or AVI file you can only search one camera channel at a time 2 Click Save 3 Select the appropriate E...

Page 80: ...e to identify the bookmark in the Title field 8 Type a memo or notes in the More Information box 9 You may also select additional channels to include video at different locations recorded at the same...

Page 81: ...al information 8 Click Backup to start the backup Note If backing up to a removable USB device click the Unplug or Eject Hardware button after backup is complete to safely remove the device 1 In the S...

Page 82: ...pe to search in the Select Sort Option section Sensor Motion Instant Record or select the All Event Types option 7 Click OK There may be a delay while results are returned Results will be displayed in...

Page 83: ...xample images show how the Preview Search functions The first screen that appears has 24 images displayed Each image represents the first second of recorded video in each hour If there is no image rec...

Page 84: ...eded return to the previous 10 image view by double right clicking on the image 7 Use the Playback controls to play the video of the selected segment 8 To exit Preview search with the current image st...

Page 85: ...a motion region area To resize the area drag the corners to define your desired size 5 Click Start Search the Object Search Filter Information window will open 6 Select an End date time 7 Adjust the s...

Page 86: ...ecorded video it is not compatible with video recorded prior to installing version 3 6 Performing a Motion Search 1 In the Live screen click Search 2 Select a single camera channel 3 Click Motion 4 Cl...

Page 87: ...s activity 1 Right click your desired camera channel and then click Search In Live or click the scroll wheel on the mouse 2 The Search In Live controls will display at the bottom of the image 3 Use th...

Page 88: ...ar line of receivers that support 2 ID addresses The PT Driver Address is associated with the PTZ ID address set on the camera The addresses must match for the recorder to communicate with the proper...

Page 89: ...era channel on the Display screen 2 Click Pan Tilt to enable the Graphical PTZ Controller 3 Click your desired Preset number on the controller Some protocols support the ability to access the Internal...

Page 90: ...e Graphical PTZ Controller click Pan Tilt again Using the On Screen Compass 1 On the Live screen click Setup 2 Click PTZ Setup 3 Select the Camera Channel of the PTZ camera you want to enable Onscreen...

Page 91: ...ween one Preset Position to the next Dwell Time The length of time in seconds that a PTZ Tour displays a Preset Position Run Stop Runs the selected Pan or Tilt tour PTZ Tour Schedule 1 In the Live scr...

Page 92: ...video data using a proprietary compression format that can only be read by the OpenEye Backup Viewer software This ensures the integrity of the data Throughout the backup process the recorder will con...

Page 93: ...kup 2 Select a date to back up using the calendar Dates highlighted in blue contain recorded data 3 Select the blocks of time to back up using the Hour Minute grid Blocks of time with recorded video a...

Page 94: ...to back up in the Channel Selection box 5 Select the Backup Drive to save the backup video to 6 Type the Folder Name for the clip files under Clip Name 7 Select Include Viewer to include the Backup Vi...

Page 95: ...dmin and the default Password is dvr4321 6 Click OK 7 Close the DVR Utility window and then double click OpenEye Server to restart your Server software In order to use the Scheduled Backup feature one...

Page 96: ...number of hours between backup procedures between 1 and 24 hours 6 Select the Backup Drive to save the backup video in the Select Backup Media section or click Network Drive To save to a local drive...

Page 97: ...modified via the standard networking options available on Windows 7 Embedded The recorder comes equipped with a 10 100 1000 Network Interface Card NIC This card uses a standard RJ 45 connector and sh...

Page 98: ...eate the Organization Units OUs and Groups within Active Directory 1 Verify that the recorder is connected to a network that has a valid Active Directory server Ensure that the TCP IP settings are con...

Page 99: ...annel XX for site code 100 000 DVR_HIDE_CAMERA_0XX_100 000 Hides camera XX for DVRs site code 100 000 DVR_INSTANT_100 000 Instant recording access to DVR DVR_PTZ_100 000 PTZ access to DVRs site code 1...

Page 100: ...to view live video from virtually any computer with an internet connection using Microsoft Internet Explorer In order to log in to the recorder server a user account must be made for the user This en...

Page 101: ...iewer 1 Open Microsoft Internet Explorer 2 Type the IP address of the recorder into the Address Bar 3 When attempting this for the first time on a workstation a prompt will ask you to accept an Active...

Page 102: ...When an alarm signal is detected the Emergency Agent Image Viewer window opens and starts playing the video from the camera associated to the alarm Configuring the Recorder To enable the Emergency Age...

Page 103: ...p 4 Confirm that the Network Port in the Setup window is set to the same number as the Emergency Port in Network Settings on the recorder If the numbers are different adjust the Network Port on the cl...

Page 104: ...ton to display filtered event listings 1 On the Option menu click Setup 2 Type the desired text in the box below the Alarm Confirmation List Note The items in the Alarm Confirmation List will be avail...

Page 105: ...lay controls to locate the desired video 3 Select the Continue Playing check box to watch all recorded events When cleared playback stops at the end of the alarm event 4 Select the Same Camera check b...

Page 106: ...e user is allowed to access setup or control a PTZ camera at any given time The pictures per second passed to the Remote Client vary greatly depending on the connection type and speed In order to log...

Page 107: ...enter The OpenEye Remote Software opens and the Local Connection window opens 5 Click New to open the Site Info window 6 Select the Site Type and enter a Site Name The Site Name will be the name displ...

Page 108: ...ions Time Out Value Specifies a value in seconds to wait for a signal from the OpenEye Remote Client If a signal is not received by that time the connection is dropped Center Port Used to transfer the...

Page 109: ...ption to begin installation 3 When the Welcome screen appears click Next 4 When the Setup Complete window appears click Finish Installation is complete Using the Digital Verifier 1 Open the Digital Ve...

Page 110: ...he license agreement Click Next 4 Select Yes to install the POS component or select No for a basic install Click Next Note The POS component is only necessary when connecting to a server running the P...

Page 111: ...lights View Live Video on most computers Username and Password protected Easy to use graphical interface Basics In order to log in to the recorder server a user account must be made for each user This...

Page 112: ...mission from OpenEye The information in this publication is believed to be accurate in all respects However OpenEye cannot assume responsibility for any consequences resulting from the use thereof The...

Reviews: