


C-Beam Machine
CNC xPro Assembly
18
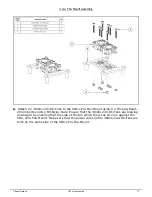
3.0.3 Attaching The CNC-xPro
A.
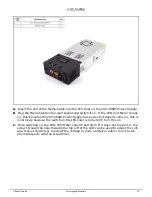
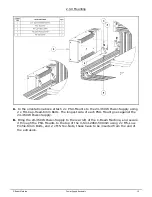
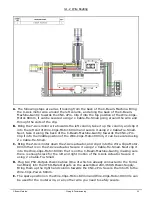
Insert 4 x M4-Cap-Head-40mm bolts through the previously assembled CNC-xPro-
Fan-Mount, and then through the CNC-xPro and each through a Nylon-Spacer-Quar-
ter-Inch. Finally, go through the CNC-xPro-Mount and tighten each bolt into a M4-
Nyloc-Nut. The CNC-xPro-Fan-Mount should be orientated so the power wires are on
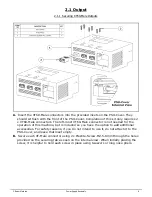
the same side as the Terminal-Block. The CNC-xPro should be orientated so the USB
terminal is in the same position as shown by the red square above.
Summary of Contents for C-Beam Machine
Page 1: ...C Beam Machine Electrical Assembly Instructions...
Page 2: ......
Page 4: ...C Beam Machine Getting Started 2 1 0 Getting Started...
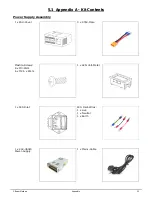
Page 7: ...C Beam Machine Power Supply Assembly 5 2 0 Power Supply Assembly...
Page 12: ...C Beam Machine Power Supply Assembly 10 2 3 Connecting PSU Cover 2 3 1 Connecting Wires...
Page 17: ...C Beam Machine CNC xPro Assembly 15 3 0 CNC xPro Assembly...
Page 22: ...C Beam Machine CNC xPro Assembly 20 3 0 5 Mounting the CNC xPro Assembly...
Page 24: ...C Beam Machine Wiring Commissioning 22 4 0 Wiring Commissioning...
Page 33: ...C Beam Machine Appendix 31 5 0 Appendix...
Page 38: ...C Beam Machine Appendix 36 Misc 1 x Ceramic Screw Driver 1 x USB Cable...


